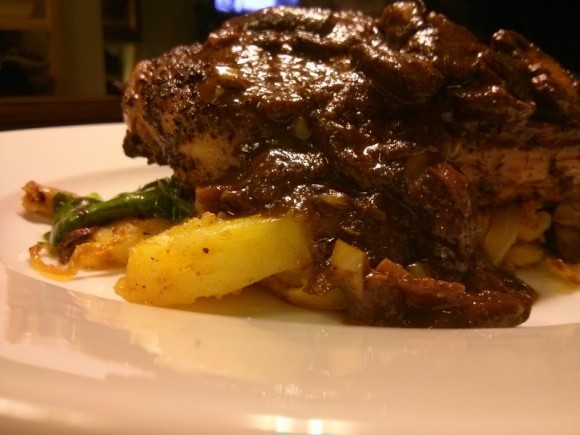
- Time Travel Chicken (1/4/2016)
A brush of snow on the ground, heater running full blast, sweaters, slippers, a hot beverage… Yes, Winter has arrived and it’s time to get on that ‘Culinary Bus’ and head to the kitchen to create something that zings with flavors of warmer places and seasons!
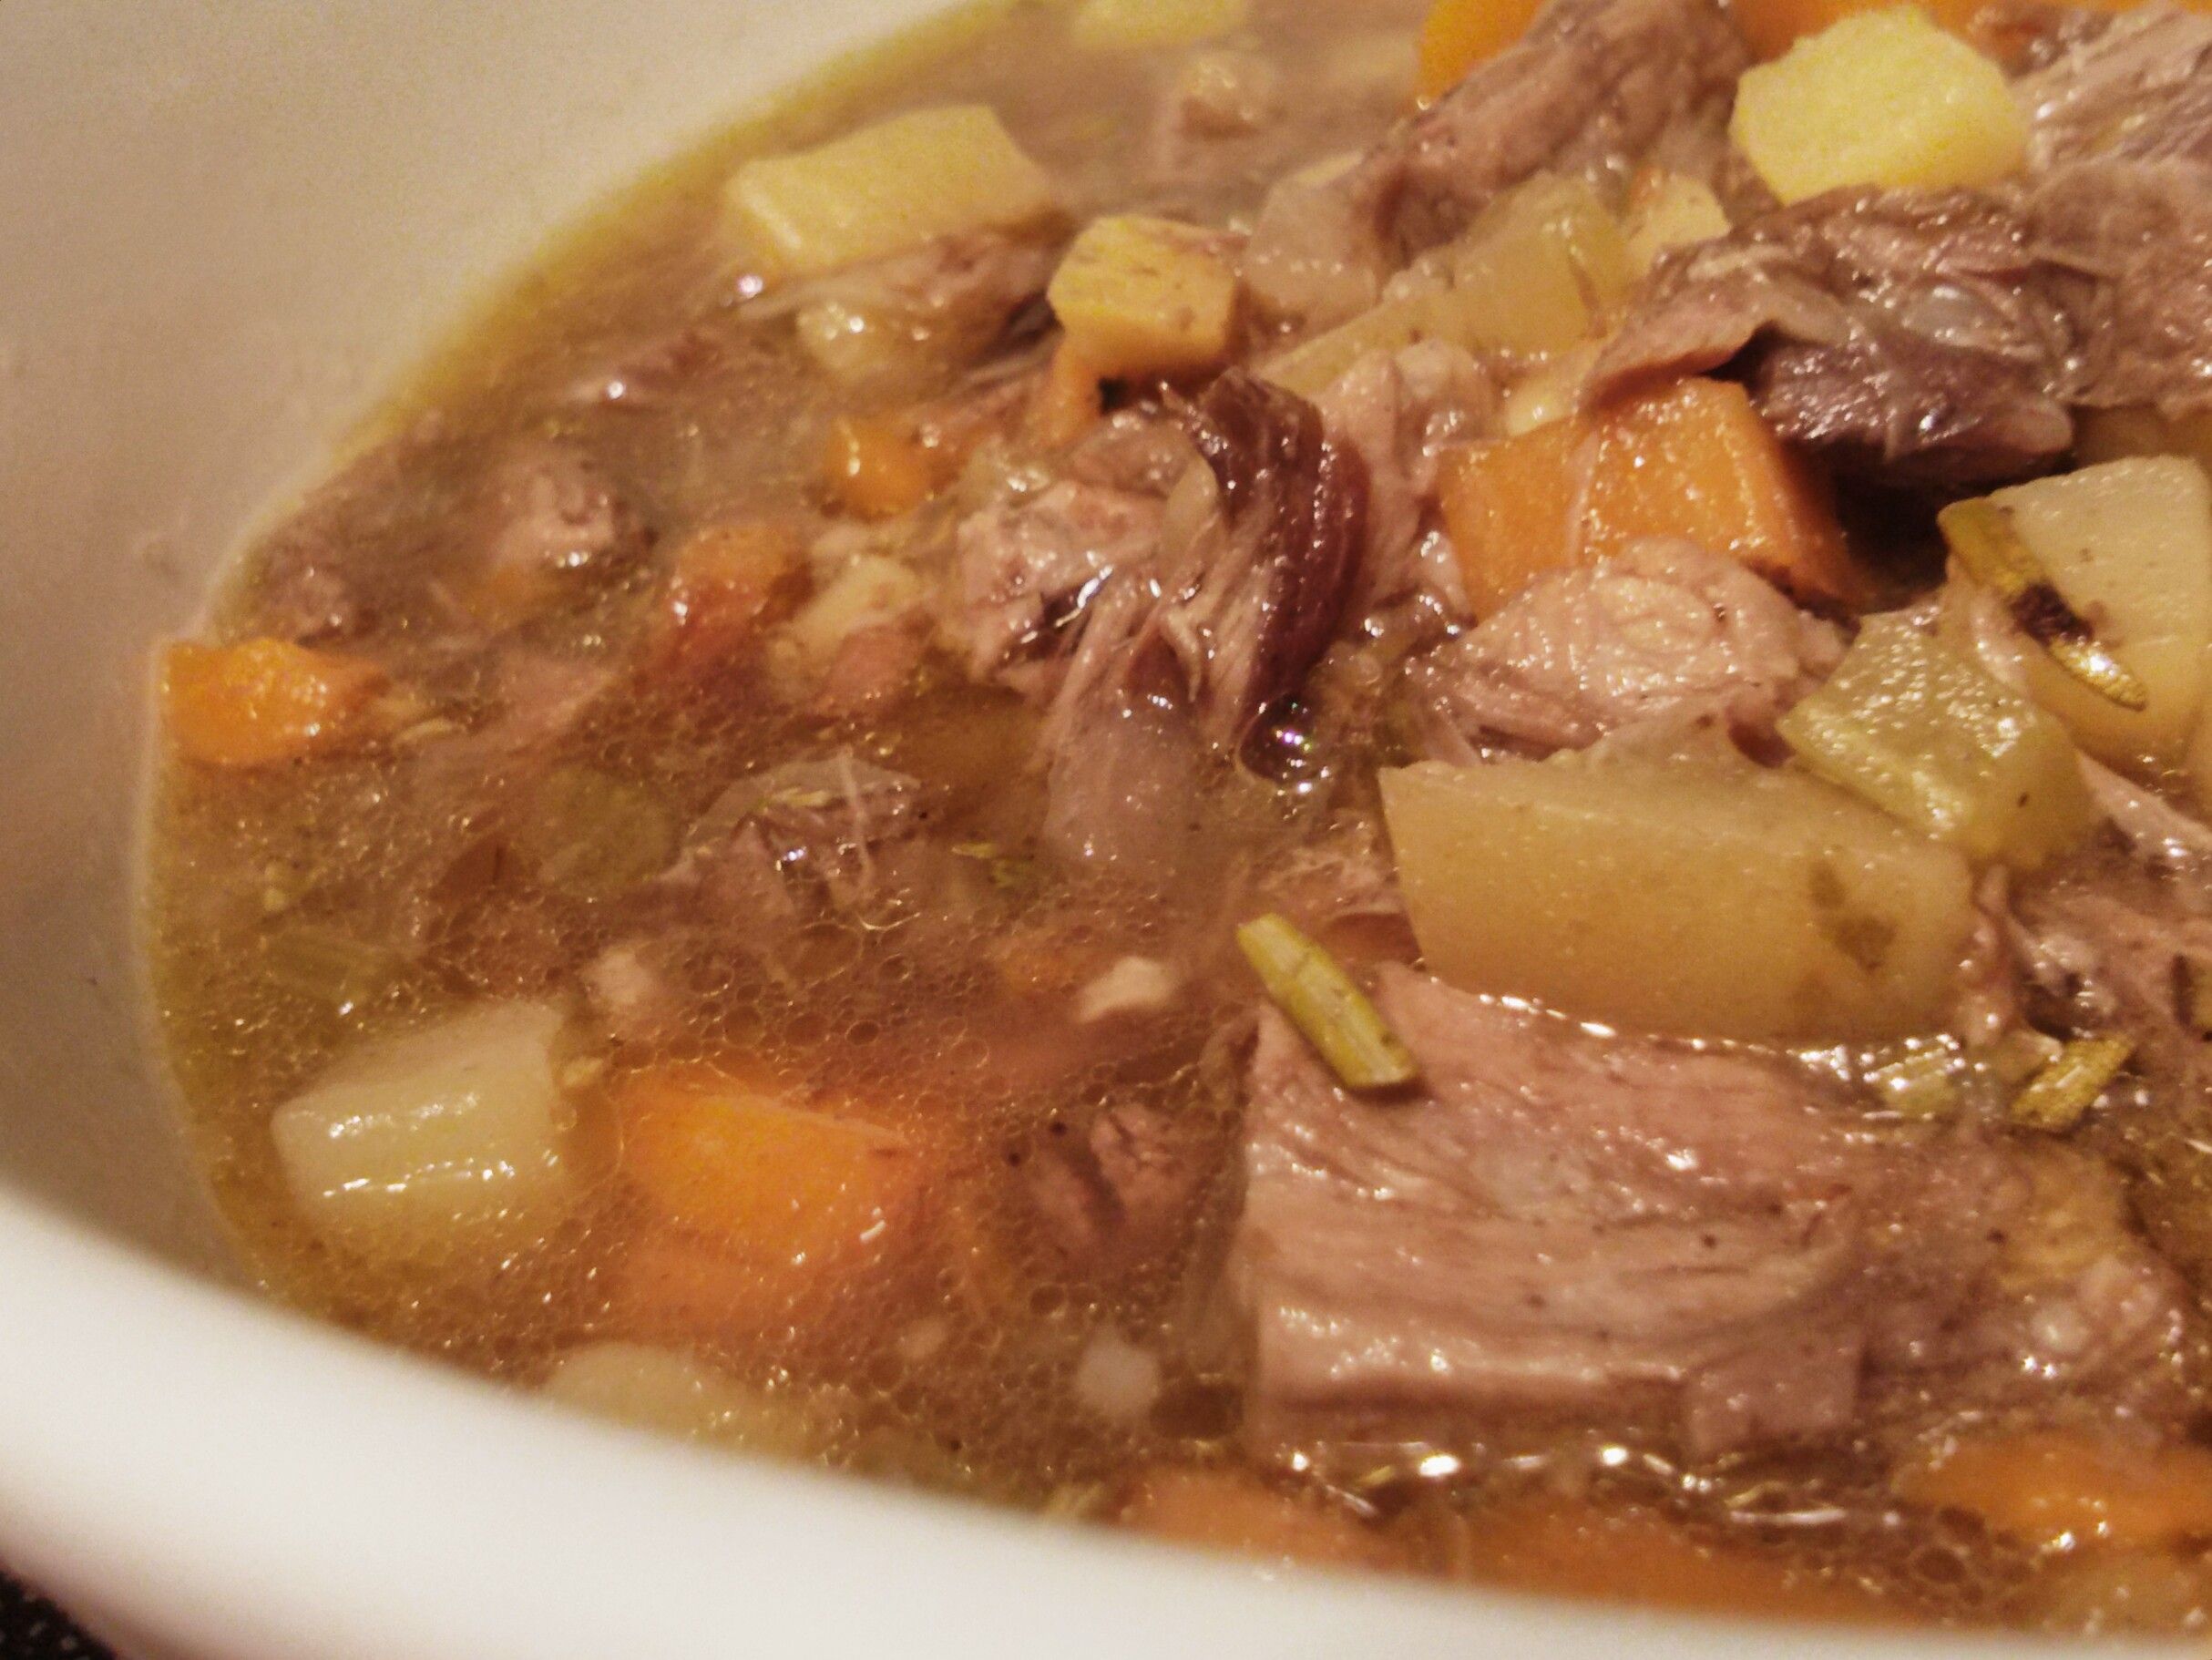
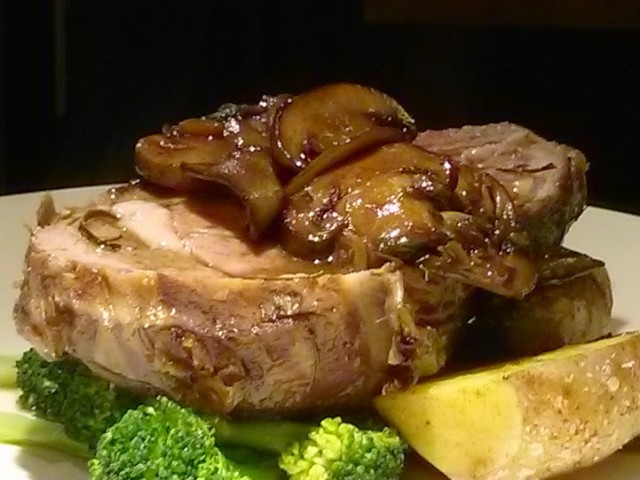
Porcini Mushrooms speak of Spring and hope for warmth! Chefs and Foodies quiver with delight as these morsels hit the market every year. So, being January, I delved into my stash of dried Porcini to create this dish!
How to season this particular bird… A rub of ground Porcini will give it a rich earthy aroma and hints of the reawakening forest floor, but more is needed to convince my palate that, indeed, it will be Spring again! Taking my nose through the spice jars led to Sri Lankan Curry!
 This beautiful blend of Indian Coriander Seed, Cumin Seed, Cinnamon, Fennel Seed, Fenugreek Seed, Cardamom Seed, Japones, Black and Tellicherry Peppercorn, and Cloves from Seattle’s World Spice Market added exactly the right amount of Zing, Pow, Bam needed to make this a highly memorable dish!
After roasting the bird, use the drippings and a few more chopped porcini to make a risotto. Enjoy!! Chef Celinda
- The Book of Betty (11/16/2015)
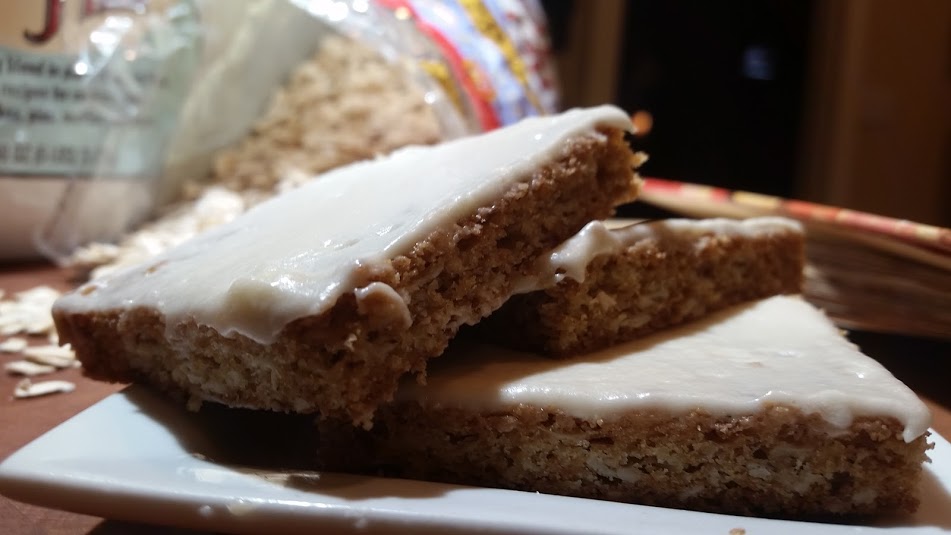
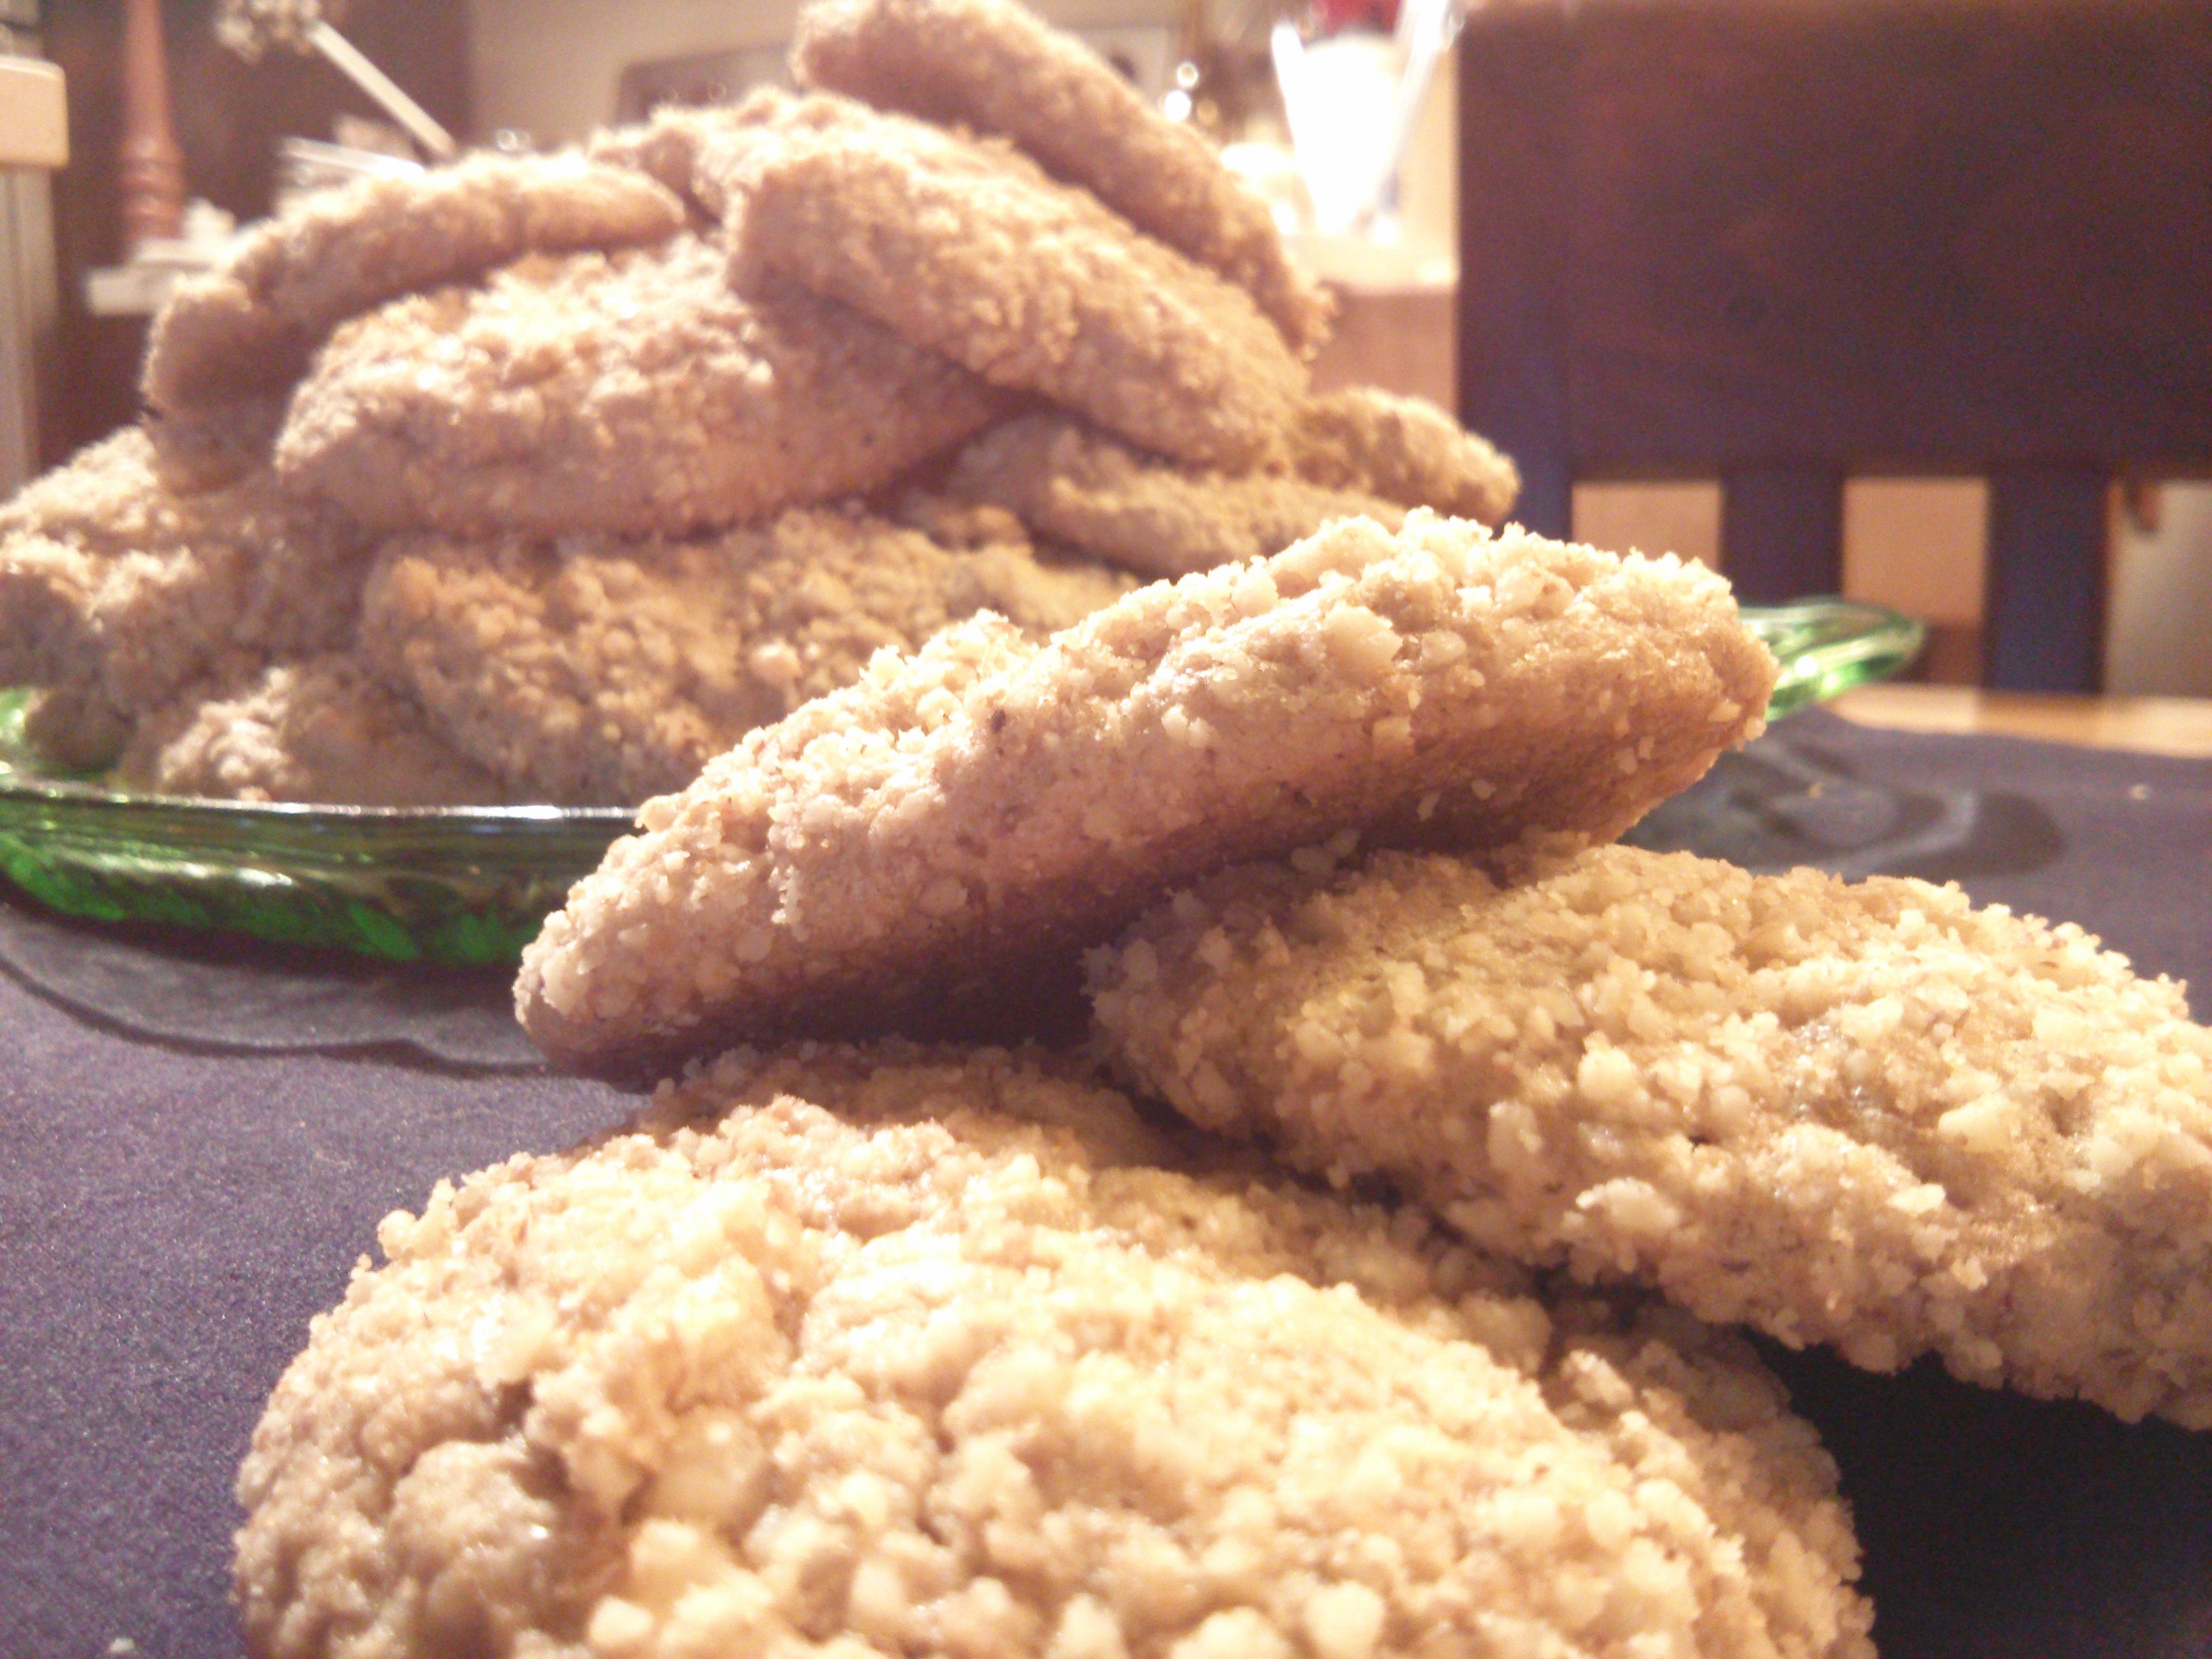
 “Rainy Days and Mondays” always make me think of warm couches, fires and cookies… So, I drug out my ancient, well, circa 1972, “Betty Crocker Cooky Book” for inspiration. Turning those well thumbed pages, finding the dog eared treasures, with pictures (and greasy finger prints to match) unearthed a flood of warm memories. Oatmeal seemed just the thing to make this rainy Monday perfect. Feeling delightfully lazy, I figured bar cookies were the best thing to create…
Gluten Free Oat Bars with Maple Buttercream
Cream together:
1 C softened unsalted butter
1/2 C white sugar
1/2 C packed light brown sugar
Add:
2 eggs Continue beating until creamy and smooth
Add:
1 C Redmills 1 to 1 Gluten Free Flour
1 C Gluten Free Rolled Oats
1 tsp Real Vanilla
1 tsp Kosher Salt
When well mixed, add:
1/2 tsp baking soda
1/2 tsp baking powder
Just make sure these are mixed in thoroughly. Don’t over mix at this point.
Spread the soft dough across a lipped baking sheet that you have greased with either butter or a light coating of Olive Oil pan spray. Place into a preheated 350 degree oven for approximately 12-14 minutes, or until the top browns and the cookies begin feeling firm. Remember, these will continue to cook in the hot pan after you take them out of the oven. Of course, if you want your cookies crisp, you are welcome to cook them a bit more. It’s up to you! When they are done, place on a rack to cool.
The buttercream is super easy:
1 1/2 C powdered sugar
1/4 C softened butter
1/2 C Real maple syrup
Toss this all into the mixer and whip until smooth and creamy. Spread over the cooled cookies. When the buttercream is set, cut the cookies into whatever shape and size that makes you smile. Enjoy your Monday!
Thanks for visiting Fearless Feast! Chef Celinda
- Mi Masa Su Masa (4/20/2015)

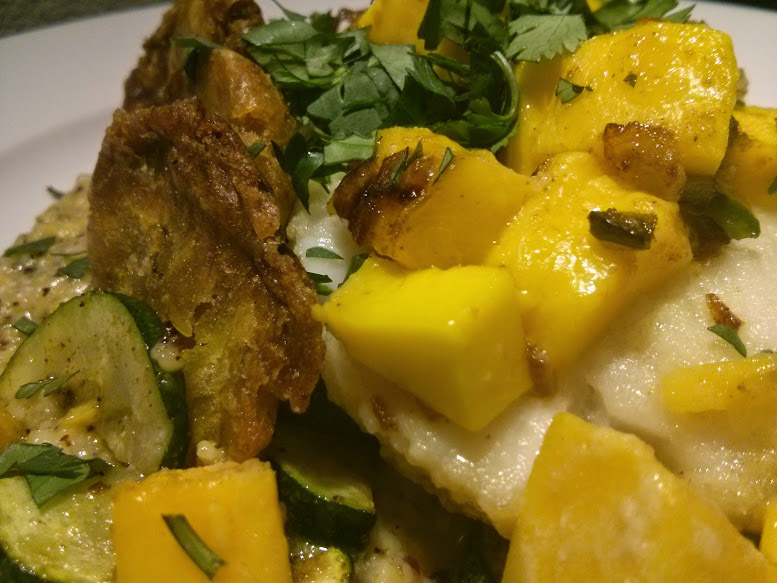
So many gluten free flour blends are heavy with rice flour. These tend to magnify my waistline… A perusal of my pantry turned up a lovely bag of masa harina; corn that has been soaked in lime, then ground into a flour. This made a spectacular light coating for the long-line rockfish I picked up at Town & Country’s Central Market in Shoreline today.Cut your fish into serving size pieces, salt each side and dust lightly with the masa. Brown on each side in hot olive oil. Top with a mixture of fresh mango and minced jalapeno. Pop into a preheated 400 degree oven. You want to cook rockfish fully. It will be flaky, white throughout and no longer opaque.
To complete my theme I served the delicate fish with Abenaki’s Corn Polenta. I picked up this beautiful multi-hued polenta from the people that grow the corn, grind it with utmost care and then sell it at the Eugene, Oregon farmer’s market a few weeks ago. This is some of the best polenta I have encountered, to date. I cooked it with fresh stock and a squeeze of lime to bring out the lovely corn flavor. Check out their website www.lonesomewhistlefarm.com
For some fun texture I made my own version of tostones; double fried green plantain. Simply score the plantain down each side, snip the ends and pop into the microwave until soft and the skin is dark brown/black. One large plantain took about three and a half minutes in my microwave. Once the fruit is soft, let it cool just enough to handle and remove the skin. Cut into 12-14 rounds. The recipes I’ve seen call for all manner of methods to ‘smash’ the rounds, but being a chef with ‘cast-iron’ hands (who needs fingerprints, anyway!) I placed them between two pieces of wax paper and smooshed them fairly flat with the heel of my hand. You could use a glass, a plate, a pan, whatever is handy. Now fry them on one side in olive oil in a cast iron pan. Turn them over in the oil and place the pan into your 400 degree oven with the fish, until they are done. I made mine fairly crisp, but do them how ever you prefer. They can even be cooked extra crisp and served with a dip for a fun appetizer.
Some zucchini sauteed with World Spice’s Caribbean Curry and a bit of fresh minced cilantro to finish! It was VERY quiet around the dinner table at my house!
Enjoy!! Chef Celinda - Goddess of Green Things (3/30/2015)
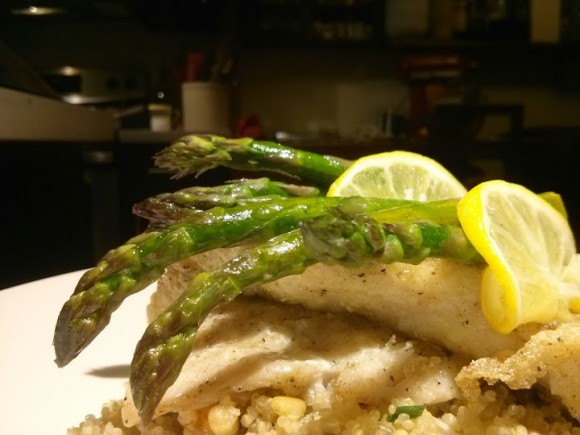
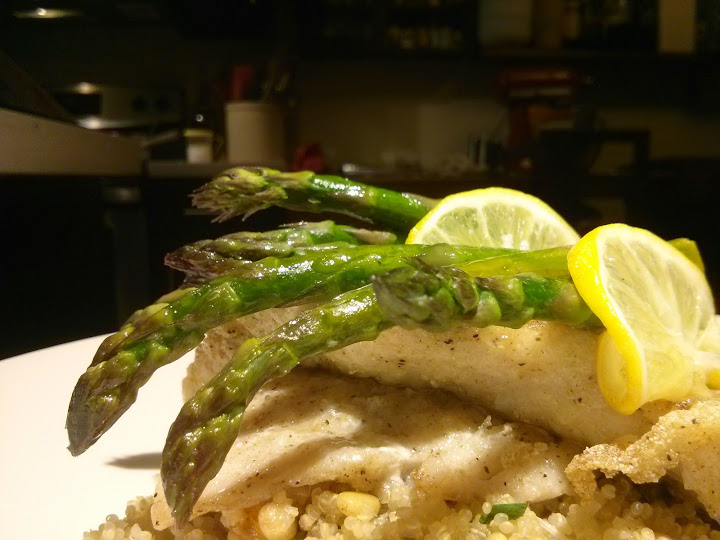
Want to be a Goddess? Read on! Fresh, vibrant vegetables are trickling into our markets. It just takes an understanding of flavors and a deft touch while cooking these glorious examples of Spring bounty to bring your dinner guest to rapturous delight.Little could be simpler to prepare then the beautiful asparagus pictured above.
1 bunch of asparagus, washed and bottoms snapped off
2 Tbsp unsalted butter, cold, cut in thin slices
Sliced of fresh Meyer or regular lemon
Fleur de selArrange the asparagus in a baking dish. Place the slices of butter across the middle of the stalks. Layer the slices of lemon on top of the butter. Sprinkle all with fleur de sel and pop into a 350 degree oven for about 15-20 minutes. Keep on eye on the asparagus. Once the color starts to brighten, test for tenderness. As soon as it reaches the level you prefer, remove from the oven. It’s ready to serve.
The dish pictured shows the pretty asparagus served with fresh Rockfish seasoned with tarragon and minced orange zest on top of quinoa studded with roasted pine nuts, scallion and julienne morsels of dried mandarin orange. Once the asparagus was happily balanced across the fish, I poured the resulting butter over the whole.
Gluten Free, as always!! Enjoy! Chef Celinda
- March Madness (3/27/2015)

The sun is occasinoally popping out in startling glory, yet despite calendar exclamations of the changing season, my Spring Fever or March Madness is creating a longing for moist garden soil running through my fingers, outdoor expeditions and, above all, Warmth!To keep the depression at bay, brought on by malingering Winter evidence, I cook food from warm climates. Tonight my home smells of the Caribbean! Lime, coconut, allspice, nutmeg, such lovely acquaintances…
To accompany a pork roast rubbed with lime zest and those warm friends, I created a “Caribbean Succotash”. I am using that term loosely, since there were no lima beans involved, but it seemed like the perfect name for this dish.
1 each yam and sweet potato, peeled and cut into small dice
1/2 Yellow Onion, minced
Organic Virgin Coconut oil
1 small Jalapeno, seeded and minced
1/2 Cup shredded coconut
1 banana, peeled and diced
3 Tbsp World Spice’s Caribbean Curry blend
6oz Pineapple Juice
Kosher SaltSaute the sweet potato, yam, onion and jalapeno in the coconut oil until beginning to brown a bit. Add the curry blend and cook for two more minutes. Turn off the heat, add the pineapple juice, banana and coconut. Toss together. Salt to taste and place in a 350 degree oven. Cook until nicely browned, about 45 minutes.
Like every dish on Fearless Feast, this recipe contain no gluten nor many other allergens.
Enjoy!! Chef Celinda
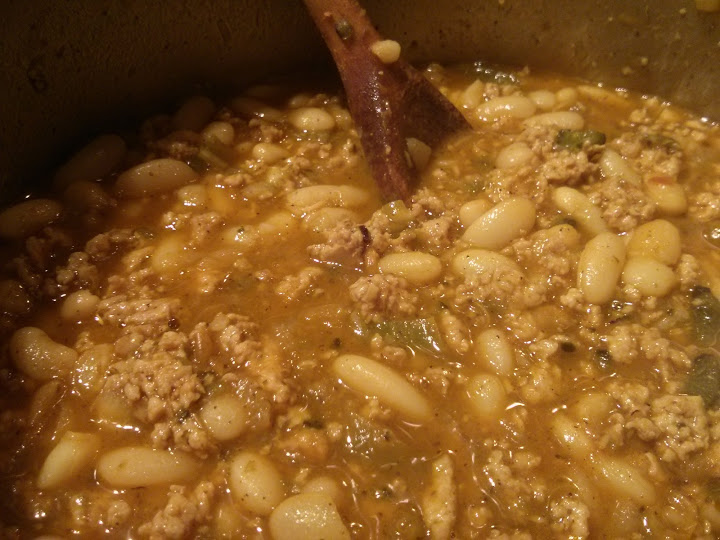
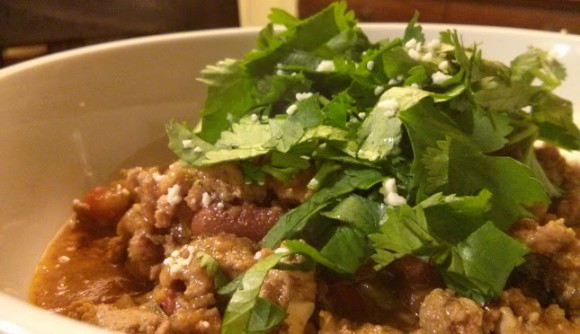
- You are my Sunshine! (3/4/2015)
 Maybe not my, ‘only Sunshine’, but you do, soooooo make me Happy!
The beautiful fresh flavors and color inspired the name
‘Sunshine Chili’Ground chicken thigh meat
Cannellini beans, prepared
Yellow onion, minced
Poblano, fresno, jalapeno peppers, minced
Chicken stock
Lime zest
Cumin, ground
New Mexican chili pepper, groundAji amarillo, ground
Turmeric
Garlic
Oregano, Mexican
Coriander
Sage
Rosemary
Cilantro
Salt and PepperCook the chicken, onion and fresh peppers until chicken is cooked through. Add lime zest and spices; cook for a few minutes. Add herbs then chicken stock to level of the meat in the pan. Season with salt and pepper. If you cooked your own beans and did not finish them with salt, you will need to be pretty generous now.
Cook on low for a couple hours, or until you can’t stand it and have to get a bowl and a spoon…
Garnish with fresh minced cilantro and a fresh chevre, feta or cotija fresco.
Once again, NO gluten!! Who knew!! Enjoy! Chef Celinda
- Shanks! (3/4/2015)
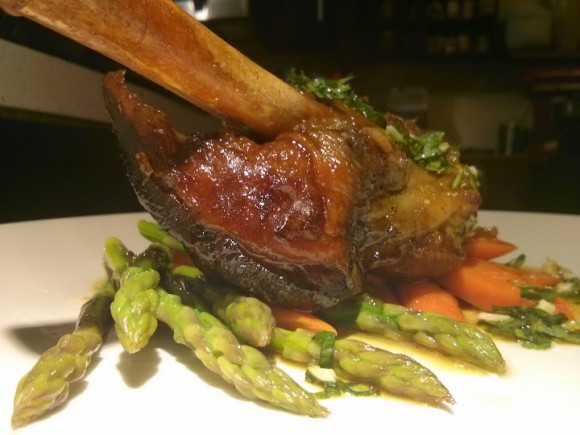 Aw, for the love of Lamb Shank! Spring is here!!! At least it is, in Seattle!
A supremely simple pleasure to prepare:
Season each shank with salt and pepper then brown on all sides. Place in a dish large enough to hold them all. Add chopped Spring Onion, fresh minced garlic minced orange peel and a non-oaked white wine to fill the pan to the half way point. Add additional seasoning, seal with parchment, foil and the lid. Place in a preheated 325 degree oven for about three and a half hours. The shanks are ready to serve, but I prefer to do this a day ahead, chill uncovered, remove the fat layer and reheat. You will find the texture to be much better, if you have the time to do this.
To serve, Spring asparagus and carrots were the perfect touch with a garnish of gremolata made from citrus zest, mint, flat leaf parsley, minced garlic, olive oil, sea salt and fresh ground pepper.
Cooking without gluten is so very easy!! Enjoy! Chef Celinda
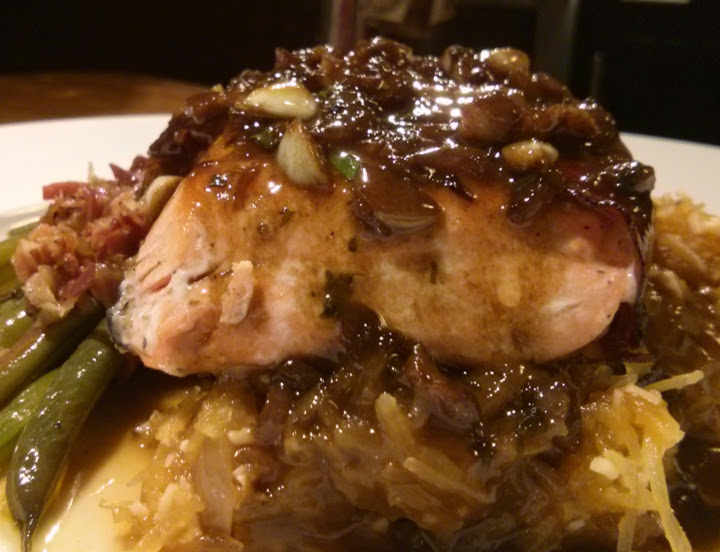
- Silver for the King (2/22/2015)
 Pretty, wild Silver, also known as Coho, Alaskan salmon is incredible when prepared with dense, flavorful King Oyster mushrooms.

This variety of mushroom combines the flavor, we love, of the oyster mushroom, with a dense meatiness that adds incredible texture to your dish. You will find them to willlingly avail themselves of the flavors you introduce in the pan. Tonight, I chose to saute them in butter with shallot and cardamom. When they were sufficiently softened, I deglazed with Oloroso sherry, then a touch of maple syrup, the sweetness balanced by Jerez sherry vinegar.Coco, or Silver salmon are frequently found at a much better price in your fish market. Being a smaller fish, you need to handle them pretty gently, when cooking. They can dry out in a heartbeat! Keep a close eye on them as you pan roast, poach or oven roast this wonderful fish.
For those of you seeking to keep your diet free of allergens, fresh wild salmon is an excellent choice. Firm fish, like salmon, do not need a coating, as do more delicate fish, like sole. This means, you can usually count on it as a Gluten Free option on restaurant menus. Do carefully read the menu description, though. Ask you server, to be sure it is safe. At home, Salmon is wonderful with so many flavors, sauces, cooking styles and accompaniments. Be creative! Enjoy! Chef Celinda
- Gluten Border Patrol (2/21/2015)
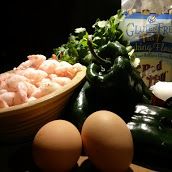 Satisfying your craving for amazing Mexican dishes should not require a run in with the Gluten Border Patrol!
By using one of our great choices, in gluten free flour, it is simple to create many of the dishes you are lusting after!
Try my Shrimp and Lime filled Chili Rellenos. They take some time, but aren’t difficult.
2 Poblano peppers per person, or one, for smaller appetites
Sweet shrimp, peeled
Fresh Lime
Chevre
White or Brown Rice, prepared
Cilantro, chopped
Green Onion, minced
Shallot, minced
Garlic, minced
Organic tomato sauce
Olive oil
Cumin
Coriander
Cayenne or other favorite powdered chili
Salt and Pepper
Egg
Gluten free flour: I prefer Redmill 1 to 1 baking flourThe Peppers:
Using the broiler or over a gas flame, burn the skin of the poblano peppers. Wrap in paper towel or a paper bag to steam the skins loose. When cool, remove all of the skin. Remove the top and seeds. The peppers can be fragile, so do so gently. If one splits, don’t fret, toothpicks can work magic. Place the opened, prepped peppers on waxed paper and set aside.The Sauce:
Place olive oil and shallot in a sauce pan. When wilted, add garlic, ground cumin and coriander. When done, add the tomato sauce, cayenne, salt and pepper. Once warmed through, add the juice from half a lime and simmer. Keep an eye on the liquid level. You may need to add a few tablespoons of water.The Filling:
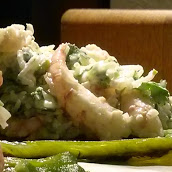
If shrimp are frozen, thaw under cold running water, then mix together the shrimp, some of the chevre, a few tablespoons of prepared rice, chopped cilantro, lime zest, juice from the other half of the lime, salt and pepper.To Stuff the Peppers:
Place the shrimp filling on the roasted, opened pepper. Wrap the cut sides around the filling and secure with a toothpick. If you have additional splits in the pepper, secure those, as well. Once you have filled all the peppers, prepare them for frying. Beat the eggs in a bowl large enough to hold a pepper, too. Add a tablespoon, or two of cold water and mix. Place some gluten free flour in another, equally sized bowl. Dip each pepper in, first the egg, then the flour and set on a plate or waxed paper. Once you have coated all the peppers, heat some olive oil in a stout bottomed pan. When hot, carefully place one or more peppers in the oil and cook each side until lightly browned. Set aside to cool. When all the peppers are browned, carefully remove all the toothpicks. They should stay together nicely.To put the dish together:
Ladle some of the sauce into the bottom of a baking dish. Place the browned peppers neatly on top of the sauce. Put the rest of the sauce across the peppers and garnish with the remainder of the chevre. Pop into a 350 degree oven. Cook for about 45 minutes, or until bubbly and the cheese is lightly browned.The side dish:
Mix warm prepared rice with chopped cilantro, green onion, melted butter or olive oil and desired seasoning. Place rice on the plate and top with one or two of the finished rellenos.Serve to family and friends. You have no reason to tell them they are gluten free. They will never know! In fact, they will probably suggest you open a Mexican restaurant! Enjoy! Chef Celinda
- Simply Wild (2/15/2015)
 Wild ‘Bruce Gore’ King Salmon and wild huckleberries; nothing tame about that combo!
When creating recipes for Northwest treats, it’s fun to pair up ingredients that inhabit the same environs. They frequently make excellent combinations.
To make this dish, simply season fat salmon fillets and sear in olive oil. Once evenly caramelized, move the pieces into a baking dish and finish cooking in a 400 degree oven. Keep an eye on them! Overcooked salmon is a crime! When 90% done, remove from the oven and let them rest to finish cooking.
For the sauce, add minced shallot and rosemary to the remaining oil you cooked the salmon in. When the shallot is done, add a round of tawny port and reduce. Add huckleberries and cook to a glossy substance. Remove from the heat and mount with unsalted butter. Season the finished sauce, as needed. Plate the salmon and serve with your incredible sauce.
If you are unfamiliar with huckleberries, they are in the blueberry family. I found some in the freezer section at Central Market. You can pick them at the end of the Summer in higher elevations. I used to greatly enjoy doing this! The bear ‘sign’, I was careful not to step in, made me a little nervous, but hey, sometimes great meals require some adventure to achieve! Besides their wonderful flavor, they have five times the antioxidant of blueberries! And, like blueberries, they are believed to help maintain mental function, as we age. Something to keep in mind.
Like every recipe I create for Fearless Feast, this one is, of course, gluten free. Enjoy!! Chef Celinda
- Bacon and Wine (2/7/2015)
 Join me at Columbia Tower Club for “Women Stars of Food and Wine”, Sunday, February 8! My table will have a couple of your favorites, Bacon! and Wine!!
Fearless Feast is offering an amuse bouche featuring Gluten Free Rosemary and Sea Salt Shortbread (Yes! Gluten Free!!) topped with cardamom scented Pear, Pickled Celery and my famous Bacon Brittle with Laphroaig 10 year Single Malt Scotch. The shortbread recipe follows, below.
I will be joined by Kelly Hightower offering her amazing wines! Her 2011 Hightower Red Mountain Merlot is predicted to pair beautifully with my featured culinary creation.
Tickets are still available at the door! For more information, go to: http://www.wfalliance.org/events/
To Make Chef Celinda’s Gluten Free Shortbread ~
2 C Red Mill’s 1 to 1 Gluten Free baking flour
1/2 C granulated sugar
1/2 tsp fleur de sel
2 Sticks unsalted butter, cubed
1 Egg Yolk
1 tsp real Vanilla extract
2 tsp minced rosemary, or other herb, as desired
Additional sea salt. For the featured dish, I used apple smoked sea salt to finish. This corresponded with the flavors of the bacon brittle.Mix the sugar, fleur de sel, and rosemary until combined. Now mix in the butter. Once incorporated, add the flour. Mix for 30 seconds then add the egg yolk and vanilla. Mix until a dough forms. Wrap in wax paper and chill in fridge for 30 minutes.
Once chilled, roll out the dough. For the delicate ‘vehicles’ featured, I rolled mine to 1/8 inch and cut them into 1″ squares. For more traditional cookies, 1/4 inch thickness is recommended. Use your imagination or a favorite cookie cutter for shapes!
Place the cut pieces on a parchment paper lined baking sheet. They don’t need more then a tiny bit of space between them. They won’t spread. Once you have the tray filled, place it in the refrigerator. I know… just do it! Preheat your conventional oven to 350 degree.
Your cookies should be adequately chilled in about 15 minutes. Place the tray in the oven. For my thin cookies, I only needed to cook for 15 minutes. Thicker cookies may take a few minutes more. Watch your oven. You want them to just barely be beginning to color. Upon removal from the oven, immediately sprinkle them with desired sea salt.
Leave the cookies on the tray until fully cooled, then carefully place them on a platter, or serving tray. note: these will hold beautifully for a couple days if sealed up. To do so, place wax or parchment paper between layers, to protect them.
Shortbread is a highly versatile base for pretty much anything you can come up with. Use them, as I have, as a savory component. Or, dream up sweet accompaniments. For dessert options, modify or leave out, the fresh herb. Lavender and Lemon Zest would make simple but exquisite treats when sprinkled with a bit of fleur de sel and a dusting of powdered sugar. However you serve them, family, friends, snobs or country folk; everyone loves these melt in your mouth pastries!
See you Sunday!! Chef Celinda
- Love and Lies (2/2/2015)
 Is it a bad thing to fool your special someone by feeding them things that are good for them without their knowledge?? You know how they love spectacular desserts and just should NOT be eating Gluten, but…
You have probably looked at the gluten free treats at the grocery store. You ponder, wondering if they will taste good. At that price, you sure do hope so, but probably don’t have a great deal of faith…
This pretty cheesecake is well within your ability. You need a good mixer, a spring form pan and fresh cream cheese.
This recipe was made for a 6" spring form pan. The crust recipe included, is enough for two cakes or one larger, 9" spring form pan. I put the remaining dough into the freezer for my next baking expedition!
If you are using a conventional oven, you need to take some extra steps to prep your pan. The butter in the crust will potentially melt, dripping down on the element and start a fire. In a convection oven, there is no exposed element, so not a problem. I do like to place a pan in the bottom of my convection oven, to catch drips and make cleanup easy, though. Of course, you can also use the upcoming method to handle drips, too. To create a seal for conventional cooking, wrap plastic wrap around the exterior of the assembled pan, creating a barrier to prevent leaks. You do not want it sticking up over the top edge, so tuck it neatly. Now, wrap foil around the plastic, with the thought of stopping leaks, also, but primarily to protect the plastic from the heat as well as creating a secondary catch point. The plastic will shrink from the heat, but honestly, it should do a great job. If you are further concerned, place a pan or dish under the spring form, too. This is fine, but it could make it take a little longer to bake in a conventional oven.
Once you are done sealing your pan, use a light coating of oil on the inside, for ease of release and for the crust crumb to stick to.
If using a conventional oven, set to 350; 325 for convection.
Crust:
1 C Red Mill 1 to 1 Gluten Free flour
1/3 C sugar
6 T cold unsalted butter, cubed
1 egg yolk
Dash of saltUsing the paddle attachment, mix together all the ingredients until you have formed a consistent petite pea sized crumb. Do not over mix!! Honestly, if that happens and it forms a dough, you are best to start over. You can save the screw up batch and make some cookies, but it will have a tough texture, if you try to use it for your cheesecake.
Place the finished crumb in the pan. If doing a six or seven inch spring form, put the other half in a freezer bag and store for another day. Now, carefully press the crumb all the way up the sides and across the bottom, using your fingers. If it is sticking to you, run your fingers under cold water to cool them, dry and dust with a little of your gluten free flour. It is very important to get the crust an even thickness on the entire surface. The largest pitfall is the corner where the sides meet the bottom. Push with your finger tips to thin it, if you realize you have created a slope instead of a sharp corner. If you don’t your finished cheesecake will have an unappealing block of crust in each piece. Set your crust in the fridge until you are ready to fill and bake.
To make the filling:
1 lb FRESH, good quality cream cheese. Do not cheap out and do check the date. As it ages, it loses moisture. You will end up with a cheesecake dotted with dry morsels of cheese no matter how much you whip it.
2 eggs
1/2 C sugar
1 tsp real vanilla
zest from half of a lemonPlace all the filling ingredients into your mixer with the whip attachment. Whip until fluffy and smooth. Carefully spoon into your prepared crust. Push it up against the sides in a way that you do not knock the crumbles loose and smooth the top. It will be fairly full. Place in the preheated oven. The cake will take roughly an hour. It’s done when a toothpick comes out clean from the center. If the top is beginning to get too brown, place a loose foil tent over it for the final baking.
Once fully cooled on a rack, carefully remove the spring form pieces. You can simply dust with powdered sugar and serve or use your favorite gluten free topping. The pictured cake has fresh strawberries in pineapple glaze. This is super easy and the combined acid and sweetness of the pineapple will give you the flavor that may not be in the berries coming in at this time of year. Simply reduce the pineapple juice. Add more sugar if your berries are particularly sour. Cool for a few minutes then fold into sliced berries. For a thicker glaze, add some dissolved gelatin before mixing with the berries. For an extra pretty batch, you can also add red food coloring.
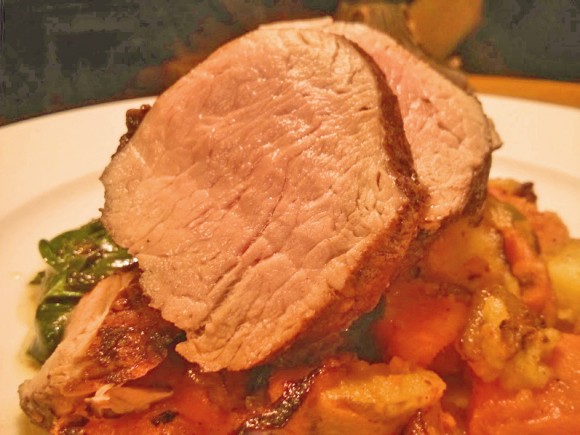
- Nice Rack! (2/2/2015)
 I picked up a gorgeous Veal Rack from William at Pike Market’s BB Ranch this week! A tumultuous array of recipes cascade through my mind, as I ponder where to begin!

I wanted to do something Big and Showy!! Veal Rack is the baby to a bone-in Prime Rib, so I decided to prepare it in a similar style; seasoned and roasted then finished with a spectacular pan sauce ~“Veal Rack Oloroso”Once your meat is 130 degrees, pull it from the oven and set aside to rest. It will continue to rise in temperature. I prefer to do a veal roast medium rare. The young meat is a bit too chewy, if rare.
While the roast is resting, add shallot and sliced mushroom to the pan. You will probably need to add a little more olive oil. Just as these are nearly done, add minced shallot and fresh sage. Don’t burn these! A generous round of Oloroso Jerez Sherry deglazes and gives incredible flavor. note: This sherry is dry, yet loaded with hazelnut and caramel notes! Reduce the sherry a bit and add stock. You will need to adjust seasoning as your sauce reduces. To finish, mount with cold butter and serve over slices of pretty pink veal.
The beauty above was served with baby gold potatoes, roasted in the pan with the veal.
Enjoy! Chef Celinda
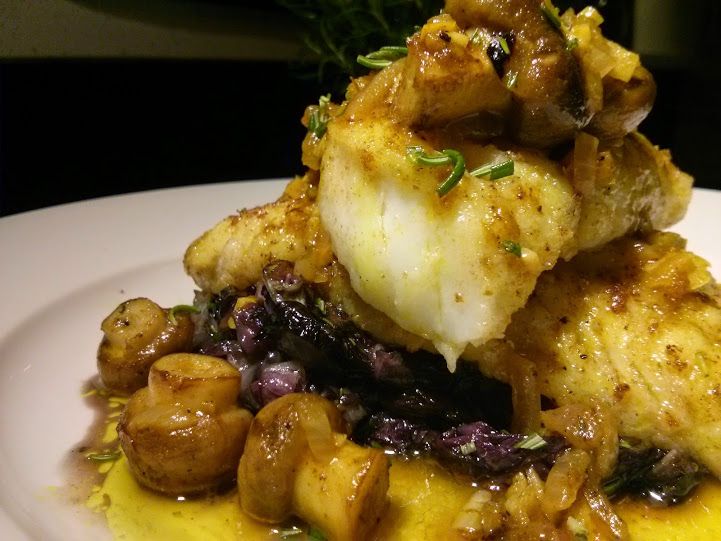
- Sword Fights (1/27/2015)
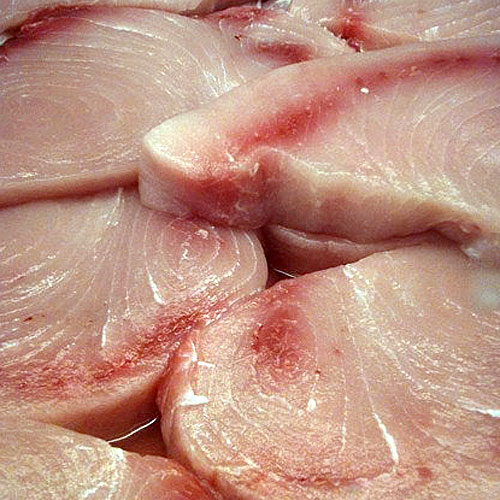 A thrust, a parry, dodge and lunge! To the victor go the spoils; realized in Blood Orange Marinated Swordfish! I scored a couple gorgeous Swordfish steaks at Pure Food Fish, in Pike Market!
Swordfish simply adores citrus. An hour, bathing in a blend of blood orange juice, olive oil, salt and pepper leaves you with a remarkably flavorful and tender piece of fish. A quick sear, followed by a short rest and this delightful fish is ready to join your favorite side dishes. The featured picture shows roasted Spring onions, baby artichokes and saffron risotto.
Enjoy! Chef Celinda - Dance of the Wallflower (1/20/2015)
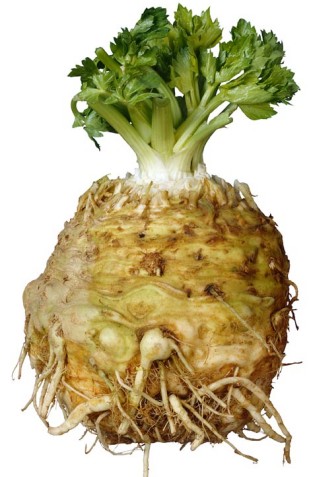 Some perfectly wonderful ingredients simply work at being ignored! Celeriac, or also known as, Celery Root, is one of those ingredients.
Yes, it’s kinda homely. The name doesn’t necessarily inspire creativity. Yet, it has a great deal going for it! Celeriac can be prepared pretty much the same way you would a potato; in fact, some diners would never notice you slipped some onto their plate in place of the weight loss inhibiting potato…
I’ve been endeavoring to work with celeriac. It’s lovely raw, grated in a salad, or cook and then puree or mash this healthful treat. The flavors are subtly bitter/sweet with notes of anise, celery, hazelnuts, and/or walnut. Mashed Celeriac has a lovely fluffy texture. The only hard part is peeling it. Get out a nice sharp knife and just go for it. A carrot peeler really isn’t going to touch this hunk of joy!
I decided to try using Celeriac in a braise featuring Italian herbs and wine. Oh, my! The battle was on! Those beautiful, soft, luscious chunks of roasted vegetable brought out the aggressive side to those at my table… So good! Please do try this soon!
Enjoy! Chef Celinda
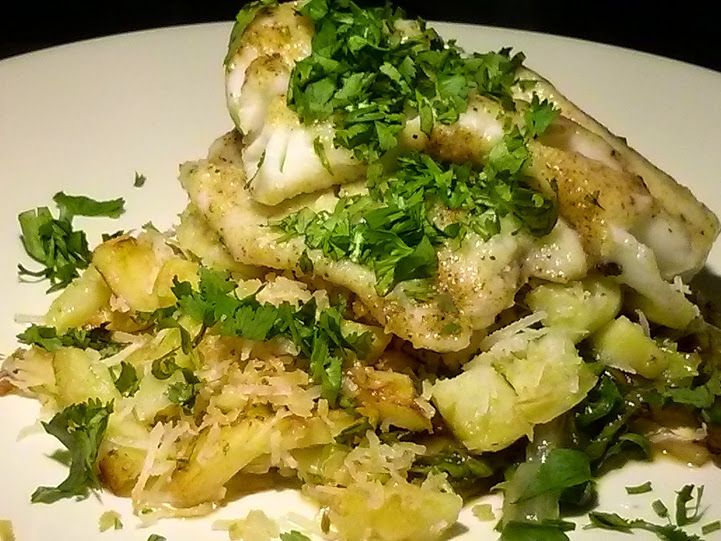
- Fishing For Sunshine (1/20/2015)

I have a large desire to find myself surrounded by jungles, sand, soft breezes and the lulling sound of Caribbean water lapping the shore… Yeah, I know, not happening, but I can fool my taste buds, for a little while, anyway…Pretty cod, pan seared with Gluten Free flour, sits atop sweet potato, dusted with a blend of Turmeric, Allspice Berry, Indonesian Cassia, Cumin Seed, Indian Coriander Seed, Ginger Powder, Cardamom Seed, Tellicherry Black Peppercorn, Nutmeg, and Habanero, is then roasted with coconut, jalapeno and lime zest. Fresh lime makes a side of escarole sing sultry tunes. Cilantro lingers for a pungent reminder: The Sun is always shining somewhere in the World!
Enjoy! Chef Celinda

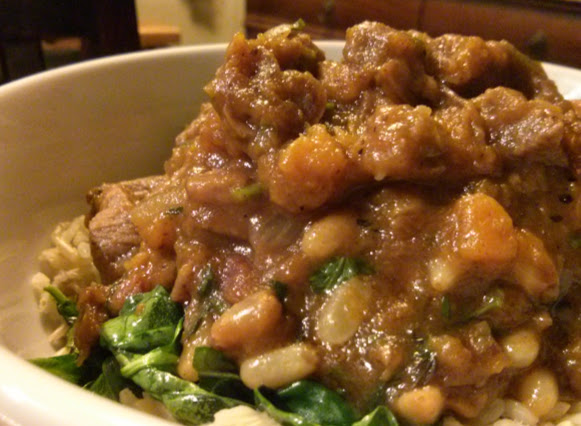
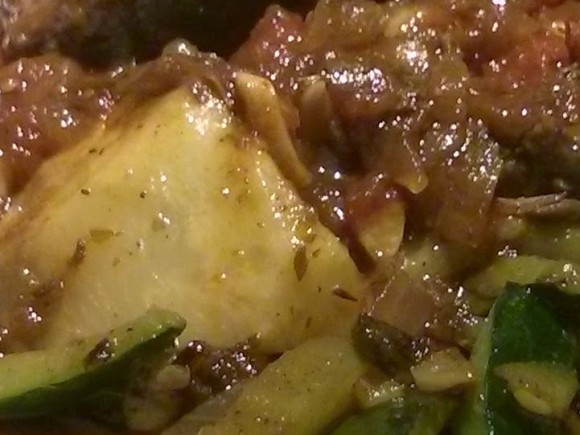
- In Search of Romance (1/19/2015)

Morocco, a land of romance, camels, sand, and history. A past that colors the food of it’s present with flavors hailing from France, Spain and North Africa. Braised dishes are very popular in Moroccan cuisine. They are typically prepared in an earthenware pot called a tajine or tagine which is also the name of the dish when complete. The pot can be found painted or glazed. The domed lid traps the rising moisture and directs it back into the food below.
The tagine is so pretty and fun, it makes me want to create! But, if you don’t have one, don’t fret, you can obtain the same results with any good braising pot or dutch oven.
Make your braise the same way you normally would. You are merely adding some different ingredients and spices to recreate the flavors of this exotic destination.
The pictured dish above was a quick version. Using left over roasted pork shoulder, I put this tempting creation together in a little over an hour. Most of that time was spent in the oven!
To create mine, saute minced onion with julienne sweet pepper and a hot chili. Add bite sized pieces of pork, or other roasted protein, chopped pitted dates, dried apricots, raisins, pine nuts, lemon jest & juice and stock. Now season with salt, pepper and ras al hanout. This is a North African spice blend. The name is Arabic for “the best of the shop”. Each shop has their own blend and guards their recipe jealously. You can anticipate the flavors of cardamom, cinnamon, cumin, clove, nutmeg, dry ginger, peppercorn, sweet and hot paprika, mace, alspice, fenugreek, chili pepper and dried turmeric. Depending on where the blend hails from, it might also include ingredients like: ash berries, chufa, grains of paradise, orris root, monk’s pepper, cubebs, dried rosebud, fennel seed or aniseed, galangal and/or long pepper. Fun!!
A typical Moroccan tagine is served over cous cous. For a gluten free side, try using quinoa.
Enjoy!! Chef Celinda
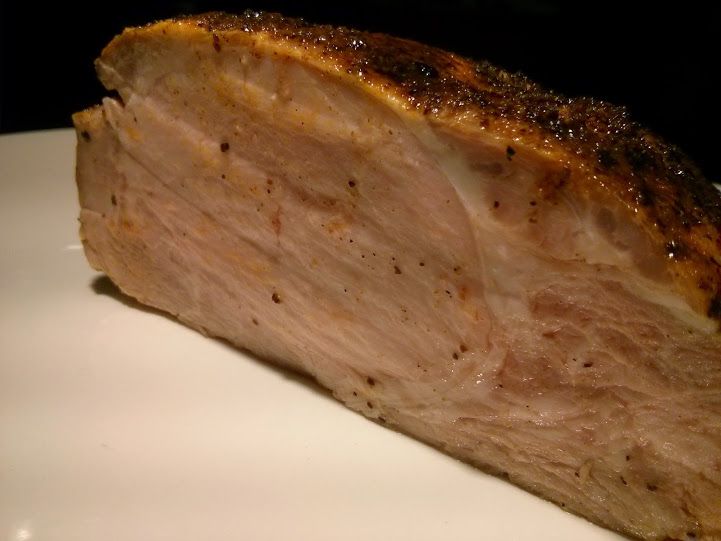
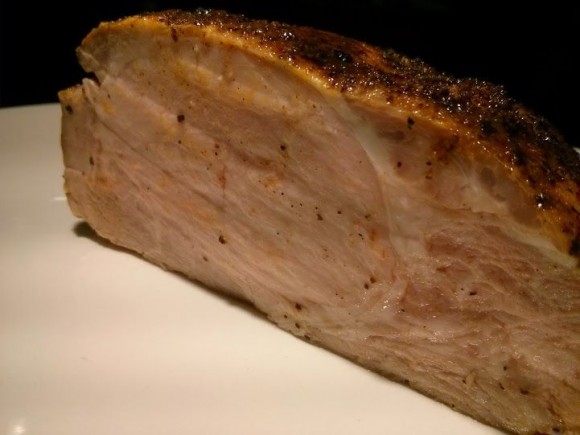
- Big Butts! (1/15/2015)
 There is little more appealing then a slice of fresh roasted Pork Butt/Shoulder, just out of the oven, steaming and dripping all over!
It is commonly braised and used for pulled pork and a variety of other options. I love to simply roast them. The fat within bastes throughout during the cooking process, adding moisture and remarkable flavor.
You can buy these with or without bones. The bone-in has more flavor, but more challenging when it comes time to slice pretty pieces. If you have a boneless one, be sure to open the flap created from removing the bones and season inside, as well.
I don’t generally brine a butt/shoulder. (and YES, the name is interchangeable for this cut of meat) You certainly can brine, if you have desire and the space.
Once seasoned, if cooking a boneless Pork Butt, you will want to tie it. Otherwise, the top tends to lift up and become dry.
Pork is so very versatile. It lends itself to a wide variety of different cuisines, so when it comes to seasoning, its wide open. If you are cooking a big piece, you may want to keep the seasoning simple, so you can use it to prepare several diverse meals. I get a kick out of my “Deja-Food” machinations. The challenge is to prepare of meal, using ‘left-overs’ while utterly fooling the picky eaters at the table.
If you have the ability to handle a large quantity of Pork Butt, I would recommend going to one of the several Cash & Carry stores. They are all over the Seattle area. These stores are set up for restaurants and other food oriented retail operations, but they are licensed for non-commercial purchases, as well. You will pay half the price per pound that you would spend at a grocery store. You will ALSO have a package containing two full butts. A ‘whole’ butt is from both sides of the pig, so two pieces. I generally cook one whole one, while cutting the other into two units that I freeze for another day. You can cut the first smaller, as well. You are in charge!
Enjoy!! Chef Celinda
Nic’s contribution…
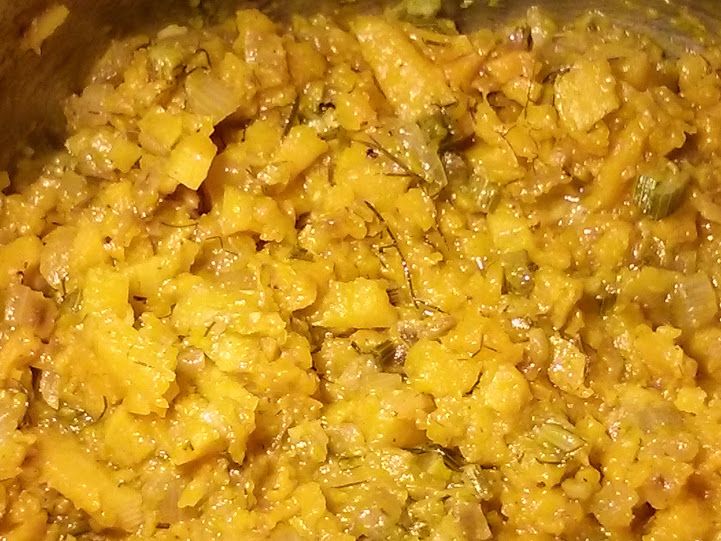
- Sq-isotto?? (1/15/2015)
 What should I call a dish made with minced butternut squash, fresh minced fennel and onion cooked slowly, while adding small increments of stock? Kinda like risotto, but no rice!
This is one of those sneaky side dishes that will win the show every time. The guests at the table, will all look at you and ask, “What is it? Oh, it is soooo GOOD!”
The essence of the fennel mellows with the subtle sweet squash flavors. Being the first time I played with this concept, I didn’t look to add more then salt for seasoning and a touch of sherry vinegar to balance the sweetness from both vegetables and the onion.
It would do well with hard cheeses, like Parmigianno. Many of the warm spices would be good options, as well as your favorite chilies, cooked into the mixture from the beginning. Fresh herbs can elevate in a large variety of directions. Make your choices based on what you will be serving with this lovely side dish.
Enjoy!! Chef Celinda
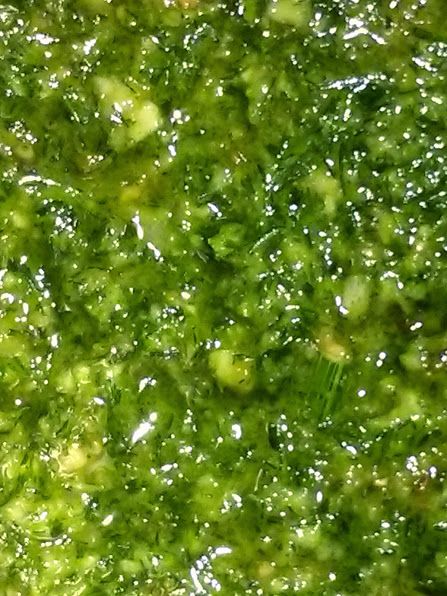
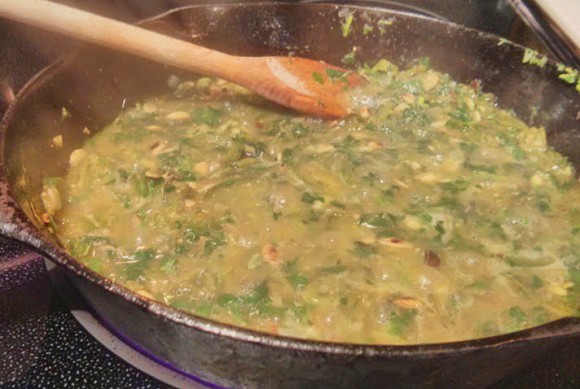
- Fennel Top Pesto (1/15/2015)
 It’s Green. It’s Easy. It has an immense FLAVOR. It is also very versatile!
Try it tossed into pasta with Feta or Gorgonzola for a simple but amazing meal!
Try is as a condiment with roast chicken, fish or pork entree’s
Slather a thin layer on grilled bread and top with roasted Roma tomatoes and Pecorino Romano for a magnificent winter Bruschetta.
Envision a sandwich featuring thinly sliced roast chicken, Gouda, fresh apple and a thin slather of this magnificent pesto!
Fennel Top Pesto
Save the long, thin stems and frilly leaves from your next fennel bulb. Chop it roughly and place in a food processor with fresh garlic and roasted pine nuts. Pulse a few times to mingle the ingredients and start breaking it down. Add a little extra virgin olive oil and blend. Add more oil, a little at a time until it is the desired consistency. I did mention that this recipe is ridiculously easy?
Enjoy!! Chef Celinda
- Lunch Option (1/15/2015)
 Lean, flavorful, pork loin is a wonderfully versatile protein to find lurking in your fridge.
Slice it super thin and layer with cheese, pickled peppers or onion jam on your favorite artisan bread,
Cube up a thicker slice and toss with roasted pears and pecans in a wilted baby kale salad dressed with warm bourbon and maple vinaigrette.
Maybe a quick taco appeals? Julienne the pork and heat with caramelized onion and chipotle pepper. Spoon into warm corn tortillas with layers of finely shredded napa cabbage and a quick shave of cotija.
How to Prepare Your Pork Loin
Being lean, you need to take extra measures to protect this lovely piece of meat. Brining is ideal. Use 1/4 cup of salt to 3 cups of water. I like to add some honey, a bay leaf, peppercorn and acid in the form of a splash of organic cider vinegar or half of a lemon. Cook to dissolve salt and honey. Cool fully, then immerse the roast into the liquid and refrigerate. Even a couple hours will make a huge difference. For a larger roast, over night is ideal. Remove from the brine at that time, or it will affect the overall texture of the meat.
To roast, merely make a rub of your favorite herbs and spices then smear them all over the roast. If you did have time to brine, you will not need as much salt when roasting. Pop the meat into a 350 degree oven and roast until the thermometer reads 145 degrees. It cooks fairly fast, so keep an eye on it. Once out of the oven, please set it aside to rest. The rest period allows the temperature to permeate consistently through out the meat. The juices settle, so when you cut it, they don’t run out, resulting in a dry piece of pork.
Have fun creating your own recipes with this low cost ingredient!
Enjoy!! Chef Celinda
- Too Pretty to Eat? (1/13/2015)
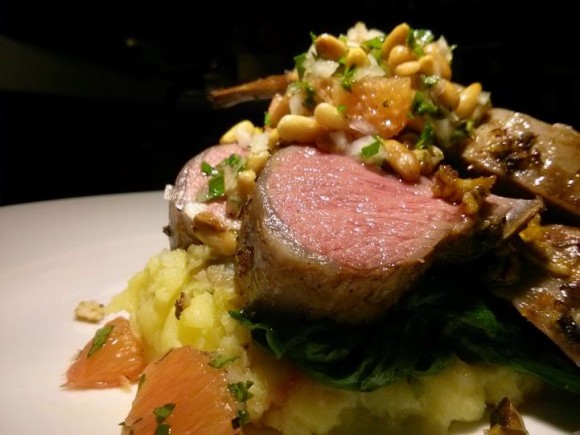 Too pretty? Never!! Grab me a fork!
Rack of Lamb with Orange Gremolata
Lamb Rack, frenched, typically eight bones
Rosemary, minced
Garlic, minced
Cara Cara Orange, zested and supremed into separate dishes
Salt and pepper
Italian flay leaf parsley, chopped
Shallot, minced
Pine nuts, toastedChef’s Secret: The key to cooking lamb is patience. To achieve the beautiful color in the picture, you need to allow it to rest. If you don’t, when you cut it, all those lovely juices run free.
Cut the rack into portions, allowing three to four ribs per person when using small imported lamb. If you are using American lamb, it is usually from larger animals, so you won’t need as many ribs per person.
Salt and pepper all surfaces. Set it aside and allow to come to room temperature. This creates more even cooking through out.
Mix the orange zest, rosemary and garlic. Set aside.
Heat a cast iron skillet with a small amount of olive oil. Place the lamb in it, meat side down. Brown this. When that is achieved, turn it over. While the back side is cooking, rub the orange zest mixture all over the meat side of the rack. Now, put the pan, with the lamb into a 400 degree oven. Cooking time will be determined by the size of the portions. When the meat is no longer smushy, but beginning to be firm to the touch, pull the pan from the oven. Transfer the racks, uncut, to a plate and set aside.
While they are resting for 10-15 minutes you can complete any side dishes and make the orange salad garnish. To make this, combine the orange supremes with the parsley, shallot and pine nuts.
Once the lamb is fully rested, carefully cut between the rib bones to make chops. They should be beautifully pink, warm all the way through and not losing their juices. Plate them and top with the supreme salad.
Enjoy!! Chef Celinda
- Lemon Butter Braise (1/11/2015)
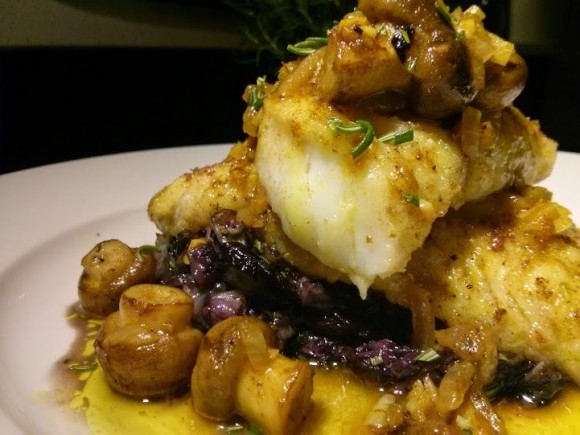
I bought some beautiful, super fresh, white True Cod at Central Market Saturday. Looking for a bright, bold flavored dish, I created:
Lemon Butter Braised True Cod
The pieces you bring home from the Market, will be dense at the tail end, tapering to thin wider pieces over the area previously containing the fish’s rib bones. You will need to cook the thicker pieces longer. Be aware that the thin ones will be a bit tricky to handle, when cooked, being fairly delicate. A ‘fish spatula’ is a most useful tool!
True Cod, cut into portion sized pieces
Gluten free flour. I like to use Red Mill’s 1 to 1 baking blend.
Shallot
Garlic
Unsalted butter
Olive oil
Button mushrooms. note: other mushrooms, if desired
Fresh lemon
Fresh rosemary, minced
Vegetable stock
Saffron
Coriander
Turmeric, ground
Salt and pepperPrep shallot and garlic, set aside. Season the fish portions with coriander, salt and pepper. note: I used Rosemary Sea Salt instead of regular salt, but either will work. Dredge in a small amount of the flour.
Melt butter in a good quality, thick bottom saute pan. Add olive oil, as well. This will make the butter much easier to work with. Brown the fish, remove and set in a baking dish. Place in a 250 degree oven to keep warm, and allow to finish cooking all the way through. If you make the sauce quickly, the timing will be perfect. If you work slowly, keep on eye on the fish, so it doesn’t over cook.
Scrape the bottom of the pan to dislodge any morsels of remaining fish. Remove them. Place the mushrooms in the pan and cook until they start softening. You will probably need to add additional olive oil. Now, add shallot. When shallots are about half done, add the garlic and rosemary. When shallot is lightly browned, add vegetable stock, juice of fresh lemon, saffron and turmeric. Reduce, season as needed, then mount with additional butter. Pour over the fish and serve immediately.
Dreary weather take heed! We culinary soldiers will win this battle! Enjoy! Chef Celinda
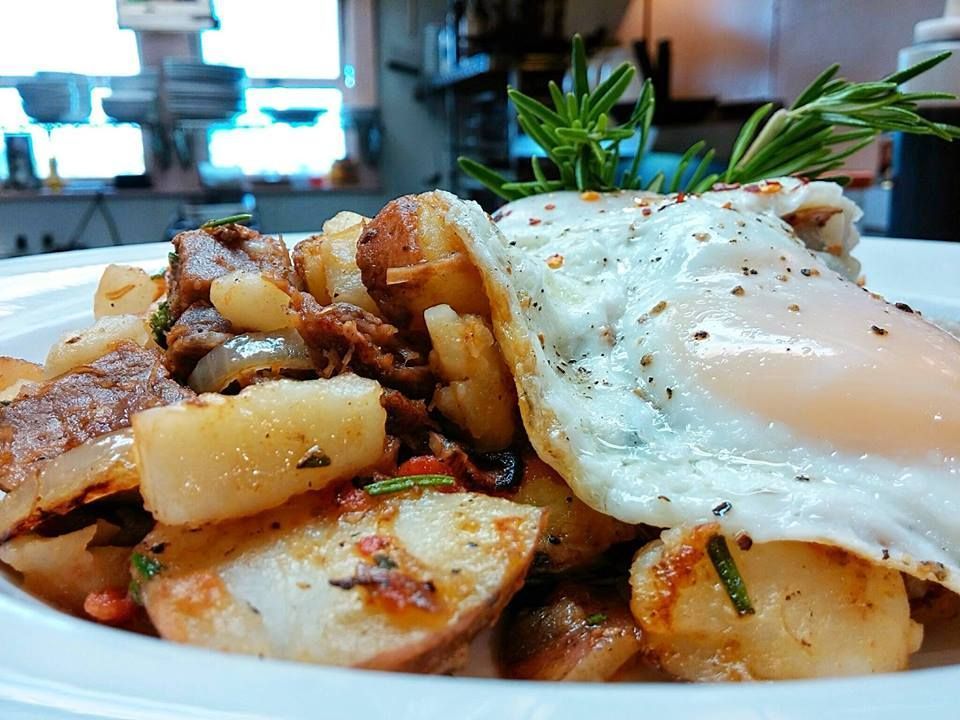
- Sunday’s Comin’! (1/10/2015)
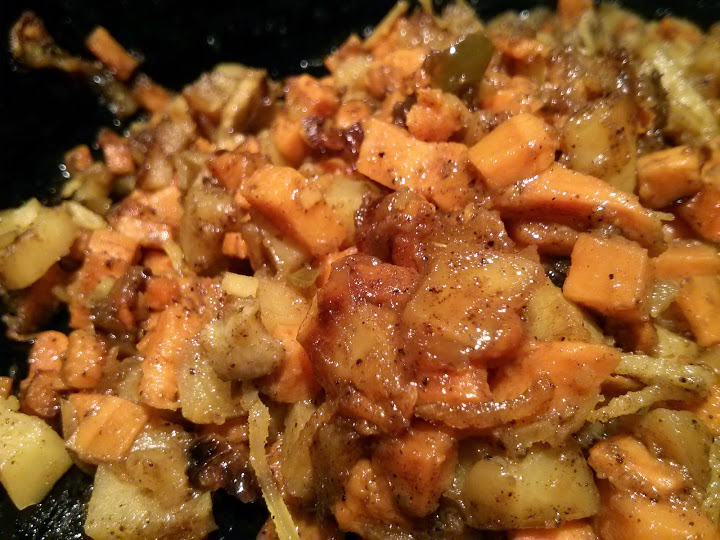
 Sunday, especially gloomy Winter Sundays are synonymous with BRUNCH. And a memorable brunch needs to include PORK BELLY!
Pork Candy Hash
This delightful dish was a Parco creation. You need to plan this ahead, but it’s easy to put together when it’s time to feed all the little Piggies at your table!
For braise:
Pork Belly, uncured
Maple Syrup, REAL, preferably grade B (dark)
Salt
For hash:
Partially cooked red potatoes, diced (peel, if desired)
Apple, cored, sliced with peel still on. I like to use Pink Lady apples. Great flavor and color!
Onion, chopped or julienne, as desired
Baby Kale, I always enjoy using Earth Bound Farms Organic Baby Kale blend
Rosemary, minced
Apple cider vinegar, Try Bragg’s!!
Salt and pepper
Eggs, preferably Organic, Cage-free hen eggs or your choice of other varieties
You need to braise the pork belly first. It’s super easy. You will need a pan that will hold the belly, laid out and deep enough for the liquid. Salt the belly on both sides and lay in the pan. Add cold water to reach half way up the side. You want it sloshy but not fully submerged. Now drizzle on the syrup. If you are in a pinch to make, but don’t have the syrup, try molasses or brown sugar.
To braise, first cover the meat with parchment paper, then seal the top tightly with heavy foil. Carefully place into the oven. 325 degrees for standard or 300 for convection. Personally, I prefer to do my braises in a convection oven. The texture is more consistent. You will cook this for three hours. When it’s done, remove the foil and paper then fully chill.
When cooled, carefully remove the fat layer from the top of the liquid and discard. Notice the beautiful gelatinous brown ‘jelly’ around the pork belly? You want to save this, it’s BELLY JELLY and makes a wonderful ingredient to enhance other dishes.
Place the cooked belly on a cutting board and cut into portions. For the hash recipe, you will want to cut each portion into bite size pieces. Place these in a good cast iron skillet with just enough olive oil to keep them from sticking. Bring the morsels to temperature. Be careful, they have a lot of moisture and will pop and snap. Ow!!! Once warm, pull from the heat and drizzle with more maple syrup. No subs at this point!! Place in a 350 degree oven until they caramelize.
While the belly is lolling about in the oven, place the potatoes, apple slices, onion and rosemary in a size-able cast iron pan. Note: if you don’t have any, when you look into purchasing, look at Lodge brand pans. Excellent quality and will last forever! Cook potatoes until nicely browned. The belly should be finished. Carefully remove the morsels and mix into the potatoes. You do not want the remaining fat in the caramelizing pan. Watch that you don’t get burned on the HOT maple caramel!
To finish the dish, add the baby kale and a dash of cider vinegar. Adjust the seasoning and cook until the kale is just wilted. Plate and top with a pair of eggs, sunny side up or basted.
This meal epitomized FOOD FUN!! Enjoy! Chef Celinda
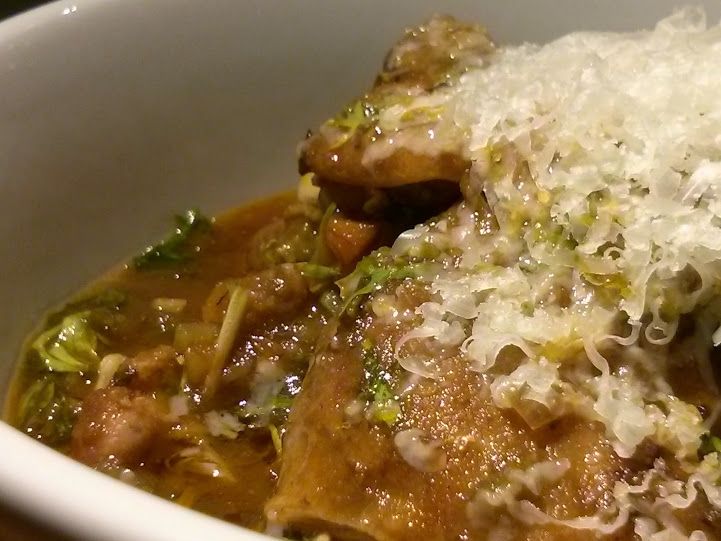
- Football Sustenance (1/9/2015)

Football, a word that means you are going to have a handful, or maybe a house-full, of “12th Wo/Men” hanging out to watch the game Saturday! Can you face another dinner of pizza and wings? If not, here’s a great dish, that the hordes will love!
Chef Celinda’s Game Day Chicken
Chicken thighs, boneless and skinless, seasoned with s&p on both sides
Olive oil
Onion, minced
Celery, minced
Carrot, minced
Garlic, minced
Balsamic vinegar
Castelvetrano olives, chopped
Yellow skinned potatoes, peeled and diced
Tomato sauce, preferably made from Italian, San Marzano’s
Oregano and Marjoram
Stock
Frisee
Salt and pepper
Make mire poix with the onion, celery and carrot. Place this, with the chicken thighs, in braising pan with heated olive oil. When the chicken is nearly done browning, add the garlic. When soft, deglaze the pan with balsamic vinegar, then add stock. I was lucky and had a ham bone simmering nearby. I kyped a couple scoops of that for my stock! What a lovely addition. Chicken or vegetable stock will work fine. Mine’s just gonna be better… teehee
Add the chopped olives, tomato sauce, oregano and marjoram. Check the salt levels. Adjust as needed. Remember, to keep in mind you will be reducing the liquid, which increases salt percentages, but also adding potatoes, which will absorb it.
Add the diced potatoes. Stir them around, so they are submerged in the liquid. Add more stock, if needed.
Cover and allow to simmer until the chicken and potatoes are done. Add your chopped frisee and cook until it wilts nicely. Serve with a strong flavors cheese garnish, either shaved are shredded. Parmigiano or Pecorino Romano will do nicely. I happened to have a pretty piece of Grand Ewe Vintage Best Uniekaas that was an amazing addition.
Enjoy!!
- Now What? (1/8/2015)
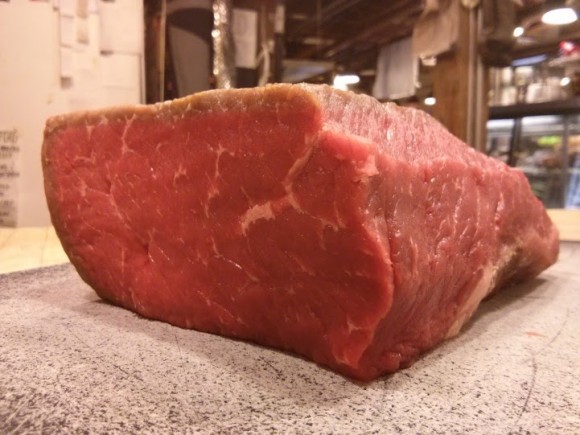
You bought this great looking piece of beef and haven’t a clue what you are going to actually make with it…
Top round is super lean, so you need to prepare a dish that involves either a very quick cooking method, using super thin slices of the beef; like a stir fry or a combination of both dry and wet cooking methods. Some standard ideas would be Beef Stroganoff, Bourguignon, Braciole, Goulash or Stew. I’m feeling like something decadent tonight!
Truffled Beef and Mushrooms with Blue Cheese
Begin by cutting the top round into thin pieces, against the grain, to shorten the fibers that can make it chewy. Finish cutting these slices into bite size morsels. Season with salt and pepper, then dredge with Red Mill’s 1 to 1 Gluten Free Flour, or your favorite brand that works well in this application. Brown the prepared beef in a small amount of olive oil. Remove it from the pan and set aside. Immediately, add minced shallot and Cremini, or your favorite mushrooms. If necessary, add a touch more olive oil. When they are getting close, add minced garlic and cook until soft. Deglaze with balsamic vinegar, then add stock, the browned beef, a bay leaf, salt and pepper. Cover and simmer for an hour, or until the beef is tender. You may need to add more stock, if it gets too thick. Take the pan off the heat and finish with minced flat leaf parsley, a round of black truffle oil and unsalted butter, stirring to melt the butter to create a glossy sauce. Remove the bay leaf and adjust the seasoning, if necessary. Just before serving, fold in crumbled blue cheese and spoon over your favorite prepared gluten free pasta.
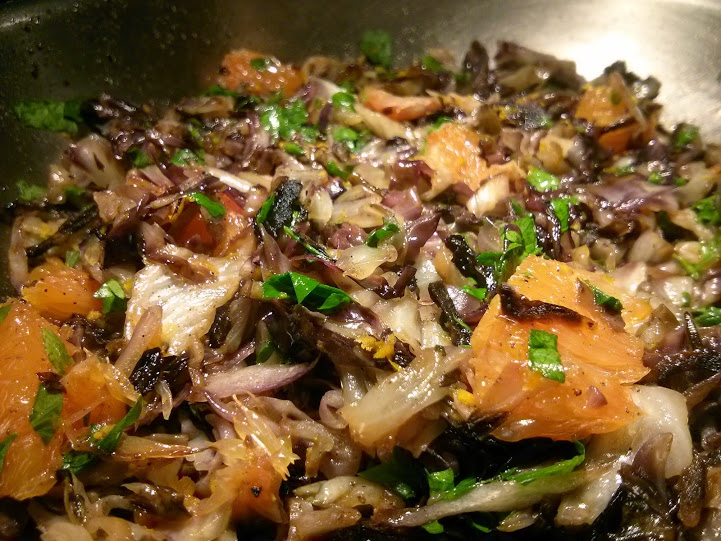
- Sunny Side Trip (1/6/2015)

Beautiful, sweet Cara Cara oranges are in season right now! Read more about this treat on Sunkist’s page. I thought I’d include them to create a “side trip” to somewhere sunny on our “Arm Chair Vacation Tour”!
The sweet, yet tangy flavor of these oranges lend themselves beautifully to a warm radicchio salad. Such beautiful colors! Your guests will be excited to try this dish. It is excellent as a side, with many different proteins, or it makes a memorable lunch entree with the addition of crumbled chevre and roasted pine nuts.
1 head radicchio, cored and thinly sliced across the grain
1/2 cup julienne red onion
Olive oil
Cardamom
1 Cara Cara orange
Italian flat leaf parsley
Salt and Pepper
Sherry Vinegar
Start the red onion and olive oil on a moderate temp. While that’s cooking, you will want to use a micro-plane and zest about half of the orange. Reserve this. Now, using a very sharp pairing knife, cut away the rind and pith; then cut out the segments, between the membranes. Keep a bowl below you, to catch the juices. Place the pretty supremes in the juice. When finished, wring any remaining juice from the membranes, then discard them. Set your juice and supremes aside.
As the onion is nearly finishing, add the cardamom directly to the pan. You want the heat to awaken the wonderful flavors of the spice. Toss that around a bit. Now add your radicchio. Don’t worry that you have too much, it is going to wilt quite a lot. Add salt, pepper and the orange zest. Cook until the radicchio is soft, but still retaining it’s color. Now add the orange segments and parsley. Cook just until the orange is warmed thru. Cara Cara’s are less acidic, and your dish needs a touch to bring it to it’s full potential, so add about a half teaspoon of good quality sherry vinegar and toss thru.
If you are serving as a lunch entree, add the crumbled chevre and roasted pine nuts at the very end, as well.
Enjoy your trip! Remember to take pictures!
- No Passport Needed (1/4/2015)

Balsamico e Burro! Park me in a chair, tighten my seat belt and hand me a fork! An ‘armchair’ vacation made in culinary heaven!
This fresh Coho Salmon, wrapped with Speck prosciutto, in Balsamic, garlic and butter sauce will induce severe ‘Vacation’ brain. It’s pretty easy to create, too!
Salmon, boned and cut into 6 oz portions
Speck prosciutto, have thinly sliced when you purchase
Fresh rosemary, finely minced
Shallot, julienne
Garlic, thinly sliced
Cold unsalted butter, cut into large cubes
Salt and pepper
Fresh Italian parsley, minced
Extra virgin olive oil
Salt and pepper the salmon fillets. Massage a small amount of the minced rosemary into each. Wrap with a slice of Speck Prosciutto. Heat a small amount of oil in a thick bottom saute pan. When it’s hot, add the salmon, top side down first. Make sure the Speck stays in place. When the first side is done, carefully turn the fish over in the pan. As it’s cooking, add the julienne shallot and garlic. Watch that you don’t over cook the garlic! When the fish is done, transfer to a plate to rest and finish cooking. When the shallot and garlic are sweated and lightly browning, add balsamic vinegar. Reduce 75% of the liquid. Take the pan off the heat and add a small amount of the butter. Whisk until dissolved. Add more butter. When you have a beautiful glossy sauce, quickly add the parsley and you’re done! Quickly plate the salmon and top with the Balsamico e burro.
The dish above featured low carb and gluten free steamed spaghetti squash that has been tossed with a lovely Marinara sauce and Pecorino Romano. The fresh beans were cooked with more of the lovely Speck.
The best kind of vacation! Travel anywhere you want for the price of a meal and no suitcase to unpack later!
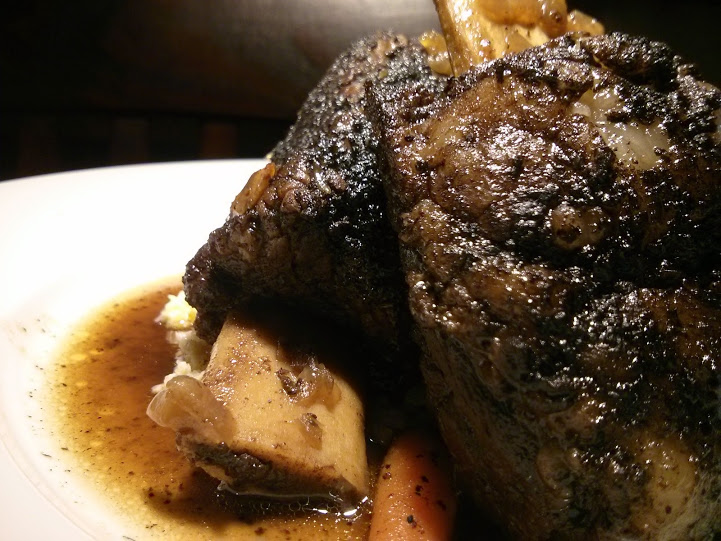
- Bitter Bones (12/29/2014)

Short ribs are always a favorite! I don’t often repeat a recipe or concept, but I do love these braised with a rich dark beer. Unfortunately, beer typically has a gluten base. To reproduce the flavors, I started by breaking down the flavors the beer would impart. Coffee, chocolate, bitter… Okay! That’s not hard at all.
To begin, I used some ground Midnight Blend, Classic Italian Roast from The Vashon Island Coffee Roasterie. I picked up a bag on Sunday, while doing a bit of a day trip to the island.
Next, I added some of my favorite Mayan Cocoa from World Spice, some ground urfa peppers for a hint of heat, then cinnamon, salt and freshly ground black pepper. What a wonderful smelling rub! Don’t be stingy!
After searing, I added yellow onion, orange peel and bay leaf, deglazing with spiced rum. Than, stock, to bring up the liquid and a healthy drizzle of real maple syrup to balance all those beautiful bitter flavors from the coffee, orange peel and unsweetened cocoa. Into the oven! Yeah, I do realize how much my neighbors hate me; smelling so many lovely dishes…
I served my bitter bones with polenta; dotted with minced seeded jalapeno and finished with creamy chevre and a squeeze of fresh lime to wake everything up.
Enjoy!
- Oh, Coconuts! (12/24/2014)

Take a stroll down a different path. Skip traditional dull Winter recipes…
Spice up tonight with Vietnamese Sweet Coconut Pork. One of the pretty blends I bought on my recent foray to Savory Spice Shop at Alderwood, is an enticing Vietnamese Sweet Lemon Curry. Joy in a jar!!
Turmeric, lemongrass, cumin, black pepper, paprika, coriander, garlic, cardamom, sugar, salt and a myriad of this and that inspired this dish. I got the meal started by, using the blend as a rub on pork tenderloin. Once browned in pure sesame oil, the little piggy popped happily into the oven to finish. Meanwhile, I sauteed yellow pepper, seeded jalapeno, onion, fresh ginger and garlic in natural coconut oil.
When the tenderloins were close, they were moved to a plate and the cast iron pan returned to the stove top where I added a round of silver rum to deglaze. With that bubbling merrily, it was time for some stock and juice from half of a large fresh lime. A good shake more of the Lemon Curry added layers of additional flavors. Just as the sauce was finished reducing I added a handful of sweet flake coconut.
Serve over a bed of steamed rice. The pic above features Basmati, since I seem to have an abundance currently. Jasmine or another of your favorites are excellent ideas.
Happy Holidays to all!!
- The Sin-less Seven (12/23/2014)

Alspice…Black Pepper…Cinnamon…Clove…Fenugreek…Nutmeg…Ginger, a lively group of ‘friends’ hailing from Lebanon that I picked up at Seattle’s Spanish Table recently. They made the perfect addition to my pre-Christmas ‘exotic culinary adventures’.
This is a cozy meal using roast lamb, butternut squash, spinach, onion, cilantro, a teaspoon of tomato paste, toasted pine nuts, chicken stock and plenty of Lebanese Seven Spice. I served it over brown rice that I steamed with some bits of orange rind. Quick and easy. Now back to wrapping those Christmas gifts!
- The Cow and The Toy Shop (12/22/2014)
It was probably a steer, but it didn’t seem overly important at the time. Long story, short, I got a hella deal on a smallish whole New York. Perfect for home! I cleaned it up and cut ten beautiful thick steaks. Ummmmmhmmmmmm!
As to the Toy Shop, I discovered a new, to me, spice shop at the entrance to Alderwood mall. I’m not much of a mall shopper, but thought it might be amusing to wander amongst the suburban Christmas shoppers for an afternoon. Yeah, I know I’m fairly strange… LOL
To a Chef, an unexplored spice shop is the ultimate ‘Toy’ experience! “Savory Spice Shop” was all kinds of fun! So many pretty jars of tantalizing smells, tastes and colors!!
My basket of goodies included some lovely fresh, moist, crushed Urfa peppers. These delights hail from Turkey. They are a beautiful nearly black color. The heat isn’t massive; more the sneak up on you, variety. A wonderful ingredient to cook with! I simply rubbed a couple of steaks down with the Urfa and some salt.
To make the dish pictured, allow the steaks to come up to room temperature, then sear them in a hot cast iron skillet and place them in a 400 degree oven. When they are close to the desired temp, remove them to a plate to rest. Use the pan to make a beautiful mushroom sauce.
My steaks were fairly lean, so I added a touch more olive oil and sauteed minced onion and sliced crimini mushrooms. Other mushrooms would be excellent, too. When my mushrooms were close to done, I added some minced garlic, browned that a bit and deglazed with some red wine. Once that reduced I added chicken stock, a teaspoon of organic tomato paste, fresh dried oregano and salt. You can reduce this quickly, if you have time to watch it, or slowly, if you are busy with other tasks. Once it has reduced down to a fairly thick consistency, remove from the heat and begin ‘mounting’ with unsalted butter, stirring in each pat before adding another, until you have a glossy sauce. The butter, not only makes the sauce pretty, it is also mellowing the acid of the wine and heat from the peppers. This allows the full flavor of the meat and peppers to balance.
Enjoy!
- Sacrifices (12/19/2014)
World Spice’s Mayan Cocoa always makes me think of sacrifices. Not MINE, thank you very much! Chocolate…sacrifice… Nope! I feel the Mayans of old sacrificed enough. It’s covered.
I ran across a small package of this delectable combo while cleaning out my spice cupboard. Dreary December evenings call for interesting dishes with bold exotic elements. With a bite of this crazy good dish in your mouth, you will simply no longer care what the weather is doing outside!
Mayan Cocoa is a blend of deep chocolate, mellow chile, true cinnamon and allspice from World Market in Seattle. https://www.worldspice.com/blends/mayan-cocoa If you aren’t nearby, they definitely ship all their lovely wares. Check out the website. If you’re in town, wander down there. The heavenly smell of the shop, alone, is worth the parking and hills.
Mayan Cocoa Encrusted Pork Tenderloin
Pork tenderloin, trimmed of waste. Cut into portions. Each one will serve 2-3 guests
Mayan Cocoa
Salt
Oil for searing the pork. I like coconut oil for this, but olive is always a great choice
Chicken stock
Rum
Fresh lime
Simply rub the portions with the cocoa and salt liberally. When your oil is heated, add the pork. Brown lightly on all sides then put the pan into the oven at 350 degrees. It will take roughly 15 minutes to finish cooking. Since the tenderloin size can vary, you will want to keep a close eye on them. Over cooked pork is so dry and flavorless.
When it’s close to done, remove from the oven and place the pork on a plate to rest while you make the sauce. Now place the pan on the stove top. Bring the temperature up, if it has cooled down. Add a round of rum, preferably a spice rum with vanilla notes. If you are using gas, this will flame up. Stir to deglaze any bits from the pan, add stock and a squeeze of fresh lime. Reduce most of the way. Season.
While the sauce is finishing, slice the pork into rounds and plate. The cocoa will have added a touch of pink to the cooked meat. Don’t be alarmed. Drizzle with the sauce immediately and serve.
I accompanied my dish with a combo of sweet potato and yam sauteed with onion and seeded jalapeno.
This splendid meal is free of Gluten, Dairy, Soy, Corn, Nuts and Eggs.
- Gonners (11/30/2014)
The game is on. The ‘fans’ are working up an appetite. You are frightened to open the fridge. That left over Thanksgiving turkey awaits. Every creative cell in your body is screaming NOOOOOO!!! You can’t even consider looking at another bite of the sacrificial beast, or worse, the accusatory glare of your family, should you consider it, but…
Heck, just make some Gonners, Turkey Tacos with Pumpkin Seed Mole! You know you want to… Besides, it’s easy and it’s good for your ‘fans’! No gluten, soy or tree nuts and only optional dairy
Pumpkin Seed Mole
Poblano and serrano peppers, oil roasted, peeled, seeded, chopped
Jalpeno, seeded and minced
Yellow onion, chopped
Garlic, fresh, minced
Oil to cook vegetables note: a true mole is best with lard, but olive oil will work fine in this
Pumpkin seeds
Coriander, ground
Chicken stock, note: if you are making a vegetarian dish with the mole, vegetable stock is a great option
Cilantro, chopped
Flat leaf parsley, chopped
Salt and pepper
Fresh lime
Using a cast iron pan, dry roast the pumpkin seeds over moderately high heat. When they are nearly done, add the coriander. Keep the pan moving, shake it gently, so the spice doesn’t burn. You need it toasted to release it’s best flavors. Add lard/oil and onion. Cook until it begins to soften, add the garlic, do not brown this. Add the chopped peppers and cook for a bit. Add enough stock to moisten. Keep cooking, adding more stock as needed. You want to get the peppers and onion to begin breaking down. You can do this ‘green’ mole fast, over higher heat then most brown moles that need time to develop their complex flavors. If you aren’t in a hurry, turn the burner all the way down and let it do it’s thing.
When you are ready to finish your sauce, add the chopped herbs, salt and pepper. Cook just until herbs are heated thru. Using an immersion blender, carefully emulsify your mole. Don’t get burned! Add fresh lime juice to taste and serve with warm shredded turkey and finely shredded romaine lettuce or napa cabbage, in corn tortillas – preferably fresh ones, you just made, if possible (it’s pretty easy!) For those that can enjoy dairy, some cotija would be lovely!
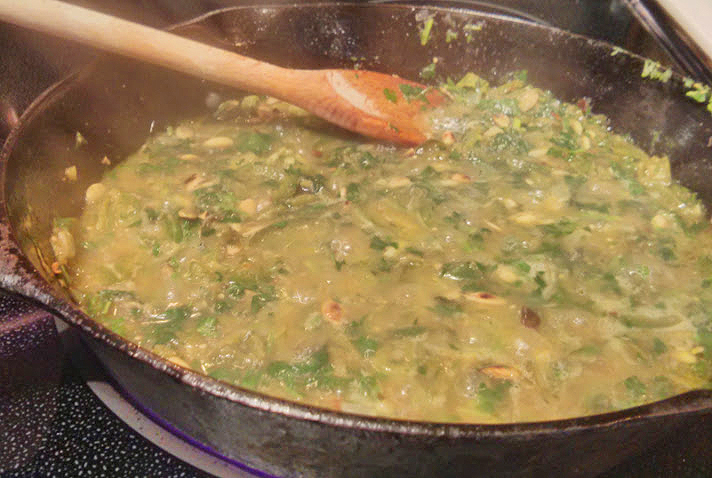
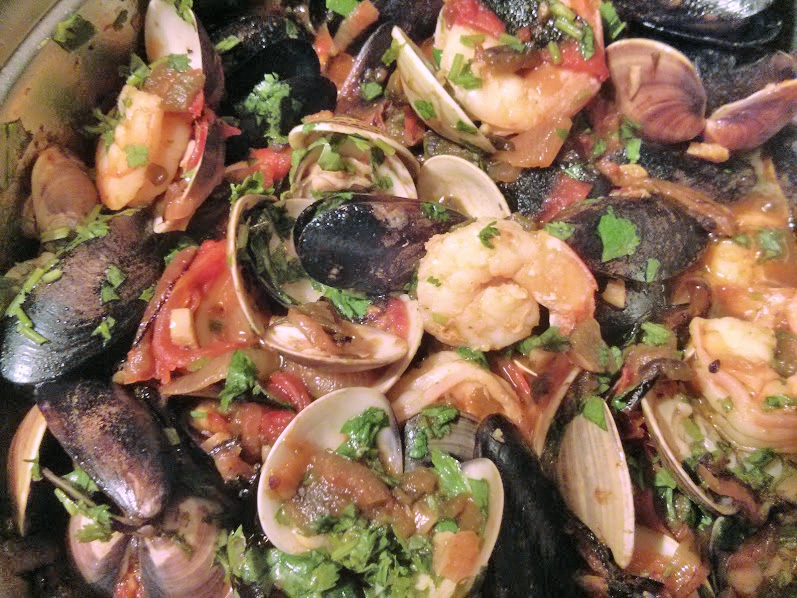
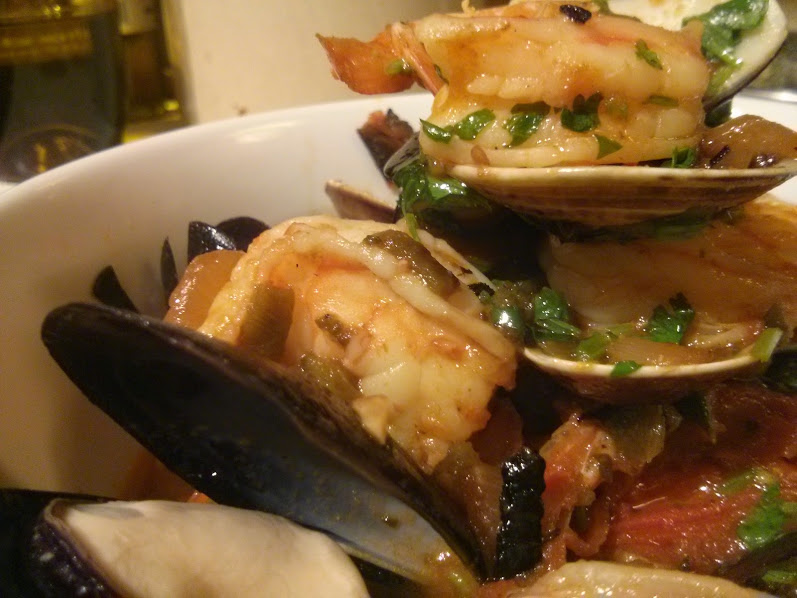
- Twas The Night Before Turkey (11/25/2014)

There are those days… just before a big feast holiday, when it’s difficult to get excited about cooking, let alone being creative. The kitchen is ready. The fridge is stuffed to the gills with all the necessities your upcoming throng expects. Unfortunately, you are hungry TODAY! Others that occupy your home are giving you ‘the look’. The phone is right there. Pizza would be so easy, but you are going to feel so miserable after you eat all that gluten and dairy and… Yeah. I know you realize this. It happens in every well meaning kitchen.
Mariscos Ranchero
Roma tomatoes, quartered
Yellow onion, 1/2 inch slices
Poblano peppers
Optional additional hotter peppers
Garlic, minced
Stock
Prawns, shelled, cleaned
Hard shell clams, cleaned
Mussels, debearded, clean
Cilantro, chopped
Salt and pepper
I like to make the sauce ahead, then finish cooking the shellfish right before serving.
Place tomatoes, onions and peppers on a baking sheet under the broiler. Keep an eye on the peppers. You just want to blister the skins. Keep turning them until you have blistered the entire surface. Wrap them in a paper towel. Finish cooking the tomatoes and onion until they begin to blacken.
When the peppers are cool enough to handle, peel them and discard the seeds and membrane. Rough chop.
Rough chop the onions and cook in a small amount of oil. Add the garlic when they are nearly done. Cook quickly and add the chopped peppers and the tomatoes. Cook on medium until the vegetables begin to break down a bit. Add enough stock to moisten. Season with salt and pepper. Set sauce aside unless you are cooking the shellfish to serve now.
To finish, increase the stock to a just visible level. Bring the sauce to a simmer. Add all the shellfish. Place a lid over the pan. It will only take a few minutes for everything to cook. The clams and mussels will be open when they are done. Toss with fresh cilantro and put into individual serving bowls.
Serve with some warm gluten free bread.

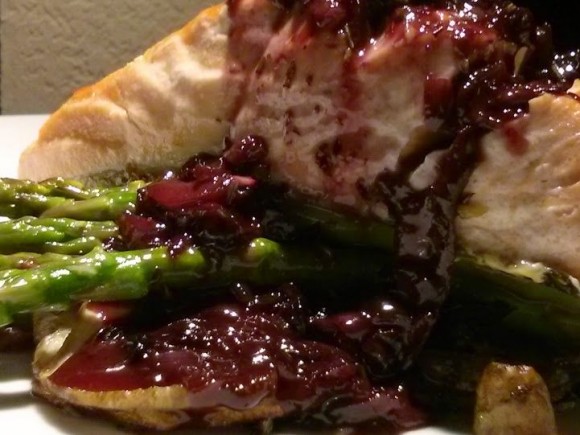
- Pretty Pair (11/21/2014)

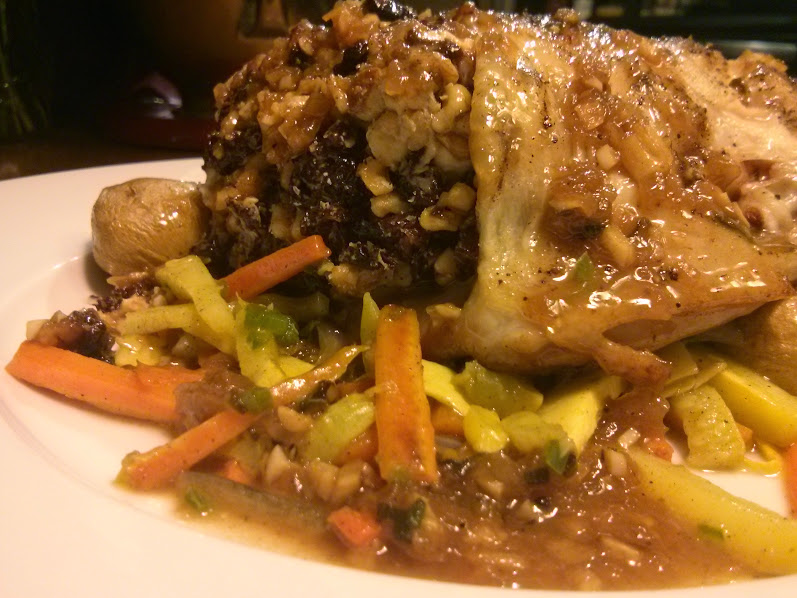
Such a pretty pair of Organic chicken breasts! With thoughts of the holiday frenzy swirling about my brain, I was inspired to do a little preliminary stuffing!
Dried cherries, walnuts and cream cheese went into the pocket I cut, after a couple hours in an apple studded brine to guarantee these beauties would live up to their destiny.
Fresh sage and butter under the skin. A quick brown to crisp, then into the oven!
Julienne carrots and yellow squash, red onion, and minced seeded jalapeno were sauteed quickly with a dash of cinnamon and titch of cardamom to create an extra layer of flavor when paired with the chicken and stuffing.
While the breasts enjoyed a moment of leisure, I made a sauce from the dripping; sauteing finely minced onion and garlic, deglazed with stock and finished with a splash of balsamic vinegar.
Simple, beautiful and wonderful! One of the dishes that you can put together in under thirty minutes, with a little pre-planning. Keep it in mind when your anticipated Elf duties start to seriously encroach on your time.
Like all the recipes I post of Fearless Feast
gluten free
soy free
This one does contain nuts and dairy. For a non dairy approach consider mixing prepared quinoa with the cherries for a wonderful stuffing.
- Black Sheep Chili (11/19/2014)
Don’t you just hate realizing you have on an outfit just like someone else? Well, I’m the same way with my cooking. I simply do not possess the “do it just like everyone else always has” gene. I gotta do my own thing; be the ‘black sheep’!
Honestly, my greatest fantasy is to never cook the exact same dish twice. Yes, I realize this doesn’t work in restaurant cuisine. But, I’m at home, so NO RULES!!
Black Sheep Chili features, yeah you know it, lamb! Ground lamb is something I love to experiment with. Years back, I served a lamb burger at my Seattle restaurant, 94 Stewart that got a write up in New York, alongside the burger from Daniel, of four star fame.
You will find ground lamb to have all the flavor you are looking for in ground beef. You know, that tantalizing meaty scent that makes your mouth water? But, when you taste the beef, it simply does not follow thru with the flavor. More then a let down; don’t you feel totally cheated?!?!
Using lamb in a chili is definitely a bold move, though. The slow cooking of the meat with onions, sweet and hot pepper, garlic, and tomatoes will result in an increase to the true earthy lamb flavor. As a burger, the fast sear doesn’t accentuate those qualities like braising does. That said, I chose to play up the spices a little differently. Really, using cumin, cinnamon, coriander and oregano don’t sound like such unusual choices, but changing the ratios of one to another, with lamb and they become a Middle Eastern olfactory bizarre.
Add some of your favorite beans, salt to taste, a titch of sherry vinegar to balance the flavors and top with fresh cilantro and sheep milk feta cheese. Welcome to my world as a well adjusted Black Sheep!
- Painless Pasta (11/18/2014)

Using one of the many Gluten Free pastas on the market these days, you can create impressive dishes for your guests. It’s up to you, whether you tell them they are better for them!
The pretty Caprese Pasta, pictured here, is a dish I served at my last restaurant.
All you need, besides gluten free pasta, are tomatoes, basil, mozzarella, olive oil, mire poix, fresh lemon juice and fresh egg.
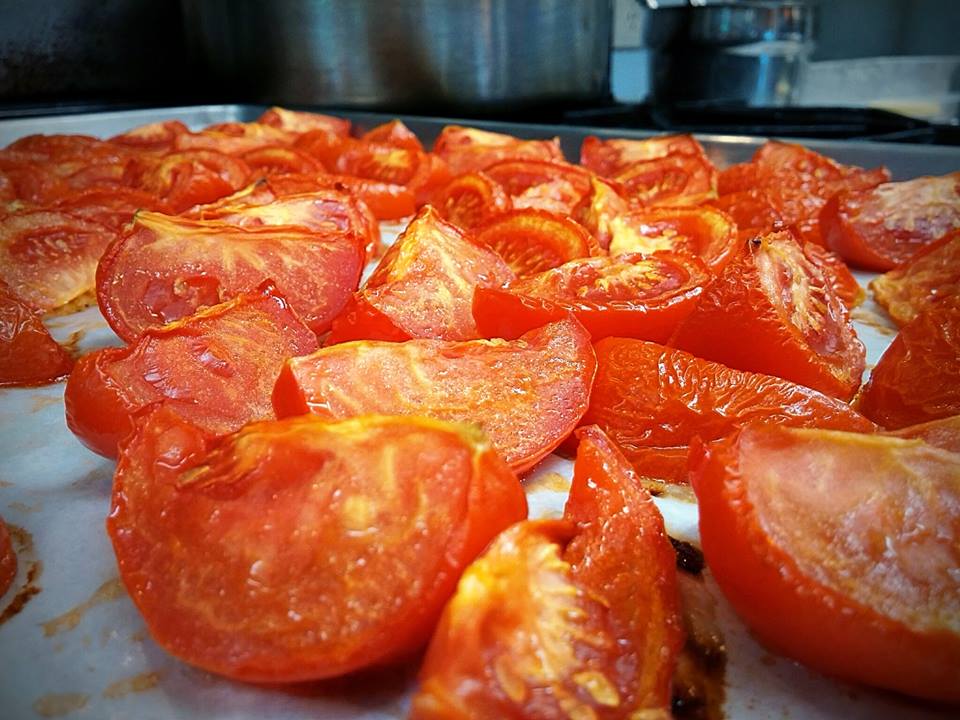
For the tomato you can use some of the beautiful roasted tomatoes I featured in an earlier post, sun dried tomatoes, or even good quality canned fire roasted tomato. You can use fresh, but during the Winter months they have so little flavor all they add is color.
The pictured dish features micro-basil. If those aren’t available, you can chiffinade fresh leaves.
You will want fresh mozzarella, not drier pizza mozzarella for this dish. If you get lucky and find some di bufala mozzarella, do a full on HAPPY DANCE!! This is an incredible treat.
To make the dish, simply saute your mire poix in a small amount of olive oil. Add the tomatoes to heat thru. Add a few drops of fresh lemon juice to boost the fresh flavors of the dish. At the last moment of cooking, drop in your chopped mozzarella. Do not cook it; just get it to begin warming so it will melt. Turn off the burner and add cooked Gluten Free pasta, directly from the boiling water.* Immediately add a raw egg yolk. Toss it thru the hot pasta to cook it. Do NOT let it sit! Visible pieces of cooked egg will create a very unappetizing looking dish. Toss in salt and pepper, as desired. If the dish isn’t ‘saucy’ enough, spoon some of the pasta cooking water in and toss. Add the fresh basil, folding it in. Serve immediately.
note: Yes, you can make the dish without the egg, if this concerns you. It does create the richness you are looking for in the finished dish, though. You could add a small amount of organic cream, instead. If you are allergic to eggs, be aware that most fresh pasta is made with egg. Look at dried pastas, carefully reading the ingredients, to find another option.
* Do not over drain your pasta. You want some of the liquid. When pasta is over drained it begins soaking up any moisture available in the dish. You end up with a dish that seems under sauced and dry.
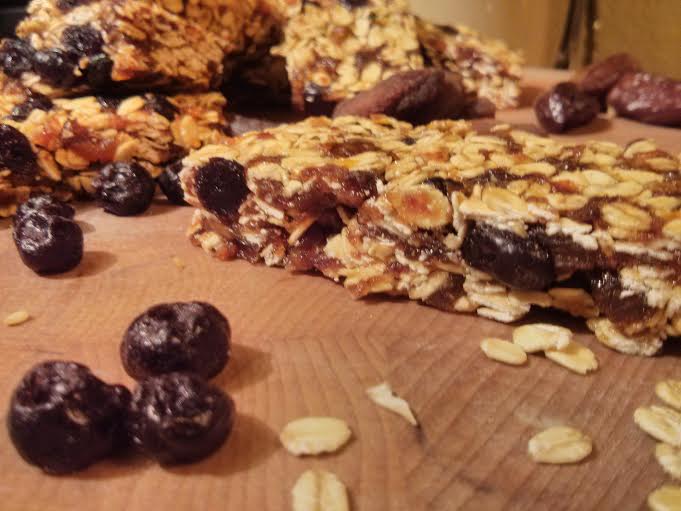
- Don’t give up! (11/5/2014)
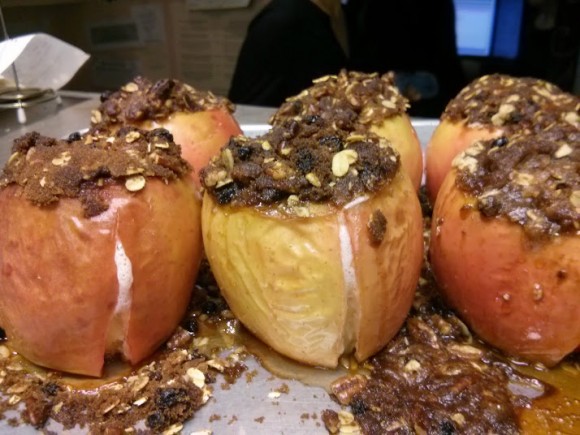
If you are allergic/sensitive to both gluten and dairy, you know that dessert is seldom an option for you. It’s just sad to sit there reading all those incredible restaurant dessert menus… “Hmmmm… maybe this one? Oh, no it has dairy. That one? Nope, gluten… I guess I’ll have the sorbet…” Woohoo! Sorbet, yeah… It’s COLD out, I WANT SOMETHING RICH AND WARM AND WONDERFUL!!
And you can have it!
The Fall apple crop is rolling through the produce aisles. So many to pick from! What’s your favorite? Personally, I like to cook with Pink Ladies, but there are so many that will work.
Stuffed Apples
Gluten free oats
Walnuts, unless you are allergic to them
Raisins or substitute chopped dates or currants
Cinnamon
Extra virgin coconut oil
Agave to taste
Dash of salt
Fresh Apples, 1 per guest
Simply mix everything, except the apples, together in a mixer or by hand. Fill cored apples. note: when coring, leave some fruit at the bottom, to keep filling from melting out. Place filled apples on a baking sheet. Line with parchment first, if you have it. Way less mess! Pop into a 350 degree oven until the apples soften. This will vary with apple variety and moisture content. You will need to watch them and see. Usually, I know something is done, when I begin to smell it!
This dish can easily be made ahead and then reheated. If they are in a low temp oven during the meal, you will totally torment your guests with the incredible scent…
- Flowers, for me! (10/31/2014)
 Chef’s favorite flower? Cauliflower, of course!
I love the texture of steamed cauliflower. It has such a comfort aspect! When you have to avoid so many other culinary vices, due to allergies and sensitivities, one simply finds comfort in other dishes.
Honestly, I’m perfectly happy just snacking on it, as is, but sometimes one needs to dress up a bit. Have you ever tried making Carrot Top Pesto? It’s easy, it’s beautiful, it has an immense level of flavor and your compatriots ’round the table will be thrilled. The pictured dish was served with some lovely pork chops.
Carrot Top Pesto
3-4 Cloves of garlic
1/4 C Pine Nuts, toasted
Fresh carrot tops from 2-3 carrots, organic
Olive oil
Salt
Lemon Juice
Simply drop your garlic and cooled pine nuts into the food processor. When they are rough chopped add the carrot tops and a tablespoon or so of olive oil. Go for it. If the greens won’t chop, push them down with a rubber scraper and add a touch more olive oil. When everything is emulsified add a dash of salt, a small squeeze of fresh lemon juice and more olive oil until you have the desired texture.
Carrot Top Pesto can be used in many of the same ways you would use Basil Pesto. I garnished my cauliflower and pesto dish with some Pecorino Romano cheese. Many individuals with dairy sensitivity can indulge in cheeses made from sheep and/or goat milk. Pecorino means sheep. Do check labels, like always, though.
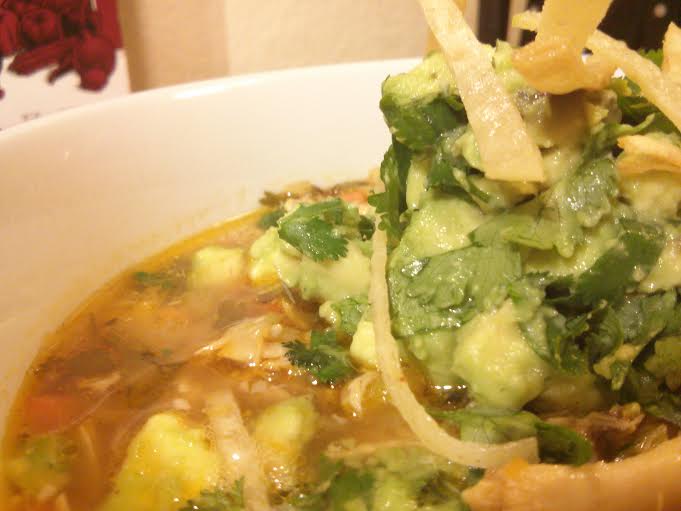
- Penance Soup (10/28/2014)

The roast chicken I made last night was perfect! So good that, upon opening the refrigerator this morning, I am faced with the evidence of our sins; over indulgence; gluttony… No reminder quite as stern, as a nearly decimated chicken carcass. Not picked totally clean, mind you! No, we showed a certain level of restrain; mostly the result of food coma onset.
So, how does one atone for this? What to do with the gleanings of this once proud bird? I’m thinking soup!
While contemplating the thick puddle of fat my once feathered culinary cohort is residing in, I conclude that overindulgence is something he/she could have clearly related to. Fat = Flavor! This is gonna be wonderful stock to make my soup with. (If you aren’t familiar with making stock from scratch, I have included instruction at the bottom of the recipe)
Further perusal of the fridge’s deeper recesses produces a poblano, one lonely roma tomato, an onion, half of a delicata squash, a couple carrots and some celery. I’m getting ideas! Diligence yields fresh corn tortillas, cilantro and avocado! Yup! I’m going to make
Tortilla Soup
This can be a complicated soup or a very simple soup. I think of it as Mexican Refrigerator Soup. Once you have the basics, there are many additional ingredients that are good in it.
If you are in a hurry, grab some commercial stock and do a quick poach with fresh chicken. I prefer to use thighs for the flavor, but you can use breast meat if you would rather.
Mire poix ~ minced onion, carrot & celery
Olive oil
Garlic, minced
Cumin
Coriander
Cinnamon
Mildly Hot Pepper – you can use whatever heat level you enjoy. If using a larger pepper, like a poblano, you will need to roast and peel it before mincing. The seeds contain a lot of the heat. I usually discard them. I want the flavors in balance.
Sweet red pepper, seeded and minced
Using a soup pot, start cooking the mire poix in the olive oil. You want to sweat it down with moderate heat. When it’s about half done, add the peppers, and garlic. Continue to cook. I like to also put my spices in at this time. The heat opens up the flavors for maximum impact. When the vegetables are done add the rest of the ingredients
Chicken stock
Chopped or shredded chicken meat
Tomato – I prefer to have the chicken element at the forefront, so chose to use a small amount of V-8. If you want more tomato, by all means use your favorite tomato puree or even roasted & chopped tomato.
Cilantro, chopped
Salt and pepper to taste
Other ingredients that work well:
Beans, corn, winter squash, and/or a small amount of chiffonade baby kale at the finish
Corn tortillas (check ingredients to be sure they do not contain any wheat) Cut into julienne strips
Avocado, cut into small bites
Cilantro rough chopped
Fresh Lime
Fry the tortillas just before it’s time to plate. Fry them quickly, either in a deep fryer or using stove top method. Toss with salt and allow to drain.
Mix the avocado, cilantro and lime in a bowl. Add salt and pepper to taste.
To plate: place some fried tortilla in the bottom of the bowl. Top with a ladle of soup. Top with the avocado salad. Garnish with additional tortilla strips and serve.
This is a fun recipe to play around with. It’s super easy to avoid: gluten, soy, nuts, and dairy
How to make stock from left over chicken
Remove as much of the meat as possible. Set aside. Place the carcass in a stock pot and cover with cold water. Add aromatics, ie: onion, celery, carrot, fresh lemon, bay leaf, cinnamon stick. I do NOT add salt to my stock. I prefer to have total control of the salt levels in the dishes I make. Salt in the stock can be quite the ‘wild card’ detail to work around. Making stock from a left over roast chicken, can have some salt remaining from the initial roasting. Just be aware of it.
Allow your stock to come to a full simmer and hold it there for an hour, or more. The longer it cooks, the more flavor it will have.
For soup, I don’t generally remove the resulting fat. I want that flavor in the finished product. If I am using the stock for sauces, etc. I definitely do not want it. To remove, allow the stock to cool in the refrigerator. The health department recommends the stock be no more then two inches deep while cooling. This should be a small enough batch of stock that that won’t be a problem. Do be aware of other ingredients in the refrigerator stored near the cooling liquid. You don’t want them to become warm.
Once the liquid is fully cooled, the fat will rise to the surface. Simply scoop it off.
It is possible to carefully skim off a lot of the fat with a ladle, while it’s hot, but cooling first gets more and gives a chance for the flavors in the fat to meld with the liquid.
- Grrrrrrrrrrrrrr….. (10/22/2014)
 Gr…………………anola bars! Blueberry! Gluten Free Granola Bars!
Do you live with lovers of granola bars? Those individuals that are always in a hurry/snack seekers/lovers of seemingly healthy morsels to nosh on at random times?
I assume you’ve noticed the increasing array of choices, as well as the way a handful of these beauties make you do a double take when the grocery checker gives you the total for that ONE bag of groceries! Now, I must inquire… have you read the INGREDIENTS? Some brands, actually ARE healthy, but, many sadly are not.
I’ve been playing around with some recipes. This is today’s favorite! The peanut butter ones disappeared before I could get any pictures. I’m told they taste exactly like peanut butter cookies. I’ll share that recipe soon. You got this picture because I’m home alone.
Gluten Free Blueberry Granola Bars
This recipe is also free of: Dairy, nuts, soy, corn and processed sugar. Don’t tell the fam, but they are even vegan…
1 1/2 Cups Toasted Gluten Free rolled oats (place on a baking sheet in a 350 degree oven, shaking occasionally, until lightly browned)
1 Cup pitted dates, emulsified in a food processor
3/4 Cup dried apricots, minced either with a food processor or by hand. note: I used unsulfured, but that’s a personal choice.
3/4 Cup dried blueberries
1/2 tsp kosher salt
1/3 C hot agave syrup
While the oats are in the oven, emulsify the dates and mince the apricots. Place in a mixing bowl with the blueberries and salt. When the oats are done, immediately add to the fruit mixture. Heat the agave in the microwave until just about to boil. Pour this into the bowl and mix everything together. Press the granola mixture into a plastic wrap lined 8×8 baking dish. Refrigerate. When they are fully chilled and firm, cut into bars, wrap individually and put back into the fridge.
Caution: Stampede Warning!
- Mouth Full of Summer (10/14/2014)

Summer’s harvest of gorgeous, ripe tomatoes, in all their glory, is a rapidly diminishing memory. Sigh… I learned a trick, years ago, to make tomatoes taste good all year round!
Roasting tomatoes is super easy and does amazing things for the flavor. As a bonus, they have no gluten, egg, dairy, corn, nuts, or any other allergens added, unless you are allergic to tomatoes or the nightshade family!!
This is a phenomenal ingredient to have in the fridge. Layer them on a sandwich. (By the way, we made an astonishing find; Franz has a really good gluten free bread out on the market! I know?!?!) You can also toss them with gluten free pasta, in a salad, use with fresh mozzarella for a caprese, add them to soup, or just snack on them!
One of my secrets, as a Chef, is my mystery ingredient stash… I keep such things in my fridge to add to dishes and make them magical with little or no effort. Actually, I’m pretty lazy. I’d much rather be hanging out with my family or dinner guests, instead of slaving away in the kitchen during those last hours before dinner is served. Ingredients like this will get you that Culinary Goddess Tiara you’re eying…
Roasted Tomatoes
It feels like I’m cheating to call this a recipe. Really, you just need some tomatoes, olive oil, salt and pepper. Roma tomatoes are your best out-of-season option, generally. Once washed, you will want to quarter them lengthwise. If they are really large ones, cut into six pieces, if you wish. Put them in a non reactive bowl. Toss with a light dressing of olive oil and add salt and pepper to taste. Spread them in a single layer on a baking sheet lined with parchment paper. You don’t have to use the paper, but it sure makes cleanup a lot easier.
You are going to put them in a 350 degree oven and let them roast until they start to soften; or cook them more if you prefer. This will be anywhere from 45 minutes to an hour and a half. It totally depends on the moisture level of your tomatoes. You can also do them in a slower, 300 degree oven for a longer period to make them a bit more intensely flavored. Which ever way you like!
- Punkin’ Eater! (10/13/2014)
It’s so fun to walk by the massive piles of pumpkins outside the grocery stores. I especially get a kick out of the monster pumpkins displayed in front of Central Market on Saturday. Being me, my first thought involved, “How many pumpkin pies, cheesecakes, cookies, muffins, crisps, batches of pumpkin soup, pumpkin souffle, pumpkin hash… would one of those magnificent behemoths make?” Yeah, I know, those aren’t ‘sugar pumpkins’, grown for baking, but still… So, I came home and created a new gluten free Pumpkin Cookie recipe!

Gluten Free Maple Nut Pumpkin Cookies
- 2 sticks unsalted butter, at room temperature
- 1 1/2 cup packed C&H brown sugar
- 1/2 cup granulated sugar
- 1 large egg
- 2 cups Red Mill ‘1 to 1’ Gluten Free Baking flour
- 2 cups Certified Gluten Free Rolled Oats
- 1 teaspoon kosher salt
- 2 teaspoons ground cinnamon
- 1 1/2 teaspoon ground ginger
- 1/2 teaspoon ground nutmeg
- 1/2 teaspoon cloves
- 1 1/2 teaspoons baking powder
- 2 teaspoon Nielsen-Massey Madagascar Bourbon Pure Vanilla extract
1 (15-ounce) can Organic pumpkin purée
1/2 cup granulated Maple Sugar and 1 cup finely ground Walnuts to roll cookies in.
Preheat oven to 350 degrees
Cream the butter with the sugars. When beautifully whipped, add the egg and whip until fully integrated. Add the salt and the spices. Stir.
Put the oats and the baking flour in a separate bowl and stir them together until well blended. Put half this mixture into the bowl with the butter, sugar, etc. Add half the pumpkin. Stir. Carefully add the rest of the oat mixture and pumpkin until both are all in. Now add the baking powder and the vanilla. Stir until just mixed throughout the batter.
Using a spoon, drop a walnut sized round of batter into the sugar and walnut mixture. Carefully roll it around to cover. Batter is soft, but this is do-able. Place on a cookie sheet lined with parchment. Space cookies about 1 1/2 inches apart. Bake for about 15 minutes. The cookies should be light brown and somewhat firm to the touch. Remove to a cooling rack immediately upon taking them out of the oven. You don’t want the bottoms to continue cooking.
This would be a great cookie to take to work and NOT tell people they are good for them!
- The Difficulty of… (10/9/2014)
 The difficulty of cooking for someone that can’t eat gluten or dairy is especially hard at breakfast and brunch. While the fam is chowing down of waffles and pancakes and toast and biscuits and cinnamon rolls and muffins and scones and… well, you get the point. “I’ll have the boring eggs and bacon, please,” long suffering sigh….
So, let’s get creative with ingredients from the foods this person CAN have! Tortas are super easy, taste great and look impressive! The concept hails from both Italy and Spain . For best results, use a cast iron skillet to prepare the dish in. Single serving size pans, like in the picture, are fun to serve directly to the table on a charger plate.
In a nutshell, you simply throw some favorite ingredients in a pan; cooking raw ingredients in the pan first, add some scrambled raw egg and seasoning. Pop the entire creation into a preheated 450 degree oven until the eggs are set and serve!
The pictured dish was a Parco favorite.
1 raw Italian link (Read the ingredients! Many Sausages contain gluten, dairy and a host of other unnecessary things.)
Thinly sliced raw onion
Julienne strips of sweet red pepper or spicy pepper if you prefer. If using hot peppers, you may want to mince them so they aren’t just bites of heat in the finished dish.
Cook these ingredients with a small amount of olive oil directly in the cast iron pan. Once 90% done, add three well scrambled eggs, salt and pepper.
Put the pan in the oven.
When it’s done, eggs will be set, but still moist. Please don’t over cook or they will be rubbery.
I liked to serve the dish with a garnish of Earthbound Farms Wild Baby Arugula and one of my house made savory jams like sweet pepper jam or smoked jalapeno jam. You could use all manor of favorites from your fridge.
To complete, I served the Torta with fresh hash browns. For a more Spanish presentation, try frying up some par cooked potato in the pan with the protein and vegetables, then top with the eggs.
This is one of the recipes with endless possibility. Have fun and don’t be surprised when the rest of the family wants one, too.
- My Favorite Salad (10/6/2014)
This is an easy to prepare dish I created at my last restaurant. Kale is such a popular ingredient. I toyed with a couple different concepts, finally falling in love with this preparation featuring Organic Baby Kale. Earthbound Farms packages my favorite blends. Look for it in the packaged salad and greens aisle of your favorite grocery store. Like so many recipes I created for my restaurants, it is free of gluten, soy, and corn. This lovely dish also contains no nuts, egg or dairy. So unless you can’t eat bacon, it’s a crowd pleaser!
To prepare the salad:
Earthbound Farms Organic baby kale note: You can use larger kale, but must carefully remove all stem material and tear into bite sized pieces. These older greens will have a stronger flavor, but it’s all a matter of personal preference.
Crisp bacon crumbles I really like to use apple smoked bacon!
Bacon fat, reserved from cooking the bacon
Braggs Organic Apple Cider Vinegar
Thinly sliced fresh garlic
Maple Sugar
Salt and Pepper to taste
Place the bacon fat in a sauce pan. note: you can substitute olive oil for some of the bacon fat, if you have concern at consuming the bacon fat. Be aware that the flavor for the salad is primarily from this ingredient, though. Add approximately half as much vinegar as fat. When these are beginning to get hot, add the garlic. Cook quickly, remove the pan from the heat and immediately pour over the clean baby kale. Toss gently. Add 1/2 to 1 teaspoon of maple sugar and s&p to taste. If substituting olive oil for part of the fat, you will need to season it heavier to compensate. Finish tossing and serve immediately. This is not a dish that can be left to sit.
- A Little Something On The Side (10/2/2014)
 So often we may have a great idea for a dinner entree, but what on earth should we serve with it??? If we could just come up with a side dish that is as outstanding as the main dish! It needs to complement, yet have just the right level of integrity to stand up to the item it is sharing a plate with. There’s also that whole time issue. Do you really want to spend hours, slaving over a bunch of different dishes?
This is a fun concept I have played with at a couple of my restaurants. It uses healthy root vegetables and has a similarity to risotto in preparation and texture. You can use yam, sweet potato, carrot, parsnip, turnips and/or celeriac (celery root). Do keep in mind, to use numerous items from the list you are going to end up with a sizable batch! So, invite friends over! Invite them early and they can help cut up the vegetables, too!
The dish in the picture is featuring celeriac. I made it to go with wine braised chicken and mushrooms. It is free of gluten, soy, corn, egg, nut, and is dairy free if made without the butter. Using vegetable stock, makes it vegan as well.
Fall Celeriac ‘Risotto’
1 medium yellow onion, minced
1 smallish carrot, peeled and minced
2-3 cloves garlic, minced
1 whole celeriac, peeled and minced
2-3 fresh sage leaf, chiffonade
chicken or vegetable stock
butter, optional
Using a small amount of olive oil, saute the onion and carrot until softened. Add the garlic and cook until is begins to soften as well. Add the celeriac, sage and salt and pepper to taste. In the style of risotto, add a little stock at a time, cooking over medium heat, until your vegetables are nearly done. Taste for salt levels, adjust if needed. To finish, add the butter and allow to simmer for a bit to absorb the last little bit of liquid. If you accidentally put in too much liquid, drain it off and finish as above.
I kept seasoning in this dish fairly simple. I wanted the flavor of the vegetables to be the primary with the herbs and spice of the chicken I served with it, carrying the responsibility. Root vegetable risottos are a clean slate to play with different spice combinations. If you are unsure what to use, my favorite culinary book is The Flavor Bible by Karen Page and Andrew Dornenburg. It’s basically a chemistry book for chefs. It has concise lists of suggested additions to complement your other ingredients in a dish. This book is a great tool in any creative kitchen!
- Saturday Afternoon Corn Chowder (9/30/2014)

I had a heck of a time getting a picture of this seductive soup. The bowl was getting dragged away from me! It seems the culprit felt he had waited quite long enough and wanted it NOW! I can’t say that I blamed him. I had been fairly evil, overwhelming the house with the scent of first, roasted corn, then corn stock, then the bacon and onions, yeah… I think we all understand.
This isn’t a fast project, but it is easy and definitely worthy of your time! Pick up some fresh corn. Corn deteriorates very rapidly. You want to start cooking it as close as possible to when it was picked. Farmers Markets are much better then the grocery store. If you are near a field of corn, maybe you can buy some from the farmer. I got lucky and found some bi-color ears. Those are super sweet!
You will want to begin by roasting the ears, in their husks. Put them on a baking sheet in a 350 degree oven. When they start to brown and steam a bit, turn them over. The timing is pretty variable, dependent on how fresh your corn is. You are probably looking at 20-30 minutes, but it’s not an exact science.
When the corn has cooled enough to handle after roasting, you will need to shuck it. Once you have them all cleaned up, use a sharp knife to cut all the kernels from the cobs. Cut just to the base of the kernels, not the pith underneath. If it’s hard to cut, you are too deep. Put the corn in a bowl and set aside.
Place the denuded cobs into a sizable pot to make stock. Add one yellow onion, peeled and quartered, two celery stocks and one peeled carrot cut in 3-4 pieces. For aromatics, I would choose a small cinnamon stick and one good bay leaf. Fill the pot to about double the water to vegetables. Put it on to cook. Since this stock has no fat, you can cook it pretty briskly, unlike meat stocks that you need to simmer so the fat doesn’t emulsify into the liquid. Or, this part of the recipe can be started in the morning and simmered slowly for hours. You could even do it a day ahead. Just cover your cooked corn kernels and refrigerate.
When you’re ready to make the soup you will need two or three cups of small diced mire poix (carrot, onion, celery), a couple minced fresh hot peppers and good bacon. I like apple smoked bacon, in particular, especially for a recipe like this one. Cut the bacon into quarter inch pieces or smaller. Cook with the mire poix in a soup pot with a bit of olive oil. When it’s nearly done, add two minced cloves of fresh garlic. Do not over cook the garlic, or it will be bitter.
Strain your corn stock and add to the cooked vegetables. Toss in a tablespoon of salt and some fresh black pepper. If you would like potatoes in the soup, now is the time to add them. I found some German Butter Potatoes at the Lake City Farmers Market. If you can’t get to a Market, red potatoes or Yukon Golds would work, too. The German’s needed to be peeled, due to rough, pitted exteriors. If your potatoes have clean, unblemished thin skins, it’s up to you on that. A lot of time, I don’t peel them. I like the texture and color contrast in the finished soup. One to two cups of small diced potatoes will do. If you don’t have enough liquid, add either chicken stock or water to cover the vegetables. Now is a good time to peruse the spice cabinet for flavors that inspire. Coriander is a great choice. I also added a dash of African Cayenne. This is something they carry at World Spice on Western, below Pike Market. They are my favorite source for really fresh spices. (I’m planning a trip there soon. Watch for the post.) The African is hotter then regular cayenne. It also has a lot of complex flavor, making it a regular go-to in my spice array. Dried oregano completed my choices for now.
When the potatoes are done, add the cooked corn and cream to cover. Bring it back up to temperature. Add chopped flat leaf parsley and cilantro. Adjust the salt and pepper to taste. Use a touch of cider vinegar to really make those fresh flavors sing. I like Braggs Organic Cider Vinegar.
You just made some amazing healthy, gluten free soup! Watch out for the stampede headed your way! Enjoy!
- The Afternoon Quickie (9/29/2014)
Like you, I check out those easy looking packages on the store shelf in the gluten free section… I know that every cupboard doesn’t have the array of various ingredients I keep on hand, so I decided to give one a try.
I’ve always had pretty good luck with Red Mill products, so I picked up their Gluten Free Chocolate Chip Cookie Mix. Reading the ingredients, it appeared to have chocolate chips already in it, but, well… I wasn’t seeing them thru the cellophane and, let’s face it, it is pretty hard to have too many chocolate chips in chocolate chip cookies, so I picked up a bag of those, too. I also sought out my favorite secret ingredient for the ultimate in cookie texture; cream cheese. Let’s go make some cookies!!

Chef Celinda’s Version of Red Mill Gluten Free Chocolate Chip Cookies
Cream together:
1/2 cup butter
3 ounces cream cheese
Add one egg, as written on the package, whip it in until all emulsified.
Now, add the package of dry ingredients.
Stir, just until mixed. Add 1 cup of the additional chocolate chips. Mix.
You should anticipate your dough looking a bit dry, as noted on the package instructions. No worries. It will hold together when you form the balls.
You will want to cook them at 350 degrees in a regular oven or 325 degrees in a convection.
The package said to grease your cookie sheet. I was very skeptical of this and did a single cookie test first. No, do not grease the sheets. Some parchment paper on them would be excellent though. Way easier clean up.
Using your clean hands, form walnut sized balls of dough. Place them a couple inches apart on the tray. Flatten a bit with your palm. The mix is not overly sweet. If you like, these would be delightful rolled in sugar before placing them on the tray and cooking.
Follow the package instruction and bake until golden. Remove hot cookies immediately to a cooling wrap. Be careful, they are a bit delicate. Many ovens don’t have accurate thermostats, so keep an eye on your first batch, to see how long they take in your oven. If you have hot and cold spots in your unit, be sure and carefully turn the tray half way thru.
If you are allergic to dairy, you can use another fat, instead of butter. The cream cheese can be omitted, also, but the cookies will be more brittle.
These would be excellent with nuts, too! I’m sure you will have numerous willing guinea pigs standing by to test whatever combo you decide to try!
- It just might be love (9/26/2014)
You know when you bite into something new and the world slows down; the edges to things in your vision get a bit hazy; you need to consciously remember to breathe… Yeah, it was like that. I’m not sure how long I can go without another opportunity to make a complete swine of myself with these glorious rings.
Gluten Free Fried Delicata with Spiced Honey Glaze
Got your attention now, do I? But, before we get into recipes, are you familiar with Delicata Squash? You can find them at most grocery stores currently. I haven’t found any at the Farmers Markets get, but I’m hoping to. I have personally grown them in Washington state myself, so know it’s doable with our seasons.
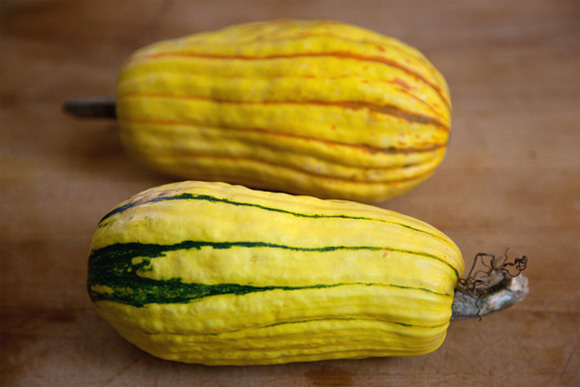
One of the primary reasons to get excited about these little guys, besides that they taste wonderful, is that they are the only Winter Squash you do not have to peel. Yes, the thin peels are entirely edible! Score! I don’t know about you, but peeling is NOT on my list of exciting and fun projects! Ha!
To make this dish, you will need to prep your squash. One will probably be enough for two servings. Well, at least the first time you eat them. Wash the squash and cut off the ends. You do remember the part about sharp knives we discussed in the last recipe? This is especially important when cutting something like this. They can be a bit ‘resistant’. When you are working with something that is hard to cut, you push harder. A dull knife will require more effort and being dull, will tend to go the path of less resistance; your finger… Need I say more? Once the ends are gone, now cut it in half, the short way. Using a pairing knife/peeler/spoon/whatever works, you are going to remove the seeds and membrane from the inside. Yeah, it’s a bit challenging, but worth it. Remember you didn’t have to peel it, too! When complete, you will have two hollow tubes. Now you are going to cut these into quarter inch thick rings. You can go thinner, but it’s pretty difficult to get them consistent. Thicker won’t have the texture, in the finished product, you are looking for. Set these aside.
You are going to need a method to fry them. I have a great little home deep fryer from Presto that I really like. Way less mess then doing it on the stove. Should you decide to purchase a fryer, the thing to look for is how much power it has. You want the one with the most, that you can find. An underpowered unit will not be able to keep up and your food will end up tasting greasy. Ick! If you are using a pan, you need something nice and stout with a heavy bottom. It needs to be large enough, so that the rings can submerge and the oil doesn’t come over the sides. Cast iron is always a good choice.
What kind of oil should you use? I have had the opportunity to cook with a lot of different oils and fats in my 35 year career. I prefer to use things without additives or excessive processing. In honesty, my very favorite to work with is lard. The medical studies are now starting to agree with me, finally, that these are not bad for us in moderation. The stuff we can’t pronounce, in our food, will always be a problem, though. If the thought of lard frightens you, try rice bran oil. A bit spendy, but fries really well and food doesn’t soak it up, like most other oils. This dream of a dish really cries out for lard, though. Just sayin’…
A quick reminder regarding deep frying and gluten. Since the oil is reusable a number of times, you absolutely must understand, that it can never have regular flour used in it, if you are planning to feed someone that can not tolerate gluten. The gluten will stay suspended in the oil and attach itself to other things you are cooking afterwards. Gluten that has been super heated in this way, is an immediate threat to those that are sensitive to it. Reactions are immediate and frequently severe.
That said, keep this in mind when ordering in a restaurant. Unless you are in a restaurant that ONLY serves gluten free dishes, the individual that is sensitive must never order deep fried food of any sort.
While the oil is heating, you can make up the honey. You could also have it made ahead. It will hold easily. The more you can have prepped ahead of time, the easier it is to get the meal done without a bunch of stress. This is the secret of why restaurant kitchens can work so effectively at getting out all those meals at the same time.
3 tablespoons clover honey, or your favorite
1 teaspoon sherry vinegar
1 tsp minced fresh hot pepper
dash of cinnamon
3/4 teaspoon ginger
1/2 teaspoon coriander
salt to taste
1/2 cup chopped fresh cilantro
Mix everything together, except the cilantro, with a whip or immersion blender. Set aside.
Grab those squash rings. You are going to need to do a light dredge with some gluten free flour. It’s super easy with a clean, dry plastic produce bag. Throw the squash in the bag with about a half cup of the flour. Twist the top to stop leaks and shake it about to coat the rings. When you have them all coated, bop the, still closed, bag on the counter. Excess flour will go to the bottom.
When your oil is up to temp, start frying the rings in small batches. They are ready to take out of the oil when they are lightly brown and floating. Place them on a paper towel lined plate. Since these are super moist, they can get soggy pretty quick, so to compensate I like to do a double fry. When you have completed the first round of cooking and it’s nearly time to complete the rest of the meal, drop them back into the fryer. Mine is large enough to hold the whole batch. Do what works with your equipment. If the oil shows any sign of cooling rapidly, get the product out immediately and do in smaller batches when it’s hot again.
Once all the rings are ready, place in a large bowl. Drizzle the honey over them and add the cilantro. Toss everything together and plate. Prepare yourself. The lucky individuals, you are sharing these with, are going to be heaping massive quantities of adulation and praise upon you!
Wasn’t that fun?
- A slow seduction (9/25/2014)
Not everything we create in our kitchens must be made FAST. The slowing down of the season is a lovely time to contemplate a bowl full of Beef Soup.
This is a recipe, yet it’s not. Honestly, the recipes I give you will always have room for your own imagination in small ways or expansive culinary coup!

To get the ultimate in flavor and the texture you are craving, you need to cook the beef twice.
Purchase a bone in (Yes, and I do mean that. Bone=flavor) chuck pot roast, preferably choice or better.
For the Braise
Salt and pepper the roast generously, then dredge meat in gluten free flour and sear it in a small amount of oil. I prefer to use cast iron. It will cook more evenly. At the point that you turn the meat over to brown the other side, add some wedges of yellow onion, peeled carrot and celery. Beware of grease spatters as you cook!
Once you have finished cooking the meat on all sides, turn off the burner. Using the cast iron pan you seared the meat in, or place the meat and vegetables in another oven proof baking dish, add red wine… note on cooking with wine: never cook with something you wouldn’t drink. The dish will taste like the wine and you won’t like it. Use the best you can afford; typically a variety that would go with the dish when it’s done. Avoid reds with large amounts of pigment, like Syrah. It will add more color to the finished dish then you want. (continuing recipe…) add red wine to fill the pan half way up the meat. You can use stock for part or all of the liquid. Now add some peeled cloves of garlic, bay leaf and any other fresh green herbs that sound good to you. If you have it, place a piece of parchment paper on top of the meat. Now, cover with enough foil to seal around the edges and put the pan lid firmly in place. Put your pan of loveliness into a preheated 325degree oven. This will need to cook for several hours. The timing depends on how large your roast is. Unless it is quite small, I’d estimate two and a half to three hours, but sometimes one can be surprised. The roast that made the soup in the picture required an extra hour. When a pairing knife slips into the roast easily, it’s time to take it out of the oven.
You are now going to cool the roast, uncovered, in the refrigerator and pretend you don’t know it’s there…
Now, for the Soup!
Tomorrow! You will cut equal parts yellow onion, celery and carrot into small dice. This is called mire poix. Please use a sharp knife! Dull knives cause far more finger cuts then sharp ones! One can never have too much mire poix, but I’d probably aim for roughly the same volume as the roast. Cook this mixture with olive oil in a nice heavy bottom soup pot until wilted and beginning to just barely brown. Thin bottom pans tend to lead to scorching. When the mire poix is about 70% done, add several cloves of minced fresh garlic. Keep stirring. Garlic turns bitter very easily and you won’t be able to get rid of that flavor.
When your vegetables are done add the liquid from the roast and an equal amount of stock. note: if you are purchasing stock PLEASE read the ingredients on the box/can. Many contain allergens. Now, dice up the cooled beef and add to the pan. Discard the vegetables and the bones from the braise. They have done their work and are ready to ‘retire’. If necessary, add more stock. In fact, add whatever amount you wish. Made it thick. Make it thin. This is YOUR soup!
If you aren’t watching Carbs, add some diced potatoes, if you wish. Another great gluten free ingredient is steel cut oats! These must be certified as gluten free. Oats will require more liquid then potatoes. Keep a close eye on your creation, that it doesn’t burn while it simmers. You will want to let it cook very slowly for the next hour or two.
Once the vegetables, etc are nearly done, taste the liquid. Add salt (don’t be shy!), pepper, spices and fresh herbs. I like rosemary in beef soup, myself. But, this is now the time for your individuality to shine. Hit those spice jars! What sounds good to you? Have some fun.
You are almost there! Heck, maybe you’re sitting there eating a bowl of YOUR soup right now, wondering why I’m still talking at you! BUT, if that pan you’ve slaved over seems to be ‘missing’ something and you just can’t put your finger on it… Add a little vinegar. Sherry or red wine vinegar would be my first choice. Add a few drops, stir well and taste…??? See! Your creation is ALIVE and wonderful; or add a few drops more until it is!
Race you to the spoon drawer!
- Eat me! (9/23/2014)
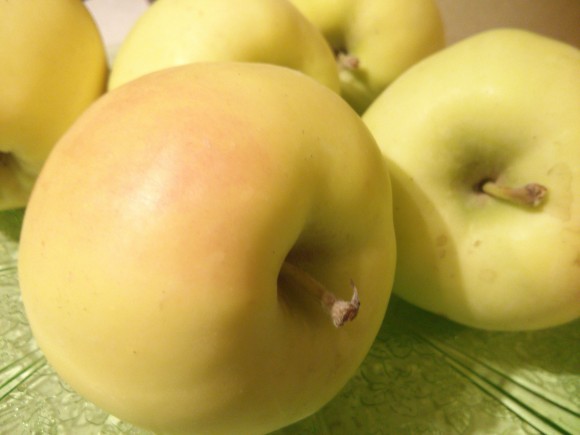 The incoming Fall weather makes me want to bake. The scent of apples and spice permeating the air is a great producer of smiles. Here is an easy recipe that makes this possible for lots of people with pesky food allergies! It contains no soy, wheat, gluten, corn, eggs, dairy, or tree nuts. Have fun!
Gluten Free Apple Crisp
Ingredients:
1/2 cup certified gluten-free rolled oats
4 tablespoons coconut milk*
3 cups sliced apples – This is an excellent excuse to visit a Farmers Market and pick out something delightful!
Agave syrup to taste. Depends on the tartness of the apple and your palate1 teaspoon lemon juice, fresh
1/2 cup Red Mill gluten free flour
1/2 cup light brown sugar, packed
1 teaspoon ground cinnamon
4 tablespoons coconut oilInstructions:
Pre-heat the oven to 350ºF. Grease a 9-inch round glass baking dish and set aside. Pay attention to what you use to grease the dish. Many sprays contain allergens!
Place the gluten-free oats in a bowl and soak them in the coconut milk for ten minutes.
Toss the apples with agave and lemon juice. Layer them in the prepared glass baking dish.
Combine the gluten-free flour, brown sugar, and cinnamon with the oats. Mix well.
Add the coconut oil in pieces. Rub the oat/flour mixture into the shortening with your fingers or two forks, creating a crumbly mix.
Top the apples with the oat mixture. Bake on the center rack for 1 hour. Top should be golden and bubbly. Serve warm or cooled.
* Coconut milk comes in both fresh and shelf stable packaging. Read the label carefully. Some are made in facilities with soy, nuts, etc. If those enjoying this treat can not consume those items, you need to keep hunting for the right coconut milk. You may also use rice milk here. Just be very careful!