cohoPretty, wild Silver, also known as Coho, Alaskan salmon is incredible when prepared with dense, flavorful King Oyster mushrooms.
KingOyster
This variety of mushroom combines the flavor, we love, of the oyster mushroom, with a dense meatiness that adds incredible texture to your dish.  You will find them to willlingly avail themselves of the flavors you introduce in the pan.  Tonight, I chose to saute them in butter with shallot and cardamom.  When they were sufficiently softened, I deglazed with Oloroso sherry, then a touch of maple syrup, the sweetness balanced by Jerez sherry vinegar.

Coco, or Silver salmon are frequently found at a much better price in your fish market.  Being a smaller fish, you need to handle them pretty gently, when cooking.  They can dry out in a heartbeat!  Keep a close eye on them as you pan roast, poach or oven roast this wonderful fish.

For those of you seeking to keep your diet free of allergens, fresh wild salmon is an excellent choice.  Firm fish, like salmon, do not need a coating, as do more delicate fish, like sole.  This means, you can usually count on it as a Gluten Free option on restaurant menus.  Do carefully read the menu description, though.  Ask you server, to be sure it is safe.  At home, Salmon is wonderful with so many flavors, sauces, cooking styles and accompaniments.  Be creative!  Enjoy!  Chef Celinda

RellenosIngredientsSatisfying your craving for amazing Mexican dishes should not require a run in with the Gluten Border Patrol!

By using one of our great choices, in gluten free flour, it is simple to create many of the dishes you are lusting after!

Try my Shrimp and Lime filled Chili Rellenos.  They take some time, but aren’t difficult.
2 Poblano peppers per person, or one, for smaller appetites
Sweet shrimp, peeled
Fresh Lime
Chevre
White or Brown Rice, prepared
Cilantro, chopped
Green Onion, minced
Shallot, minced
Garlic, minced
Organic tomato sauce
Olive oil
Cumin
Coriander
Cayenne or other favorite powdered chili
Salt and Pepper
Egg
Gluten free flour:  I prefer Redmill 1 to 1 baking flour

The Peppers:
Using the broiler or over a gas flame, burn the skin of the poblano peppers. Wrap in paper towel or a paper bag to steam the skins loose.  When cool, remove all of the skin.  Remove the top and seeds.  The peppers can be fragile, so do so gently.  If one splits, don’t fret, toothpicks can work magic. Place the opened, prepped peppers on waxed paper and set aside.

The Sauce:
Place olive oil and shallot in a sauce pan.  When wilted, add garlic, ground cumin and coriander.  When done, add the tomato sauce, cayenne, salt and pepper.  Once warmed through, add the juice from half a lime and simmer.  Keep an eye on the liquid level.  You may need to add a few tablespoons of water.

The Filling:poblano shrimp
If shrimp are frozen, thaw under cold running water, then mix together the shrimp, some of the chevre, a few tablespoons of prepared rice, chopped cilantro, lime zest, juice from the other half of the lime, salt and pepper.

To Stuff the Peppers:
Place the shrimp filling on the roasted, opened pepper.  Wrap the cut sides around the filling and secure with a toothpick.  If you have additional splits in the pepper, secure those, as well.  Once you have filled all the peppers, prepare them for frying.  Beat the eggs in a bowl large enough to hold a pepper, too.  Add a tablespoon, or two of cold water and mix.  Place some gluten free flour in another, equally sized bowl.  Dip each pepper in, first the egg, then the flour and set on a plate or waxed paper.  Once you have coated all the peppers, heat some olive oil in a stout bottomed pan.  When hot, carefully place one or more peppers in the oil and cook each side until lightly browned.  Set aside to cool.  When all the peppers are browned, carefully remove all the toothpicks.  They should stay together nicely.

To put the dish together:
Ladle some of the sauce into the bottom of a baking dish.  Place the browned peppers neatly on top of the sauce.  Put the rest of the sauce across the peppers and garnish with the remainder of the chevre.  Pop into a 350 degree oven.  Cook for about 45 minutes, or until bubbly and the cheese is lightly browned.

The side dish:
Mix warm prepared rice with chopped cilantro, green onion, melted butter or olive oil and desired seasoning.  Place rice on the plate and top with one or two of the finished rellenos.

Serve to family and friends.  You have no reason to tell them they are gluten free.  They will never know!  In fact, they will probably suggest you open a Mexican restaurant!  Enjoy!  Chef Celinda

HuckleberrySalmonWild ‘Bruce Gore’ King Salmon and wild huckleberries; nothing tame about that combo!

When creating recipes for Northwest treats, it’s fun to pair up ingredients that inhabit the same environs.  They frequently make excellent combinations.

To make this dish, simply season fat salmon fillets and sear in olive oil.  Once evenly caramelized, move the pieces into a baking dish and finish cooking in a 400 degree oven.  Keep an eye on them!  Overcooked salmon is a crime!  When 90% done, remove from the oven and let them rest to finish cooking.

For the sauce, add minced shallot and rosemary to the remaining oil you cooked the salmon in.  When the shallot is done, add a round of tawny port and reduce.  Add huckleberries and cook to a glossy substance.  Remove from the heat and mount with unsalted butter.  Season the finished sauce, as needed.  Plate the salmon and serve with your incredible sauce.

If you are unfamiliar with huckleberries, they are in the blueberry family.  I found some in the freezer section at Central Market.  You can pick them at the end of the Summer in higher elevations.  I used to greatly enjoy doing this!  The bear ‘sign’, I was careful not to step in, made me a little nervous, but hey, sometimes great meals require some adventure to achieve!  Besides their wonderful flavor, they have five times the antioxidant of blueberries!  And, like blueberries, they are believed to help maintain mental function, as we age.  Something to keep in mind.

Like every recipe I create for Fearless Feast, this one is, of course, gluten free.  Enjoy!!  Chef Celinda

baconJoin me at Columbia Tower Club for “Women Stars of Food and Wine”, Sunday, February 8!  My table will have a couple of your favorites, Bacon! and Wine!!

Fearless Feast is offering an amuse bouche featuring Gluten Free Rosemary and Sea Salt Shortbread (Yes!  Gluten Free!!) topped with cardamom scented Pear, Pickled Celery and my famous Bacon Brittle with Laphroaig 10 year Single Malt Scotch.  The shortbread recipe follows, below.

I will be joined by Kelly Hightower offering her amazing wines!  Her 2011 Hightower Red Mountain Merlot is predicted to pair beautifully with my featured culinary creation.

Tickets are still available at the door!  For more information, go to:  http://www.wfalliance.org/events/

To Make Chef Celinda’s Gluten Free Shortbread ~
2 C Red Mill’s 1 to 1 Gluten Free baking flour
1/2 C granulated sugar
1/2 tsp fleur de sel
2 Sticks unsalted butter, cubed
1 Egg Yolk
1 tsp real Vanilla extract
2 tsp minced rosemary, or other herb, as desired
Additional sea salt.  For the featured dish, I used apple smoked sea salt to finish.  This corresponded with the flavors of the bacon brittle.

Mix the sugar, fleur de sel, and rosemary until combined.  Now mix in the butter.  Once incorporated, add the flour.  Mix for 30 seconds then add the egg yolk and vanilla.  Mix until a dough forms.  Wrap in wax paper and chill in fridge for 30 minutes.

Once chilled, roll out the dough.  For the delicate ‘vehicles’ featured, I rolled mine to 1/8 inch and cut them into 1″ squares.  For more traditional cookies, 1/4 inch thickness is recommended. Use your imagination or a favorite cookie cutter for shapes!

Place the cut pieces on a parchment paper lined baking sheet.  They don’t need more then a tiny bit of space between them.  They won’t spread.  Once you have the tray filled, place it in the refrigerator.  I know… just do it!  Preheat your conventional oven to 350 degree.

Your cookies should be adequately chilled in about 15 minutes.  Place the tray in the oven.  For my thin cookies, I only needed to cook for 15 minutes.  Thicker cookies may take a few minutes more.  Watch your oven.  You want them to just barely be beginning to color. Upon removal from the oven, immediately sprinkle them with desired sea salt.

Leave the cookies on the tray until fully cooled, then carefully place them on a platter, or serving tray.  note:  these will hold beautifully for a couple days if sealed up.  To do so, place wax or parchment paper between layers, to protect them.

Shortbread is a highly versatile base for pretty much anything you can come up with.  Use them, as I have, as a savory component.  Or, dream up sweet accompaniments.  For dessert options, modify or leave out, the fresh herb.  Lavender and Lemon Zest would make simple but exquisite treats when sprinkled with a bit of fleur de sel and a dusting of powdered sugar. However you serve them, family, friends, snobs or country folk; everyone loves these melt in your mouth pastries!

See you Sunday!!  Chef Celinda

GFCheesecakeIs it a bad thing to fool your special someone by feeding them things that are good for them without their knowledge??  You know how they love spectacular desserts and just should NOT be eating Gluten, but…

You have probably looked at the gluten free treats at the grocery store.  You ponder, wondering if they will taste good.  At that price, you sure do hope so, but probably don’t have a great deal of faith…

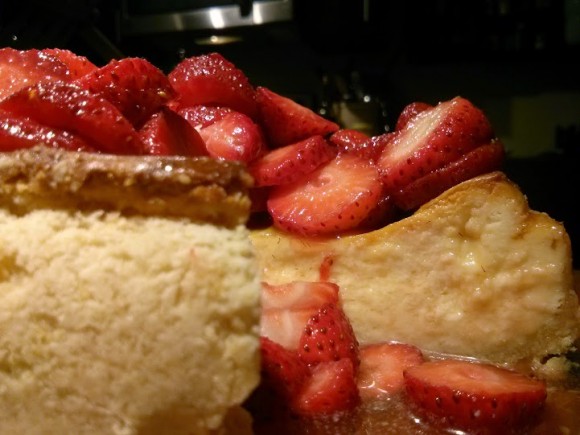
This pretty cheesecake is well within your ability.  You need a good mixer, a spring form pan and fresh cream cheese.

This recipe was made for a 6" spring form pan.  The crust recipe included, is enough for two cakes or one larger, 9" spring form pan.  I put the remaining dough into the freezer for my next baking expedition!

If you are using a conventional oven, you need to take some extra steps to prep your pan.  The butter in the crust will potentially melt, dripping down on the element and start a fire.  In a convection oven, there is no exposed element, so not a problem.  I do like to place a pan in the bottom of my convection oven, to catch drips and make cleanup easy, though.  Of course, you can also use the upcoming method to handle drips, too.   To create a seal for conventional cooking, wrap plastic wrap around the exterior of the assembled pan, creating a barrier to prevent leaks.  You do not want it sticking up over the top edge, so tuck it neatly.  Now, wrap foil around the plastic, with the thought of stopping leaks, also, but primarily to protect the plastic from the heat as well as creating a secondary catch point.  The plastic will shrink from the heat, but honestly, it should do a great job.  If you are further concerned, place a pan or dish under the spring form, too.  This is fine, but it could make it take a little longer to bake in a conventional oven.

Once you are done sealing your pan, use a light coating of oil on the inside, for ease of release and for the crust crumb to stick to.

If using a conventional oven, set to 350; 325 for convection.

Crust:
1 C Red Mill 1 to 1 Gluten Free flour
1/3 C sugar
6 T cold unsalted butter, cubed
1 egg yolk
Dash of salt

Using the paddle attachment, mix together all the ingredients until you have formed a consistent petite pea sized crumb.  Do not over mix!!  Honestly, if that happens and it forms a dough, you are best to start over.  You can save the screw up batch and make some cookies, but it will have a tough texture, if you try to use it for your cheesecake.

Place the finished crumb in the pan.  If doing a six or seven inch spring form, put the other half in a freezer bag and store for another day.  Now, carefully press the crumb all the way up the sides and across the bottom, using your fingers.  If it is sticking to you, run your fingers under cold water to cool them, dry and dust with a little of your gluten free flour.  It is very important to get the crust an even thickness on the entire surface.  The largest pitfall is the corner where the sides meet the bottom.  Push with your finger tips to thin it, if you realize you have created a slope instead of a sharp corner.  If you don’t your finished cheesecake will have an unappealing block of crust in each piece.  Set your crust in the fridge until you are ready to fill and bake.

To make the filling:

1 lb FRESH, good quality cream cheese.  Do not cheap out and do check the date.  As it ages, it loses moisture.  You will end up with a cheesecake dotted with dry morsels of cheese no matter how much you whip it.
2 eggs
1/2 C sugar
1 tsp real vanilla
zest from half of a lemon

Place all the filling ingredients into your mixer with the whip attachment.  Whip until fluffy and smooth.  Carefully spoon into your prepared crust.  Push it up against the sides in a way that you do not knock the crumbles loose and smooth the top.  It will be fairly full.  Place in the preheated oven.  The cake will take roughly an hour.  It’s done when a toothpick comes out clean from the center.  If the top is beginning to get too brown, place a loose foil tent over it for the final baking.

Once fully cooled on a rack, carefully remove the spring form pieces.  You can simply dust with powdered sugar and serve or use your favorite gluten free topping.  The pictured cake has fresh strawberries in pineapple glaze.  This is super easy and the combined acid and sweetness of the pineapple will give you the flavor that may not be in the berries coming in at this time of year.  Simply reduce the pineapple juice.  Add more sugar if your berries are particularly sour.  Cool for a few minutes then fold into sliced berries.  For a thicker glaze, add some dissolved gelatin before mixing with the berries.  For an extra pretty batch, you can also add red food coloring.
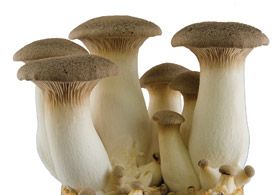
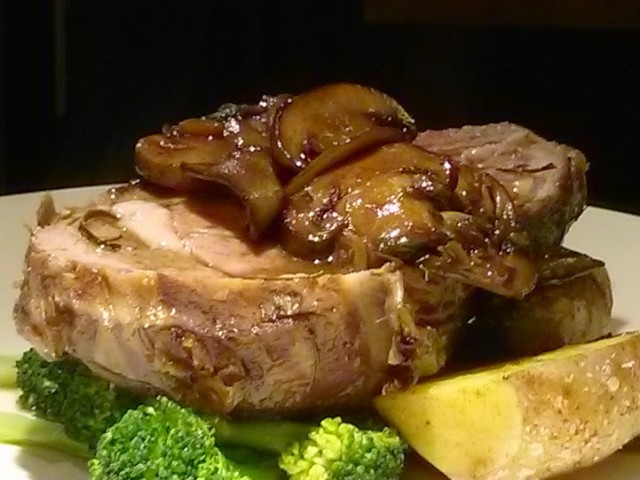
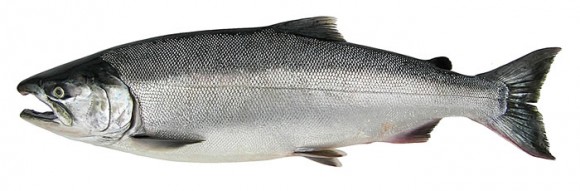
vealrack-640x480I picked up a gorgeous Veal Rack from William at Pike Market’s BB Ranch this week!  A tumultuous array of recipes cascade through my mind, as I ponder where to begin!
BBRanch
I wanted to do something Big and Showy!!  Veal Rack is the baby to a bone-in Prime Rib, so I decided to prepare it in a similar style; seasoned and roasted then finished with a spectacular pan sauce ~“Veal Rack Oloroso”

Once your meat is 130 degrees, pull it from the oven and set aside to rest.  It will continue to rise in temperature.  I prefer to do a veal roast medium rare.  The young meat is a bit too chewy, if rare.

While the roast is resting, add shallot and sliced mushroom to the pan.  You will probably need to add a little more olive oil.  Just as these are nearly done, add minced shallot and fresh sage.  Don’t burn these!  A generous round of Oloroso Jerez Sherry deglazes and gives incredible flavor.  note:  This sherry is dry, yet loaded with hazelnut and caramel notes!  Reduce the sherry a bit and add stock.  You will need to adjust seasoning as your sauce reduces.  To finish, mount with cold butter and serve over slices of pretty pink veal.

The beauty above was served with baby gold potatoes, roasted in the pan with the veal.

Enjoy!  Chef Celinda