MayanPork

World Spice’s Mayan Cocoa always makes me think of sacrifices.  Not MINE, thank you very much!  Chocolate…sacrifice… Nope!  I feel the Mayans of old sacrificed enough.  It’s covered.

I ran across a small package of this delectable combo while cleaning out my spice cupboard.  Dreary December evenings call for interesting dishes with bold exotic elements.  With a bite of this crazy good dish in your mouth, you will simply no longer care what the weather is doing outside!

Mayan Cocoa is a blend of deep chocolate, mellow chile, true cinnamon and allspice from World Market in Seattle.  https://www.worldspice.com/blends/mayan-cocoa  If you aren’t nearby, they definitely ship all their lovely wares.  Check out the website.  If you’re in town, wander down there.  The heavenly smell of the shop, alone, is worth the parking and hills.

Mayan Cocoa Encrusted Pork Tenderloin

Pork tenderloin, trimmed of waste.  Cut into portions.  Each one will serve 2-3 guests

Mayan Cocoa

Salt

Oil for searing the pork.  I like coconut oil for this, but olive is always a great choice

Chicken stock

Rum

Fresh lime

Simply rub the portions with the cocoa and salt liberally.  When your oil is heated, add the pork.  Brown lightly on all sides then put the pan into the oven at 350 degrees.  It will take roughly 15 minutes to finish cooking.  Since the tenderloin size can vary, you will want to keep a close eye on them.  Over cooked pork is so dry and flavorless.

When it’s close to done, remove from the oven and place the pork on a plate to rest while you make the sauce.  Now place the pan on the stove top.  Bring the temperature up, if it has cooled down.  Add a round of rum, preferably a spice rum with vanilla notes.  If you are using gas, this will flame up.  Stir to deglaze any bits from the pan, add stock and a squeeze of fresh lime.  Reduce most of the way.  Season.

While the sauce is finishing, slice the pork into rounds and plate.  The cocoa will have added a touch of pink to the cooked meat.  Don’t be alarmed.   Drizzle with the sauce immediately and serve.

I accompanied my dish with a combo of sweet potato and yam sauteed with onion and seeded jalapeno.

This splendid meal is free of Gluten, Dairy, Soy, Corn, Nuts and Eggs.

PumpkinSeedMole

The game is on.  The ‘fans’ are working up an appetite. You are frightened to open the fridge.  That left over Thanksgiving turkey awaits.  Every creative cell in your body is screaming NOOOOOO!!!  You can’t even consider looking at another bite of the sacrificial beast, or worse, the accusatory glare of your family, should you consider it, but…

Heck, just make some Gonners, Turkey Tacos with Pumpkin Seed Mole!  You know you want to…  Besides, it’s easy and it’s good for your ‘fans’!  No gluten, soy or tree nuts and only optional dairy

Pumpkin Seed Mole

Poblano and serrano peppers, oil roasted, peeled, seeded, chopped

Jalpeno, seeded and minced

Yellow onion, chopped

Garlic, fresh, minced

Oil to cook vegetables   note:  a true mole is best with lard, but olive oil will work fine in this

Pumpkin seeds

Coriander, ground

Chicken stock,  note:  if you are making a vegetarian dish with the mole, vegetable stock is a great option

Cilantro, chopped

Flat leaf parsley, chopped

Salt and pepper

Fresh lime

Using a cast iron pan, dry roast the pumpkin seeds over moderately high heat.  When they are nearly done, add the coriander.  Keep the pan moving, shake it gently, so the spice doesn’t burn.  You need it toasted to release it’s best flavors.  Add lard/oil and onion.  Cook until it begins to soften, add the garlic, do not brown this.  Add the chopped peppers and cook for a bit.  Add enough stock to moisten.  Keep cooking, adding more stock as needed.   You want to get the peppers and onion to begin breaking down.  You can do this ‘green’ mole fast, over higher heat then most brown moles that need time to develop their complex flavors.  If you aren’t in a hurry, turn the burner all the way down and let it do it’s thing.

When you are ready to finish your sauce, add the chopped herbs, salt and pepper.  Cook just until herbs are heated thru.  Using an immersion blender, carefully emulsify your mole.  Don’t get burned!  Add fresh lime juice to taste and serve with warm shredded turkey and finely shredded romaine lettuce or napa cabbage,  in corn tortillas – preferably fresh ones, you just made, if possible (it’s pretty easy!)  For those that can enjoy dairy, some cotija would be lovely!

rancheroshell2

There are those days…  just before a big feast holiday, when it’s difficult to get excited about cooking, let alone being creative.  The kitchen is ready.  The fridge is stuffed to the gills with all the necessities your upcoming throng expects.  Unfortunately, you are hungry TODAY!  Others that occupy your home are giving you ‘the look’.  The phone is right there.  Pizza would be so easy, but you are going to feel so miserable after you eat all that gluten and dairy and…  Yeah.  I know you realize this.  It happens in every well meaning kitchen.

Mariscos Ranchero

Roma tomatoes, quartered

Yellow onion, 1/2 inch slices

Poblano peppers

Optional additional hotter peppers

Garlic, minced

Stock

Prawns, shelled, cleaned

Hard shell clams, cleaned

Mussels, debearded, clean

Cilantro, chopped

Salt and pepper

I like to make the sauce ahead, then finish cooking the shellfish right before serving.

Place tomatoes, onions and peppers on a baking sheet under the broiler.  Keep an eye on the peppers.  You just want to blister the skins.  Keep turning them until you have blistered the entire surface.  Wrap them in a paper towel.  Finish cooking the tomatoes and onion until they begin to blacken.

When the peppers are cool enough to handle, peel them and discard the seeds and membrane.  Rough chop.

Rough chop the onions and cook in a small amount of oil.  Add the garlic when they are nearly done.  Cook quickly and add the chopped peppers and the tomatoes.  Cook on medium until the vegetables begin to break down a bit.  Add enough stock to moisten.  Season with salt and pepper.  Set sauce aside unless you are cooking the shellfish to serve now.

To finish, increase the stock to a just visible level.  Bring the sauce to a simmer.  Add all the shellfish.  Place a lid over the pan.  It will only take a few minutes for everything to cook.  The clams and mussels will be open when they are done.  Toss with fresh cilantro and put into individual serving bowls.

Serve with some warm gluten free bread.

racheroshell


CarrotTopPestoChef’s favorite flower?  Cauliflower, of course!

I love the texture of steamed cauliflower.  It has such a comfort aspect!  When you have to avoid so many other culinary vices, due to allergies and sensitivities, one simply finds comfort in other dishes.

Honestly, I’m perfectly happy just snacking on it, as is, but sometimes one needs to dress up a bit.  Have you ever tried making Carrot Top Pesto?  It’s easy, it’s beautiful, it has an immense level of flavor and your compatriots ’round the table will be thrilled.  The pictured dish was served with some lovely pork chops.

Carrot Top Pesto

3-4 Cloves of garlic

1/4 C Pine Nuts, toasted

Fresh carrot tops from 2-3 carrots, organic

Olive oil

Salt

Lemon Juice

Simply drop your garlic and cooled pine nuts into the food processor.  When they are rough chopped add the carrot tops and a tablespoon or so of olive oil.  Go for it.  If the greens won’t chop, push them down with a rubber scraper and add a touch more olive oil. When everything is emulsified add a dash of salt, a small squeeze of fresh lemon juice and more olive oil until you have the desired texture. 

Carrot Top Pesto can be used in many of the same ways you would use Basil Pesto.  I garnished my cauliflower and pesto dish with some Pecorino Romano cheese.  Many individuals with dairy sensitivity can indulge in cheeses made from sheep and/or goat milk.  Pecorino means sheep.  Do check labels, like always, though.


torta_nThe difficulty of cooking for someone that can’t eat gluten or dairy is especially hard at breakfast and brunch.  While the fam is chowing down of waffles and pancakes and toast and biscuits and cinnamon rolls and muffins and scones and… well, you get the point.  “I’ll have the boring eggs and bacon, please,” long suffering sigh….

So, let’s get creative with ingredients from the foods this person CAN have!  Tortas are super easy, taste great and look impressive!  The concept hails from both Italy and Spain .  For best results, use a cast iron skillet to prepare the dish in.  Single serving size pans, like in the picture, are fun to serve directly to the table on a charger plate.

In a nutshell, you simply throw some favorite ingredients in a pan; cooking raw ingredients in the pan first, add some scrambled raw egg and seasoning.  Pop the entire creation into a preheated 450 degree oven until the eggs are set and serve!

The pictured dish was a Parco favorite.

1 raw Italian link (Read the ingredients! Many Sausages contain gluten, dairy and a host of other unnecessary things.)

Thinly sliced raw onion

Julienne strips of sweet red pepper or spicy pepper if you prefer.  If using hot peppers, you may want to mince them so they aren’t just bites of heat in the finished dish.

Cook these ingredients with a small amount of olive oil directly in the cast iron pan.  Once 90% done, add three well scrambled eggs, salt and pepper.

Put the pan in the oven.

When it’s done, eggs will be set, but still moist.  Please don’t over cook or they will be rubbery.

I liked to serve the dish with a garnish of Earthbound Farms Wild Baby Arugula and one of my house made savory jams like sweet pepper jam or smoked jalapeno jam.  You could use all manor of favorites from your fridge.

To complete, I served the Torta with fresh hash browns.  For a more Spanish presentation, try frying up some par cooked potato in the pan with the protein and vegetables, then top with the eggs.

This is one of the recipes with endless possibility.  Have fun and don’t be surprised when the rest of the family wants one, too.

IMG_CeleryRootSo often we may have a great idea for a dinner entree, but what on earth should we serve with it???  If we could just come up with a side dish that is as outstanding as the main dish!  It needs to complement, yet have just the right level of integrity to stand up to the item it is sharing a plate with.  There’s also that whole time issue.  Do you really want to spend hours, slaving over a bunch of different dishes?

This is a fun concept I have played with at a couple of my restaurants.  It uses healthy root vegetables and has a similarity to risotto in preparation and texture.  You can use yam, sweet potato, carrot, parsnip, turnips and/or celeriac (celery root).  Do keep in mind, to use numerous items from the list you are going to end up with a sizable batch!  So, invite friends over!  Invite them early and they can help cut up the vegetables, too!

The dish in the picture is featuring celeriac.  I made it to go with wine braised chicken and mushrooms.  It is free of gluten, soy, corn, egg, nut, and is dairy free if made without the butter.  Using vegetable stock, makes it vegan as well.

Fall Celeriac ‘Risotto’

1 medium yellow onion, minced

1 smallish carrot, peeled and minced

2-3 cloves garlic, minced

1 whole celeriac, peeled and minced

2-3 fresh sage leaf, chiffonade

chicken or vegetable stock

butter, optional

Using a small amount of olive oil, saute the onion and carrot until softened.  Add the garlic and cook until is begins to soften as well.  Add the celeriac, sage and salt and pepper to taste.  In the style of risotto, add a little stock at a time, cooking over medium heat, until your vegetables are nearly done.  Taste for salt levels, adjust if needed.  To finish, add the butter and allow to simmer for a bit to absorb the last little bit of liquid.  If you accidentally put in too much liquid, drain it off and finish as above.

I kept seasoning in this dish fairly simple.  I wanted the flavor of the vegetables to be the primary with the herbs and spice of the chicken I served with  it, carrying the responsibility.  Root vegetable risottos are a clean slate to play with different spice combinations.  If you are unsure what to use, my favorite culinary book is The Flavor Bible by Karen Page and Andrew Dornenburg.  It’s basically a chemistry book for chefs.  It has concise lists of suggested additions to complement your other ingredients in a dish.  This book is a great tool in any creative kitchen!

You know when you bite into something new and the world slows down; the edges to things in your vision get a bit hazy; you need to consciously remember to breathe… Yeah, it was like that.  I’m not sure how long I can go without another opportunity to make a complete swine of myself with these glorious rings.

image. squash

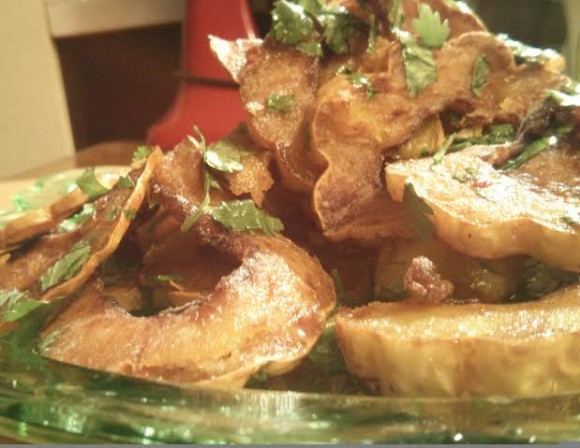
Gluten Free Fried Delicata with Spiced Honey Glaze

Got your attention now, do I?  But, before we get into recipes, are you familiar with Delicata Squash?  You can find them at most grocery stores currently.  I haven’t found any at the Farmers Markets get, but I’m hoping to.  I have personally grown them in Washington state myself, so know it’s doable with our seasons.  delicata

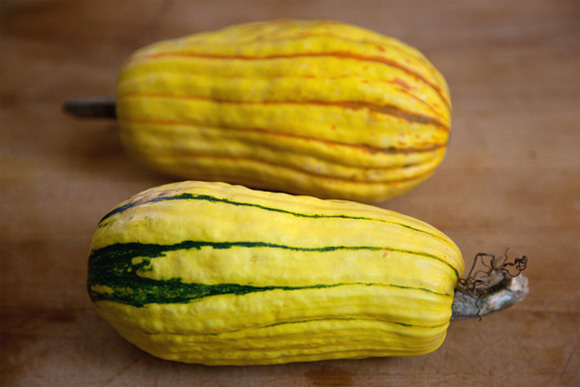
One of the primary reasons to get excited about these little guys, besides that they taste wonderful, is that they are the only Winter Squash you do not have to peel.  Yes, the thin peels are entirely edible!  Score!  I don’t know about you, but peeling is NOT on my list of exciting and fun projects! Ha!

To make this dish, you will need to prep your squash.  One will probably be enough for two servings.  Well, at least the first time you eat them.  Wash the squash and cut off the ends.  You do remember the part about sharp knives we discussed in the last recipe?  This is especially important when cutting something like this.  They can be a bit ‘resistant’.  When you are working with something that is hard to cut, you push harder.  A dull knife will require more effort and being dull, will tend to go the path of less resistance; your finger…  Need I say more?  Once the ends are gone, now cut it in half, the short way.  Using a pairing knife/peeler/spoon/whatever works, you are going to remove the seeds and membrane from the inside.  Yeah, it’s a bit challenging, but worth it. Remember you didn’t have to peel it, too!  When complete, you will have two hollow tubes.  Now you are going to cut these into quarter inch thick rings.  You can go thinner, but it’s pretty difficult to get them consistent.  Thicker won’t have the texture, in the finished product, you are looking for.  Set these aside.

You are going to need a method to fry them.  I have a great little home deep fryer from Presto that I really like.  Way less mess then doing it on the stove.  Should you decide to purchase a fryer, the thing to look for is how much power it has.  You want the one with the most, that you can find.  An underpowered unit will not be able to keep up and your food will end up tasting greasy.  Ick!  If you are using a pan, you need something nice and stout with a heavy bottom.  It needs to be large enough, so that the rings can submerge and the oil doesn’t come over the sides.  Cast iron is always a good choice.

What kind of oil should you use?  I have had the opportunity to cook with a lot of different oils and fats in my 35 year career.  I prefer to use things without additives or excessive processing.  In honesty, my very favorite to work with is lard.  The medical studies are now starting to agree with me, finally, that these are not bad for us in moderation.  The stuff we can’t pronounce, in our food, will always be a problem, though.  If the thought of lard frightens you, try rice bran oil.  A bit spendy, but fries really well and food doesn’t soak it up, like most other oils.  This dream of a dish really cries out for lard, though.  Just sayin’…

A quick reminder regarding deep frying and gluten.  Since the oil is reusable a number of times, you absolutely must understand, that it can never have regular flour used in it, if you are planning to feed someone that can not tolerate gluten.  The gluten will stay suspended in the oil and attach itself to other things you are cooking afterwards.  Gluten that has been super heated in this way, is an immediate threat to those that are sensitive to it.  Reactions are immediate and frequently severe.
That said, keep this in mind when ordering in a restaurant.  Unless you are in a restaurant that ONLY serves gluten free dishes, the individual that is sensitive must never order deep fried food of any sort.

While the oil is heating, you can make up the honey.  You could also have it made ahead.  It will hold easily.  The more you can have prepped ahead of time, the easier it is to get the meal done without a bunch of stress.  This is the secret of why restaurant kitchens can work so effectively at getting out all those meals at the same time.

Spiced Honey Glaze

3 tablespoons clover honey, or your favorite

1 teaspoon sherry vinegar

1 tsp minced fresh hot pepper

dash of cinnamon

3/4 teaspoon ginger

1/2 teaspoon coriander

salt to taste

1/2 cup chopped fresh cilantro

Mix everything together, except the cilantro, with a whip or immersion blender.  Set aside.

Grab those squash rings.  You are going to need to do a light dredge with some gluten free flour.  It’s super easy with a clean, dry plastic produce bag.  Throw the squash in the bag with about a half cup of the flour.  Twist the top to stop leaks and shake it about to coat the rings.  When you have them all coated, bop the, still closed, bag on the counter.  Excess flour will go to the bottom.

When your oil is up to temp, start frying the rings in small batches.  They are ready to take out of the oil when they are lightly brown and floating.  Place them on a paper towel lined plate.  Since these are super moist, they can get soggy pretty quick, so to compensate I like to do a double fry.  When you have completed the first round of cooking and it’s nearly time to complete the rest of the meal, drop them back into the fryer.  Mine is large enough to hold the whole batch.  Do what works with your equipment.  If the oil shows any sign of cooling rapidly, get the product out immediately and do in smaller batches when it’s hot again.

Once all the rings are ready, place in a large bowl.  Drizzle the honey over them and add the cilantro.  Toss everything together and plate.  Prepare yourself.  The lucky individuals, you are sharing these with, are going to be heaping massive quantities of adulation and praise upon you!

Wasn’t that fun?


Not everything we create in our kitchens must be made FAST.  The slowing down of the season is a lovely time to contemplate a bowl full of Beef Soup.

This is a recipe, yet it’s not.  Honestly, the recipes I give you will always have room for your own imagination in small ways or expansive culinary coup!IMG_BeefSoup

To get the ultimate in flavor and the texture you are craving, you need to cook the beef twice.

Purchase a bone in  (Yes, and I do mean that.  Bone=flavor)  chuck pot roast, preferably choice or better.

For the Braise

Salt and pepper the roast generously, then dredge meat in gluten free flour and sear it in a small amount of oil.  I prefer to use cast iron.  It will cook more evenly.  At the point that you turn the meat over to brown the other side, add some wedges of yellow onion, peeled carrot and celery.  Beware of grease spatters as you cook!

Once you have finished cooking the meat on all sides, turn off the burner.  Using the cast iron pan you seared the meat in, or place the meat and vegetables in another oven proof baking dish, add red wine… note on cooking with wine:  never cook with something you wouldn’t drink.  The dish will taste like the wine and you won’t like it.  Use the best you can afford; typically a variety that would go with the dish when it’s done.  Avoid reds with large amounts of pigment, like Syrah.  It will add more color to the finished dish then you want. (continuing recipe…) add red wine to fill the pan half way up the meat.  You can use stock for part or all of the liquid.  Now add some peeled cloves of garlic, bay leaf and any other fresh green herbs that sound good to you.  If you have it, place a piece of parchment paper on top of the meat.  Now, cover with enough foil to seal around the edges and put the pan lid firmly in place.  Put your pan of loveliness into a preheated 325degree oven.  This will need to cook for several hours.  The timing depends on how large your roast is.  Unless it is quite small, I’d estimate two and a half to three hours, but sometimes one can be surprised.  The roast that made the soup in the picture required an extra hour.  When a pairing knife slips into the roast easily, it’s time to take it out of the oven.

You are now going to cool the roast, uncovered, in the refrigerator and pretend you don’t know it’s there…

Now, for the Soup!

Tomorrow!  You will cut equal parts yellow onion, celery and carrot into small dice.  This is called mire poix.  Please use a sharp knife!  Dull knives cause far more finger cuts then sharp ones!  One can never have too much mire poix, but I’d probably aim for roughly the same volume as the roast.  Cook this mixture with olive oil in a nice heavy bottom soup pot until wilted and beginning to just barely brown.  Thin bottom pans tend to lead to scorching.  When the mire poix is about 70% done, add several cloves of minced fresh garlic.  Keep stirring.  Garlic turns bitter very easily and you won’t be able to get rid of that flavor.

When your vegetables are done add the liquid from the roast and an equal amount of stock.  note:  if you are purchasing stock PLEASE read the ingredients on the box/can.  Many contain allergens.  Now, dice up the cooled beef and add to the pan. Discard the vegetables and the bones from the braise.  They have done their work and are ready to ‘retire’.  If necessary, add more stock.   In fact, add whatever amount you wish.  Made it thick.  Make it thin.  This is YOUR soup!

If you aren’t watching Carbs, add some diced potatoes, if you wish.  Another great gluten free ingredient is steel cut oats!  These must be certified as gluten free.  Oats will require more liquid then potatoes.  Keep a close eye on your creation, that it doesn’t burn while it simmers.  You will want to let it cook very slowly for the next hour or two.

Once the vegetables, etc are nearly done, taste the liquid.  Add salt (don’t be shy!), pepper, spices and fresh herbs.  I like rosemary in beef soup, myself. But, this is now the time for your individuality to shine.  Hit those spice jars!  What sounds good to you?  Have some fun.

You are almost there!  Heck, maybe you’re sitting there eating a bowl of YOUR soup right now, wondering why I’m still talking at you!  BUT, if that pan you’ve slaved over seems to be ‘missing’ something and you just can’t put your finger on it… Add a little vinegar.  Sherry or red wine vinegar would be my first choice.  Add a few drops, stir well and taste…???  See!  Your creation is ALIVE and wonderful; or add a few drops more until it is!

Race you to the spoon drawer!


IMG_AppleThe incoming Fall weather makes me want to bake.  The scent of apples and spice permeating the air is a great producer of smiles.  Here is an easy recipe that makes this possible for lots of people with pesky food allergies!  It contains no soy, wheat, gluten, corn, eggs, dairy, or tree nuts.  Have fun!

Gluten Free Apple Crisp

Ingredients:

1/2 cup certified gluten-free rolled oats
4 tablespoons coconut milk*
3 cups sliced apples – This is an excellent excuse to visit a Farmers Market and       pick out something delightful!
Agave syrup to taste. Depends on the tartness of the apple and your palate

1 teaspoon lemon juice, fresh
1/2 cup Red Mill gluten free flour
1/2 cup light brown sugar, packed
1 teaspoon ground cinnamon
4 tablespoons coconut oil

Instructions:

Pre-heat the oven to 350ºF. Grease a 9-inch round glass baking dish and set aside. Pay attention to what you use to grease the dish. Many sprays contain allergens!

Place the gluten-free oats in a bowl and soak them in the coconut milk for ten minutes.

Toss the apples with agave and lemon juice. Layer them in the prepared glass baking dish.

Combine the gluten-free flour, brown sugar, and cinnamon with the oats. Mix well.

Add the coconut oil in pieces. Rub the oat/flour mixture into the shortening with your fingers or two forks, creating a crumbly mix.

Top the apples with the oat mixture.  Bake on the center rack for 1 hour. Top should be golden and bubbly. Serve warm or cooled.

* Coconut milk comes in both fresh and shelf stable packaging. Read the label carefully. Some are made in facilities with soy, nuts, etc. If those enjoying this treat can not consume those items, you need to keep hunting for the right coconut milk. You may also use rice milk here. Just be very careful!

So many pretty peppers!  How to choose?  A little of this… a little of that… FUN!market peppers

The Ballard Farmers Market was the perfect place to be on such a beautiful Sunday.  Besides the peppers, I also found some enticing little apples to make a gluten free crumble tomorrow and a piece of sheep milk feta (no cow milk!) from Glendale Shepherd.  Chatting with the owner, it seems the only other critters on the farm are rabbits, so many of you that are lactose intolerant can rejoice in their beautiful cheeses!

Should you be a sausage maven, check out Sea Breeze Farm sometime!  They have standard hours on Saturday at the U Dist Market and Sundays at Ballard.  They are delighted to chat about the ingredients in their multitude of impressive looking sausages.  At the moment, all do have dairy in their recipes, but none use gluten, soy or corn syrup.  Excellent news for many would be devotees.  Rose tells me they are quite willing to make custom batches for those with food allergies.  Minimum orders are required.  There were an array of others goodies in their case I may have to check out another time!