TortillaSoup

The roast chicken I made last night was perfect!  So good that, upon opening the refrigerator this morning, I am faced with the evidence of our sins; over indulgence; gluttony… No reminder quite as stern, as a nearly decimated chicken carcass.  Not picked totally clean, mind you!  No, we showed a certain level of restrain; mostly the result of food coma onset.

So, how does one atone for this?  What to do with the gleanings of this once proud bird?  I’m thinking soup!

While contemplating the thick puddle of fat my once feathered culinary cohort is residing in, I conclude that overindulgence is something he/she could have clearly related to.  Fat = Flavor!  This is gonna be wonderful stock to make my soup with.  (If you aren’t familiar with making stock from scratch, I have included instruction at the bottom of the recipe)

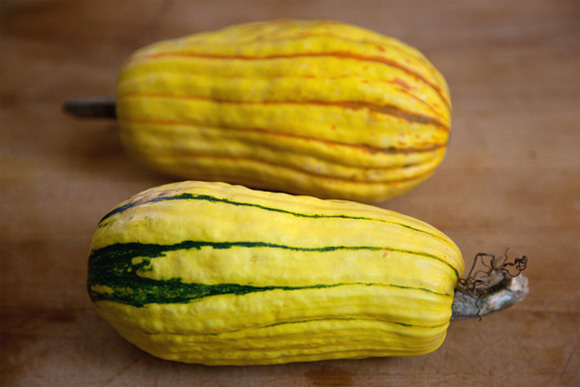
Further perusal of the fridge’s deeper recesses produces a poblano, one lonely roma tomato, an onion, half of a delicata squash, a couple carrots and some celery.  I’m getting ideas!  Diligence yields fresh corn tortillas, cilantro and avocado!  Yup!  I’m going to make

Tortilla Soup

This can be a complicated soup or a very simple soup.  I think of it as Mexican Refrigerator Soup.  Once you have the basics, there are many additional ingredients that are good in it.

If you are in a hurry, grab some commercial stock and do a quick poach with fresh chicken.  I prefer to use thighs for the flavor, but you can use breast meat if you would rather.

Mire poix ~ minced onion, carrot & celery

Olive oil

Garlic, minced

Cumin

Coriander

Cinnamon

Mildly Hot Pepper – you can use whatever heat level you enjoy.  If using a larger pepper, like a poblano, you will need to roast and peel it before mincing.  The seeds contain a lot of the heat.  I usually discard them.  I want the flavors in balance. 

Sweet red pepper, seeded and minced

Using a soup pot, start cooking the mire poix in the olive oil.  You want to sweat it down with moderate heat.  When it’s about half done, add the peppers, and garlic.  Continue to cook.  I like to also put my spices in at this time.  The heat opens up the flavors for maximum impact.  When the vegetables are done add the rest of the ingredients

Chicken stock

Chopped or shredded chicken meat

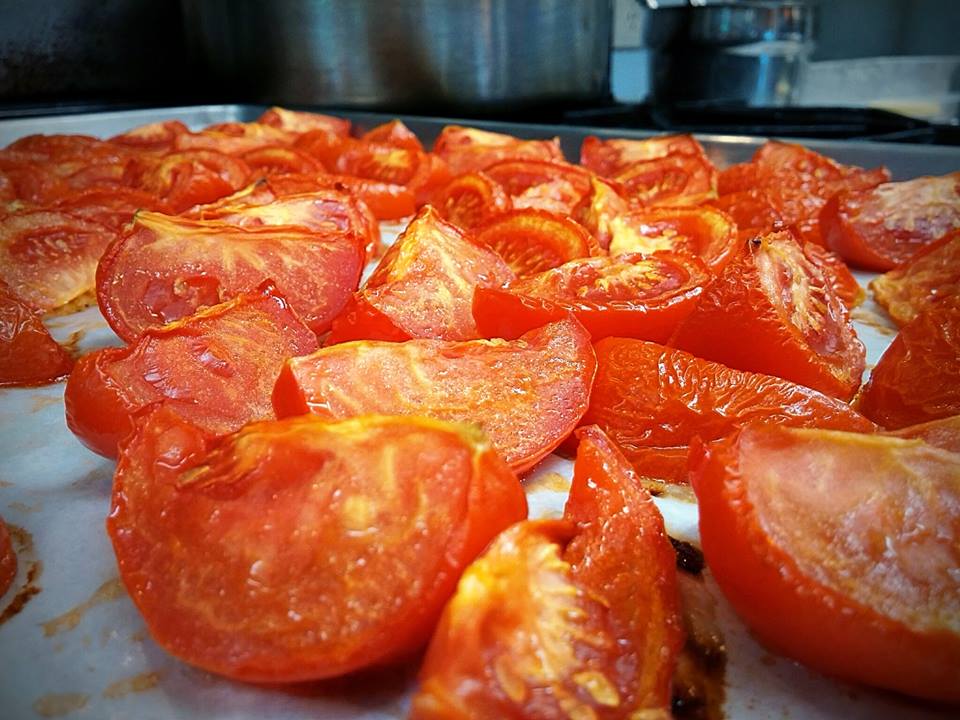
Tomato – I prefer to have the chicken element at the forefront, so chose to use a small amount of V-8.  If you want more tomato, by all means use your favorite tomato puree or even roasted & chopped tomato.

Cilantro, chopped

Salt and pepper to taste

Other ingredients that work well:

Beans, corn, winter squash, and/or a small amount of chiffonade baby kale at the finish

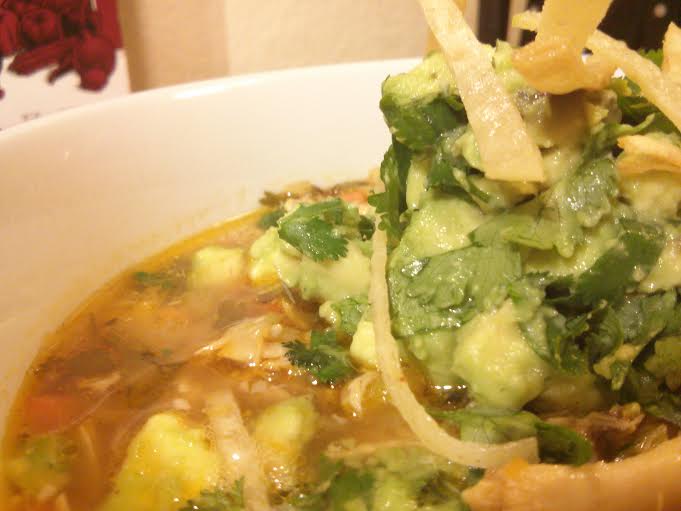
Corn tortillas (check ingredients to be sure they do not contain any wheat) Cut into julienne strips

Avocado, cut into small bites

Cilantro rough chopped

Fresh Lime

Fry the tortillas just before it’s time to plate.   Fry them quickly, either in a deep fryer or using stove top method.  Toss with salt and allow to drain.

Mix the avocado, cilantro and lime in a bowl.  Add salt and pepper to taste.

To plate:  place some fried tortilla in the bottom of the bowl.  Top with a ladle of soup.  Top with the avocado salad.  Garnish with additional tortilla strips and serve.

This is a fun recipe to play around with.  It’s super easy to avoid:  gluten, soy, nuts, and dairy

How to make stock from  left over chicken

Remove as much of the meat as possible.  Set aside.  Place the carcass in a stock pot and cover with cold water.  Add aromatics, ie:  onion, celery, carrot, fresh lemon, bay leaf, cinnamon stick.  I do NOT add salt to my stock.  I prefer to have total control of the salt levels in the dishes I make.  Salt in the stock can be quite the ‘wild card’ detail to work around.  Making stock from a left over roast chicken, can have some salt remaining from the initial roasting.  Just be aware of it.

Allow your stock to come to a full simmer and hold it there for an hour, or more.  The longer it cooks, the more flavor it will have.

For soup, I don’t generally remove the resulting fat.  I want that flavor in the finished product.  If I am using the stock for sauces, etc.  I definitely do not want it.  To remove, allow the stock to cool in the refrigerator.  The health department recommends the stock be no more then two inches deep while cooling.  This should be a small enough batch of stock that that won’t be a problem.  Do be aware of other ingredients in the refrigerator stored near the cooling liquid.  You don’t want them to become warm.

Once the liquid is fully cooled, the fat will rise to the surface.  Simply scoop it off.

It is possible to carefully skim off a lot of the fat with a ladle, while it’s hot, but cooling first gets more and gives a chance for the flavors in the fat to meld with the liquid.

BBgranolabarGr…………………anola bars!  Blueberry!  Gluten Free Granola Bars!

Do you live with lovers of granola bars?  Those individuals that are always in a hurry/snack seekers/lovers of seemingly healthy morsels to nosh on at random times?

I assume you’ve noticed the increasing array of choices, as well as the way a handful of these beauties make you do a double take when the grocery checker gives you the total for that ONE bag of groceries!  Now, I must inquire… have you read the INGREDIENTS?  Some brands, actually ARE healthy, but, many sadly are not.

I’ve been playing around with some recipes.  This is today’s favorite!  The peanut butter ones disappeared before I could get any pictures.  I’m told they taste exactly like peanut butter cookies.  I’ll share that recipe soon.  You got this picture because I’m home alone.

  Gluten Free Blueberry Granola Bars

This recipe is also free of:  Dairy, nuts, soy, corn and processed sugar.  Don’t tell the fam, but they are even vegan…

1 1/2 Cups Toasted Gluten Free rolled oats                                                   (place on a baking sheet in a 350 degree oven, shaking occasionally, until lightly browned)

1 Cup pitted dates, emulsified in a food processor

3/4 Cup dried apricots, minced either with a food processor or by hand.  note:  I used unsulfured, but that’s a personal choice.

3/4 Cup dried blueberries

1/2 tsp kosher salt

1/3 C hot agave syrup

While the oats are in the oven, emulsify the dates and mince the apricots.  Place in a mixing bowl with the blueberries and salt.  When the oats are done, immediately add to the fruit mixture.  Heat the agave in the microwave until just about to boil.  Pour this into the bowl and mix everything together.  Press the granola mixture into a plastic wrap lined 8×8 baking dish.  Refrigerate.  When they are fully chilled and firm, cut into bars, wrap individually and put back into the fridge.

Caution:  Stampede Warning!

image.roastTomato

Summer’s harvest of gorgeous, ripe tomatoes, in all their glory, is a rapidly diminishing memory.  Sigh… I learned a trick, years ago, to make tomatoes taste good all year round!

Roasting tomatoes is super easy and does amazing things for the flavor.  As a bonus, they have no gluten, egg, dairy, corn, nuts, or any other allergens added, unless you are allergic to tomatoes or the nightshade family!!

This is a phenomenal ingredient to have in the fridge.  Layer them on a sandwich.  (By the way, we made an astonishing find; Franz has a really good gluten free bread out on the market! I know?!?!)  You can also toss them with gluten free pasta, in a salad, use with fresh mozzarella for a caprese, add them to soup, or just snack on them!

One of my secrets, as a Chef, is my mystery ingredient stash…  I keep such things in my fridge to add to dishes and make them magical with little or no effort.  Actually, I’m pretty lazy.  I’d much rather be hanging out with my family or dinner guests, instead of slaving away in the kitchen during those last hours before dinner is served.  Ingredients like this will get you that Culinary Goddess Tiara you’re eying…

Roasted Tomatoes

It feels like I’m cheating to call this a recipe.  Really, you just need some tomatoes, olive oil, salt and pepper.  Roma tomatoes are your best out-of-season option, generally.  Once washed, you will want to quarter them lengthwise.  If they are really large ones, cut into six pieces, if you wish.  Put them in a non reactive bowl.  Toss with a light dressing of olive oil and add salt and pepper to taste.  Spread them in a single layer on a baking sheet lined with parchment paper.  You don’t have to use the paper, but it sure makes cleanup a lot easier.

You are going to put them in a 350 degree oven and let them roast until they start to soften; or cook them more if you prefer.  This will be anywhere from 45 minutes to an hour and a half.  It totally depends on the moisture level of your tomatoes.  You can also do them in a slower, 300 degree oven for a longer period to make them a bit more intensely flavored.  Which ever way you like!

It’s so fun to walk by the massive piles of pumpkins outside the grocery stores.  I especially get a kick out of the monster pumpkins displayed in front of Central Market on Saturday.  Being me, my first thought involved, “How many pumpkin pies, cheesecakes, cookies, muffins, crisps, batches of pumpkin soup, pumpkin souffle, pumpkin hash… would one of those magnificent behemoths make?” Yeah, I know, those aren’t ‘sugar pumpkins’, grown for baking, but still… So, I came home and created a new gluten free Pumpkin Cookie recipe!

PumpkinCookie

I am really pleased with the texture I achieved with this recipe.  So often, pumpkin cookies can be too cakey, doughy or rubbery. 

Gluten Free Maple Nut Pumpkin Cookies

  • 2 sticks unsalted butter, at room temperature
  • 1 1/2 cup packed C&H brown sugar
  • 1/2 cup granulated sugar
  • 1 large egg
  • 2 cups Red Mill ‘1 to 1’ Gluten Free Baking flour
  • 2 cups Certified Gluten Free Rolled Oats
  • 1 teaspoon kosher salt
  • 2 teaspoons ground cinnamon
  • 1 1/2 teaspoon ground ginger
  • 1/2 teaspoon ground nutmeg
  • 1/2 teaspoon cloves
  • 1 1/2 teaspoons baking powder
  • 2 teaspoon Nielsen-Massey Madagascar Bourbon Pure Vanilla extract

1 (15-ounce) can Organic pumpkin purée

1/2 cup granulated Maple Sugar and 1 cup finely ground Walnuts to roll cookies in.

Preheat oven to 350 degrees

Cream the butter with the sugars.  When beautifully whipped, add the egg and whip until fully integrated.  Add the salt and the spices.  Stir.

Put the oats and the baking flour in a separate bowl and stir them together until well blended.  Put half this mixture into the bowl with the butter, sugar, etc.  Add half the pumpkin.  Stir.  Carefully add the rest of the oat mixture and pumpkin until both are all in.  Now add the baking powder and the vanilla.  Stir until just mixed throughout the batter.

Using a spoon, drop a walnut sized round of batter into the sugar and walnut mixture.  Carefully roll it around to cover.  Batter is soft, but this is do-able.  Place on a cookie sheet lined with parchment.  Space cookies about 1 1/2 inches apart.  Bake for about 15 minutes.  The cookies should be light brown and somewhat firm to the touch.  Remove to a cooling rack immediately upon taking them out of the oven.  You don’t want the bottoms to continue cooking.

This would be a great cookie to take to work and NOT tell people they are good for them!


torta_nThe difficulty of cooking for someone that can’t eat gluten or dairy is especially hard at breakfast and brunch.  While the fam is chowing down of waffles and pancakes and toast and biscuits and cinnamon rolls and muffins and scones and… well, you get the point.  “I’ll have the boring eggs and bacon, please,” long suffering sigh….

So, let’s get creative with ingredients from the foods this person CAN have!  Tortas are super easy, taste great and look impressive!  The concept hails from both Italy and Spain .  For best results, use a cast iron skillet to prepare the dish in.  Single serving size pans, like in the picture, are fun to serve directly to the table on a charger plate.

In a nutshell, you simply throw some favorite ingredients in a pan; cooking raw ingredients in the pan first, add some scrambled raw egg and seasoning.  Pop the entire creation into a preheated 450 degree oven until the eggs are set and serve!

The pictured dish was a Parco favorite.

1 raw Italian link (Read the ingredients! Many Sausages contain gluten, dairy and a host of other unnecessary things.)

Thinly sliced raw onion

Julienne strips of sweet red pepper or spicy pepper if you prefer.  If using hot peppers, you may want to mince them so they aren’t just bites of heat in the finished dish.

Cook these ingredients with a small amount of olive oil directly in the cast iron pan.  Once 90% done, add three well scrambled eggs, salt and pepper.

Put the pan in the oven.

When it’s done, eggs will be set, but still moist.  Please don’t over cook or they will be rubbery.

I liked to serve the dish with a garnish of Earthbound Farms Wild Baby Arugula and one of my house made savory jams like sweet pepper jam or smoked jalapeno jam.  You could use all manor of favorites from your fridge.

To complete, I served the Torta with fresh hash browns.  For a more Spanish presentation, try frying up some par cooked potato in the pan with the protein and vegetables, then top with the eggs.

This is one of the recipes with endless possibility.  Have fun and don’t be surprised when the rest of the family wants one, too.

kale salad_nWarm Kale Salad

This is an easy to prepare dish I created at my last restaurant.  Kale is such a popular ingredient.  I toyed with a couple different concepts, finally falling in love with this preparation featuring Organic Baby Kale.  Earthbound Farms packages my favorite blends.  Look for it in the packaged salad and greens aisle of your favorite grocery store.  Like so many recipes I created for my restaurants, it is free of gluten, soy, and corn.  This lovely dish also contains no nuts, egg or dairy.  So unless you can’t eat bacon, it’s a crowd pleaser!

To prepare the salad:

Earthbound Farms Organic baby kale  note:  You can use larger kale, but must carefully remove all stem material and tear into bite sized pieces.  These older greens will have a stronger flavor, but it’s all a matter of personal preference.

Crisp bacon crumbles I really like to use apple smoked bacon!

Bacon fat, reserved from cooking the bacon

Braggs Organic Apple Cider Vinegar

Thinly sliced fresh garlic

Maple Sugar

Salt and Pepper to taste

Place the bacon fat in a sauce pan.  note:  you can substitute olive oil for some of the bacon fat, if you have concern at consuming the bacon fat.  Be aware that the flavor for the salad is primarily from this ingredient, though.  Add approximately half as much vinegar as fat.  When these are beginning to get hot, add the garlic.  Cook quickly, remove the pan from the heat and immediately pour over the clean baby kale. Toss gently.  Add 1/2 to 1 teaspoon of maple sugar and s&p to taste.  If substituting olive oil for part of the fat, you will need to season it heavier to compensate.   Finish tossing and serve immediately.  This is not a dish that can be left to sit.


IMG_CeleryRootSo often we may have a great idea for a dinner entree, but what on earth should we serve with it???  If we could just come up with a side dish that is as outstanding as the main dish!  It needs to complement, yet have just the right level of integrity to stand up to the item it is sharing a plate with.  There’s also that whole time issue.  Do you really want to spend hours, slaving over a bunch of different dishes?

This is a fun concept I have played with at a couple of my restaurants.  It uses healthy root vegetables and has a similarity to risotto in preparation and texture.  You can use yam, sweet potato, carrot, parsnip, turnips and/or celeriac (celery root).  Do keep in mind, to use numerous items from the list you are going to end up with a sizable batch!  So, invite friends over!  Invite them early and they can help cut up the vegetables, too!

The dish in the picture is featuring celeriac.  I made it to go with wine braised chicken and mushrooms.  It is free of gluten, soy, corn, egg, nut, and is dairy free if made without the butter.  Using vegetable stock, makes it vegan as well.

Fall Celeriac ‘Risotto’

1 medium yellow onion, minced

1 smallish carrot, peeled and minced

2-3 cloves garlic, minced

1 whole celeriac, peeled and minced

2-3 fresh sage leaf, chiffonade

chicken or vegetable stock

butter, optional

Using a small amount of olive oil, saute the onion and carrot until softened.  Add the garlic and cook until is begins to soften as well.  Add the celeriac, sage and salt and pepper to taste.  In the style of risotto, add a little stock at a time, cooking over medium heat, until your vegetables are nearly done.  Taste for salt levels, adjust if needed.  To finish, add the butter and allow to simmer for a bit to absorb the last little bit of liquid.  If you accidentally put in too much liquid, drain it off and finish as above.

I kept seasoning in this dish fairly simple.  I wanted the flavor of the vegetables to be the primary with the herbs and spice of the chicken I served with  it, carrying the responsibility.  Root vegetable risottos are a clean slate to play with different spice combinations.  If you are unsure what to use, my favorite culinary book is The Flavor Bible by Karen Page and Andrew Dornenburg.  It’s basically a chemistry book for chefs.  It has concise lists of suggested additions to complement your other ingredients in a dish.  This book is a great tool in any creative kitchen!

IMG_CornSoup

I had a heck of a time getting a picture of this seductive soup.  The bowl was getting dragged away from me!  It seems the culprit felt he had waited quite long enough and wanted it NOW!  I can’t say that I blamed him.  I had been fairly evil, overwhelming the house with the scent of first, roasted corn, then corn stock, then the bacon and onions, yeah… I think we all understand.

This isn’t a fast project, but it is easy and definitely worthy of your time!  Pick up some fresh corn.  Corn deteriorates very rapidly.  You want to start cooking it as close as possible to when it was picked.  Farmers Markets are much better then the grocery store.  If you are near a field of corn, maybe you can buy some from the farmer.  I got lucky and found some bi-color ears.  Those are super sweet!

You will want to begin by roasting the ears, in their husks.  Put them on a baking sheet in a 350 degree oven.  When they start to brown and steam a bit, turn them over.  The timing is pretty variable, dependent on how fresh your corn is.  You are probably looking at 20-30 minutes, but it’s not an exact science.

When the corn has cooled enough to handle after roasting, you will need to shuck it.  Once you have them all cleaned up, use a sharp knife to cut all the kernels from the cobs.  Cut just to the base of the kernels, not the pith underneath.  If it’s hard to cut, you are too deep.  Put the corn in a bowl and set aside.

Place the denuded cobs into a sizable pot to make stock.  Add one yellow onion, peeled and quartered, two celery stocks and one peeled carrot cut in 3-4 pieces.  For aromatics, I would choose a small cinnamon stick and one good bay leaf.  Fill the pot to about double the water to vegetables.  Put it on to cook.  Since this stock has no fat, you can cook it pretty briskly, unlike meat stocks that you need to simmer so the fat doesn’t emulsify into the liquid.  Or, this part of the recipe can be started in the morning and simmered slowly for hours.  You could even do it a day ahead.  Just cover your cooked corn kernels and refrigerate.

When you’re ready to make the soup you will need two or three cups of small diced mire poix (carrot, onion, celery), a couple minced fresh hot peppers and good bacon.  I like apple smoked bacon, in particular, especially for a recipe like this one.  Cut the bacon into quarter inch pieces or smaller.  Cook with the mire poix in a soup pot with a bit of olive oil.  When it’s nearly done, add two minced cloves of fresh garlic.  Do not over cook the garlic, or it will be bitter.

Strain your corn stock and add to the cooked vegetables.  Toss in a tablespoon of salt and some fresh black pepper.  If you would like potatoes in the soup, now is the time to add them.  I found some German Butter Potatoes at the Lake City Farmers Market.  If you can’t get to a Market, red potatoes or Yukon Golds would work, too.  The German’s needed to be peeled, due to rough, pitted exteriors.  If your potatoes have clean, unblemished thin skins, it’s up to you on that.  A lot of time, I don’t peel them.  I like the texture and color contrast in the finished soup.  One to two cups of small diced potatoes will do.  If you don’t have enough liquid, add either chicken stock or water to cover the vegetables.  Now is a good time to peruse the spice cabinet for flavors that inspire.  Coriander is a great choice.  I also added a dash of African Cayenne.  This is something they carry at World Spice on Western, below Pike Market.  They are my favorite source for really fresh spices.  (I’m planning a trip there soon.  Watch for the post.)  The African is hotter then regular cayenne.  It also has a lot of complex flavor, making it a regular go-to in my spice array.  Dried oregano completed my choices for now.

When the potatoes are done, add the cooked corn and cream to cover.  Bring it back up to temperature.  Add chopped flat leaf parsley and cilantro.  Adjust the salt and pepper to taste.  Use a touch of cider vinegar to really make those fresh flavors sing.  I like Braggs Organic Cider Vinegar.

You just made some amazing healthy, gluten free soup!  Watch out for the stampede headed your way!  Enjoy!


Like you, I check out those easy looking packages on the store shelf in the gluten free section…  I know that every cupboard doesn’t have the array of various ingredients I keep on hand, so I decided to give one a try.

I’ve always had pretty good luck with Red Mill products, so I picked up their Gluten Free Chocolate Chip Cookie Mix.  Reading the ingredients, it appeared to have chocolate chips already in it, but, well… I wasn’t seeing them thru the cellophane and, let’s face it, it is pretty hard to have too many chocolate chips in chocolate chip cookies, so I picked up a bag of those, too.  I also sought out my favorite secret ingredient for the ultimate in cookie texture; cream cheese.  Let’s go make some cookies!!

IMG_Cookie


Chef Celinda’s Version of Red Mill Gluten Free Chocolate Chip Cookies

Cream together:

1/2 cup butter

3 ounces cream cheese

Add one egg, as written on the package, whip it in until all emulsified.

Now, add the package of dry ingredients.

Stir, just until mixed.  Add 1 cup of the additional chocolate chips.  Mix.

You should anticipate your dough looking a bit dry, as noted on the package instructions.  No worries.  It will hold together when you form the balls.

You will want to cook them at 350 degrees in a regular oven or 325 degrees in a convection.

The package said to grease your cookie sheet.  I was very skeptical of this and did a single cookie test first.  No, do not grease the sheets.  Some parchment paper on them would be excellent though.  Way easier clean up.

Using your clean hands, form walnut sized balls of dough.  Place them a couple inches apart on the tray.  Flatten a bit with your palm. The mix is not overly sweet.  If you like, these would be delightful rolled in sugar before placing them on the tray and cooking.

Follow the package instruction and bake until golden.  Remove hot cookies  immediately to a cooling wrap.  Be careful, they are a bit delicate.  Many ovens don’t have accurate thermostats, so keep an eye on your first batch, to see how long they take in your oven.  If you have hot and cold spots in your unit, be sure and carefully turn the tray half way thru.

If you are allergic to dairy, you can use another fat, instead of butter.  The cream cheese can be omitted, also, but the cookies will be more brittle.

These would be excellent with nuts, too!  I’m sure you will have numerous willing guinea pigs standing by to test whatever combo you decide to try!


You know when you bite into something new and the world slows down; the edges to things in your vision get a bit hazy; you need to consciously remember to breathe… Yeah, it was like that.  I’m not sure how long I can go without another opportunity to make a complete swine of myself with these glorious rings.

image. squash

Gluten Free Fried Delicata with Spiced Honey Glaze

Got your attention now, do I?  But, before we get into recipes, are you familiar with Delicata Squash?  You can find them at most grocery stores currently.  I haven’t found any at the Farmers Markets get, but I’m hoping to.  I have personally grown them in Washington state myself, so know it’s doable with our seasons.  delicata

One of the primary reasons to get excited about these little guys, besides that they taste wonderful, is that they are the only Winter Squash you do not have to peel.  Yes, the thin peels are entirely edible!  Score!  I don’t know about you, but peeling is NOT on my list of exciting and fun projects! Ha!

To make this dish, you will need to prep your squash.  One will probably be enough for two servings.  Well, at least the first time you eat them.  Wash the squash and cut off the ends.  You do remember the part about sharp knives we discussed in the last recipe?  This is especially important when cutting something like this.  They can be a bit ‘resistant’.  When you are working with something that is hard to cut, you push harder.  A dull knife will require more effort and being dull, will tend to go the path of less resistance; your finger…  Need I say more?  Once the ends are gone, now cut it in half, the short way.  Using a pairing knife/peeler/spoon/whatever works, you are going to remove the seeds and membrane from the inside.  Yeah, it’s a bit challenging, but worth it. Remember you didn’t have to peel it, too!  When complete, you will have two hollow tubes.  Now you are going to cut these into quarter inch thick rings.  You can go thinner, but it’s pretty difficult to get them consistent.  Thicker won’t have the texture, in the finished product, you are looking for.  Set these aside.

You are going to need a method to fry them.  I have a great little home deep fryer from Presto that I really like.  Way less mess then doing it on the stove.  Should you decide to purchase a fryer, the thing to look for is how much power it has.  You want the one with the most, that you can find.  An underpowered unit will not be able to keep up and your food will end up tasting greasy.  Ick!  If you are using a pan, you need something nice and stout with a heavy bottom.  It needs to be large enough, so that the rings can submerge and the oil doesn’t come over the sides.  Cast iron is always a good choice.

What kind of oil should you use?  I have had the opportunity to cook with a lot of different oils and fats in my 35 year career.  I prefer to use things without additives or excessive processing.  In honesty, my very favorite to work with is lard.  The medical studies are now starting to agree with me, finally, that these are not bad for us in moderation.  The stuff we can’t pronounce, in our food, will always be a problem, though.  If the thought of lard frightens you, try rice bran oil.  A bit spendy, but fries really well and food doesn’t soak it up, like most other oils.  This dream of a dish really cries out for lard, though.  Just sayin’…

A quick reminder regarding deep frying and gluten.  Since the oil is reusable a number of times, you absolutely must understand, that it can never have regular flour used in it, if you are planning to feed someone that can not tolerate gluten.  The gluten will stay suspended in the oil and attach itself to other things you are cooking afterwards.  Gluten that has been super heated in this way, is an immediate threat to those that are sensitive to it.  Reactions are immediate and frequently severe.
That said, keep this in mind when ordering in a restaurant.  Unless you are in a restaurant that ONLY serves gluten free dishes, the individual that is sensitive must never order deep fried food of any sort.

While the oil is heating, you can make up the honey.  You could also have it made ahead.  It will hold easily.  The more you can have prepped ahead of time, the easier it is to get the meal done without a bunch of stress.  This is the secret of why restaurant kitchens can work so effectively at getting out all those meals at the same time.

Spiced Honey Glaze

3 tablespoons clover honey, or your favorite

1 teaspoon sherry vinegar

1 tsp minced fresh hot pepper

dash of cinnamon

3/4 teaspoon ginger

1/2 teaspoon coriander

salt to taste

1/2 cup chopped fresh cilantro

Mix everything together, except the cilantro, with a whip or immersion blender.  Set aside.

Grab those squash rings.  You are going to need to do a light dredge with some gluten free flour.  It’s super easy with a clean, dry plastic produce bag.  Throw the squash in the bag with about a half cup of the flour.  Twist the top to stop leaks and shake it about to coat the rings.  When you have them all coated, bop the, still closed, bag on the counter.  Excess flour will go to the bottom.

When your oil is up to temp, start frying the rings in small batches.  They are ready to take out of the oil when they are lightly brown and floating.  Place them on a paper towel lined plate.  Since these are super moist, they can get soggy pretty quick, so to compensate I like to do a double fry.  When you have completed the first round of cooking and it’s nearly time to complete the rest of the meal, drop them back into the fryer.  Mine is large enough to hold the whole batch.  Do what works with your equipment.  If the oil shows any sign of cooling rapidly, get the product out immediately and do in smaller batches when it’s hot again.

Once all the rings are ready, place in a large bowl.  Drizzle the honey over them and add the cilantro.  Toss everything together and plate.  Prepare yourself.  The lucky individuals, you are sharing these with, are going to be heaping massive quantities of adulation and praise upon you!

Wasn’t that fun?